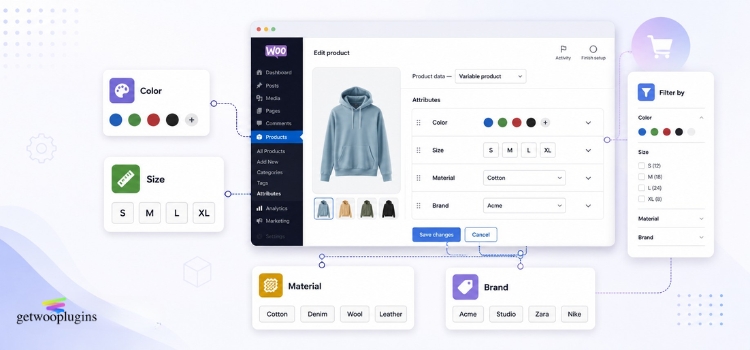
Attributes are one of the most useful parts of WooCommerce. They are also one of the most confusing.
Most store owners meet attributes for the first time when they try to build a variable product. They add a “Size” attribute, tick a box, and hope for the best. Then something breaks. The filter shows nothing. The attribute does not appear on the product page. Or the same color is spelled three different ways across the shop.
This guide fixes that. You will learn what attributes are, the difference between global and custom attributes, how to create both, how to show them, how to filter with them, and how to fix the problems that come up most often.
Everything here is checked against the official WooCommerce documentation. Where a feature needs a plugin, or only works in certain conditions, we say so.
What are WooCommerce Product Attributes?
An attribute is a feature of a product. A term is one option for that feature.
If the attribute is Size, the terms might be Small, Medium, and Large. If the attribute is Color, the terms might be Red, Blue, and Green.
WooCommerce describes attributes as a way to group products that also helps customers find and select what they need, and calls them crucial for creating variable products.
There are two main jobs attributes do:
- They describe and filter products. A shopper can narrow the shop page down to blue shirts in a medium.
- They build variable products. Each variation of a product is defined by the attributes you assign to it.
That is it. Everything else in this guide grows out of those two jobs.
Attributes vs. Categories vs. Tags vs. Variations
These four words get mixed up constantly. Here is the short version.
| Term | What it is | Example | Best used for |
|---|---|---|---|
| Category | A group of similar products. Can have parent and child levels. | Shirts → Long-sleeve | Main shop navigation |
| Tag | A loose label with no hierarchy. Cuts across categories. | Eco-friendly, Waterproof | Cross-category discovery |
| Attribute | A feature of a product, made of terms. | Color → Red, Blue | Filtering and building variations |
| Variation | One buyable combination of attribute terms, with its own price and stock. | Red / Medium — $29 | Selling one product in several forms |
Categories are hierarchical, so you can nest subcategories, while tags have no hierarchy at all.
The simplest way to remember it: a category is where a product lives. An attribute is what a product is like. A variation is the exact thing the customer buys.
Global Attributes vs. Custom Attributes
WooCommerce gives you two ways to add an attribute. Picking the wrong one is the single most common attribute mistake.
| Subject | Global attribute | Custom attribute |
|---|---|---|
| Where you create it | Products → Attributes | Inside one product |
| Reusable on other products | Yes | No |
| Has its own terms you can edit | Yes | No — values are typed in |
| Can power the filter blocks | Yes | No |
| Can have an archive page | Yes | No |
| Rename once, updates everywhere | Yes | No |
| Good for | Color, Size, Brand, Material | One-off specs like “Artist” |
WooCommerce recommends defining attributes globally, because a global attribute can be assigned to any product and renamed in one place — if your team decides to call “Blue” products “Cerulean” instead, you update the name once and it changes everywhere the attribute is used.
Custom attributes have a real limit. Attributes created on the product page are not available for global use, and will not be available for reuse on other products.
The practical rule: if more than one product will ever use this feature, make it global. If it truly belongs to one product and one product only, a custom attribute is fine.
How to Create a Global Attribute in WooCommerce
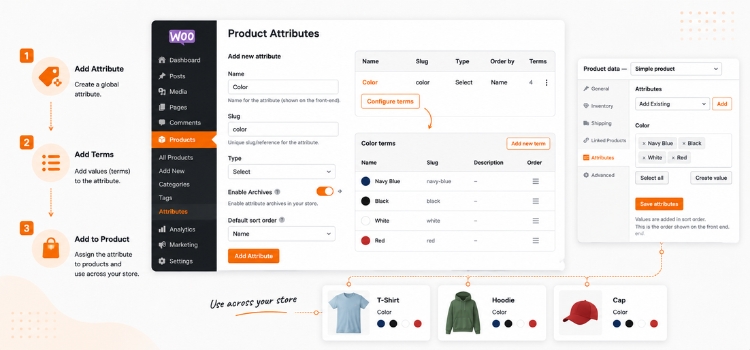
This takes about two minutes.
Step 1: Add the attribute
Go to Products → Attributes.
Fill in the form on the left:
- Name — what shoppers will see. For example,
Color. - Slug — optional. The URL-friendly version. If you leave it blank, WooCommerce generates one for you.
- Type — most attributes use Select.
- Enable Archives — turns on a browsable page for each term. More on this below.
- Default sort order — choose Name, Name (numeric), Term ID, or Custom ordering.
Two things worth knowing about sort order:
If your terms are numbers, such as shoe sizes, pick Name (numeric) so they order correctly. Otherwise 10 lands between 1 and 2.
For variable products, the sort order of the attribute also controls the order of the dropdown selectors on the product page.
Click Add Attribute.
Step 2: Add the terms
Your new attribute appears in the table on the right, but it is empty. Click Configure terms to add values on the Edit Attribute page.
For each term you can set:
- Name — for example,
Navy Blue. - Slug — optional, auto-generated if left blank.
- Description — not shown prominently by default, though some themes display it.
Add as many terms as you need. If you chose Custom ordering, you can drag and drop the terms into place here.
Step 3: Add the attribute to a product
Open any product and find the Product data box.
- Click the Attributes tab.
- Pick your attribute from the Add Existing dropdown.
- Add the values you want for this product. You can click terms one at a time, use Select all to load every existing value, or use Create value to add a new term that gets saved globally for reuse.
- Click Save attributes, then Update.
One detail that trips people up: when you use Select all, values are added in their sort order, and the order they are added here is the order they appear on the front end.
How to Add a Custom Attribute to One Product
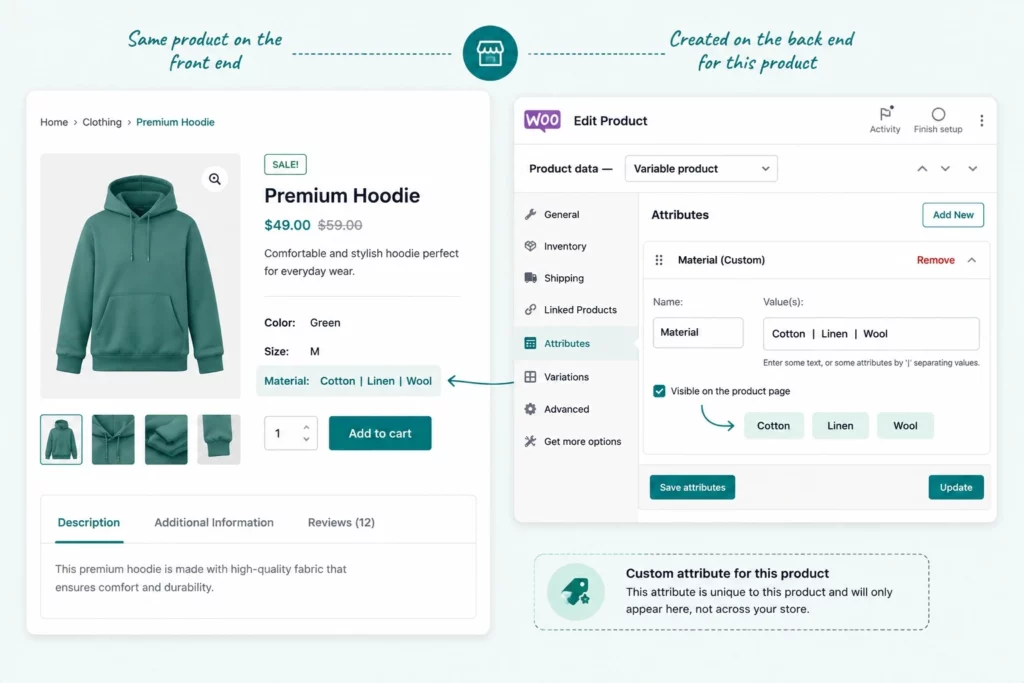
Use this when the detail is unique to a single product.
- Edit the product and open Product data → Attributes.
- Click Add New. An empty attribute row appears.
- Give it a name, then type the values into the box, separated by the pipe symbol ‘|’.
So Cotton | Linen | Wool becomes three values.
- Tick Visible on the product page if you want shoppers to see it.
- Click Save attributes, then Update.
Remember: this attribute now exists only on this product. It will not show up in filter blocks, it has no archive page, and you cannot reuse it elsewhere without typing it again.
How to Show Attributes on the Product Page
By default, visible attributes appear in the Additional information section, as a small spec table.
To turn this on, tick Visible on the product page next to the attribute, then save.
If the section is missing entirely, this is usually why: WooCommerce only adds the Additional Information tab when a product has attributes, weight, or dimensions to display, and attributes must have “Visible on the product page” enabled.
Classic themes usually show this as a tab. Block themes may show the same product data through the Product Details block or an accordion layout instead.
So if you cannot find it, check three things in this order: the checkbox, whether the product has any weight or dimensions, and your theme’s product page settings.
How to Use Attributes for Product Variations
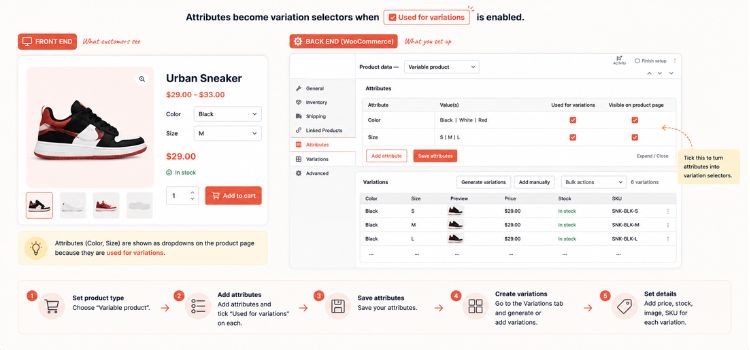
This is the part most people came for.
An attribute becomes a variation selector when you tick Used for variations on the product’s Attributes tab. Then:
- Set the product type to Variable product.
- Add your attributes and tick Used for variations on each.
- Save attributes.
- Go to the Variations tab and generate or add variations.
- Give each variation its own price, stock, image, and SKU.
WooCommerce’s own documentation frames this as a two-step job: first add attributes to the product, then use those attributes to define the variations.
A few things to keep in mind:
- Only attributes marked Used for variations become dropdowns.
- An attribute can be visible on the product page and used for variations, or just one of the two.
- Custom attributes can drive variations too, but they still cannot be filtered or given archive pages.
Variations are a big topic on their own — pricing, stock, images, and the dreaded “no matching variations” message. We will cover that separately.
How to Let Shoppers Filter Products by Attribute
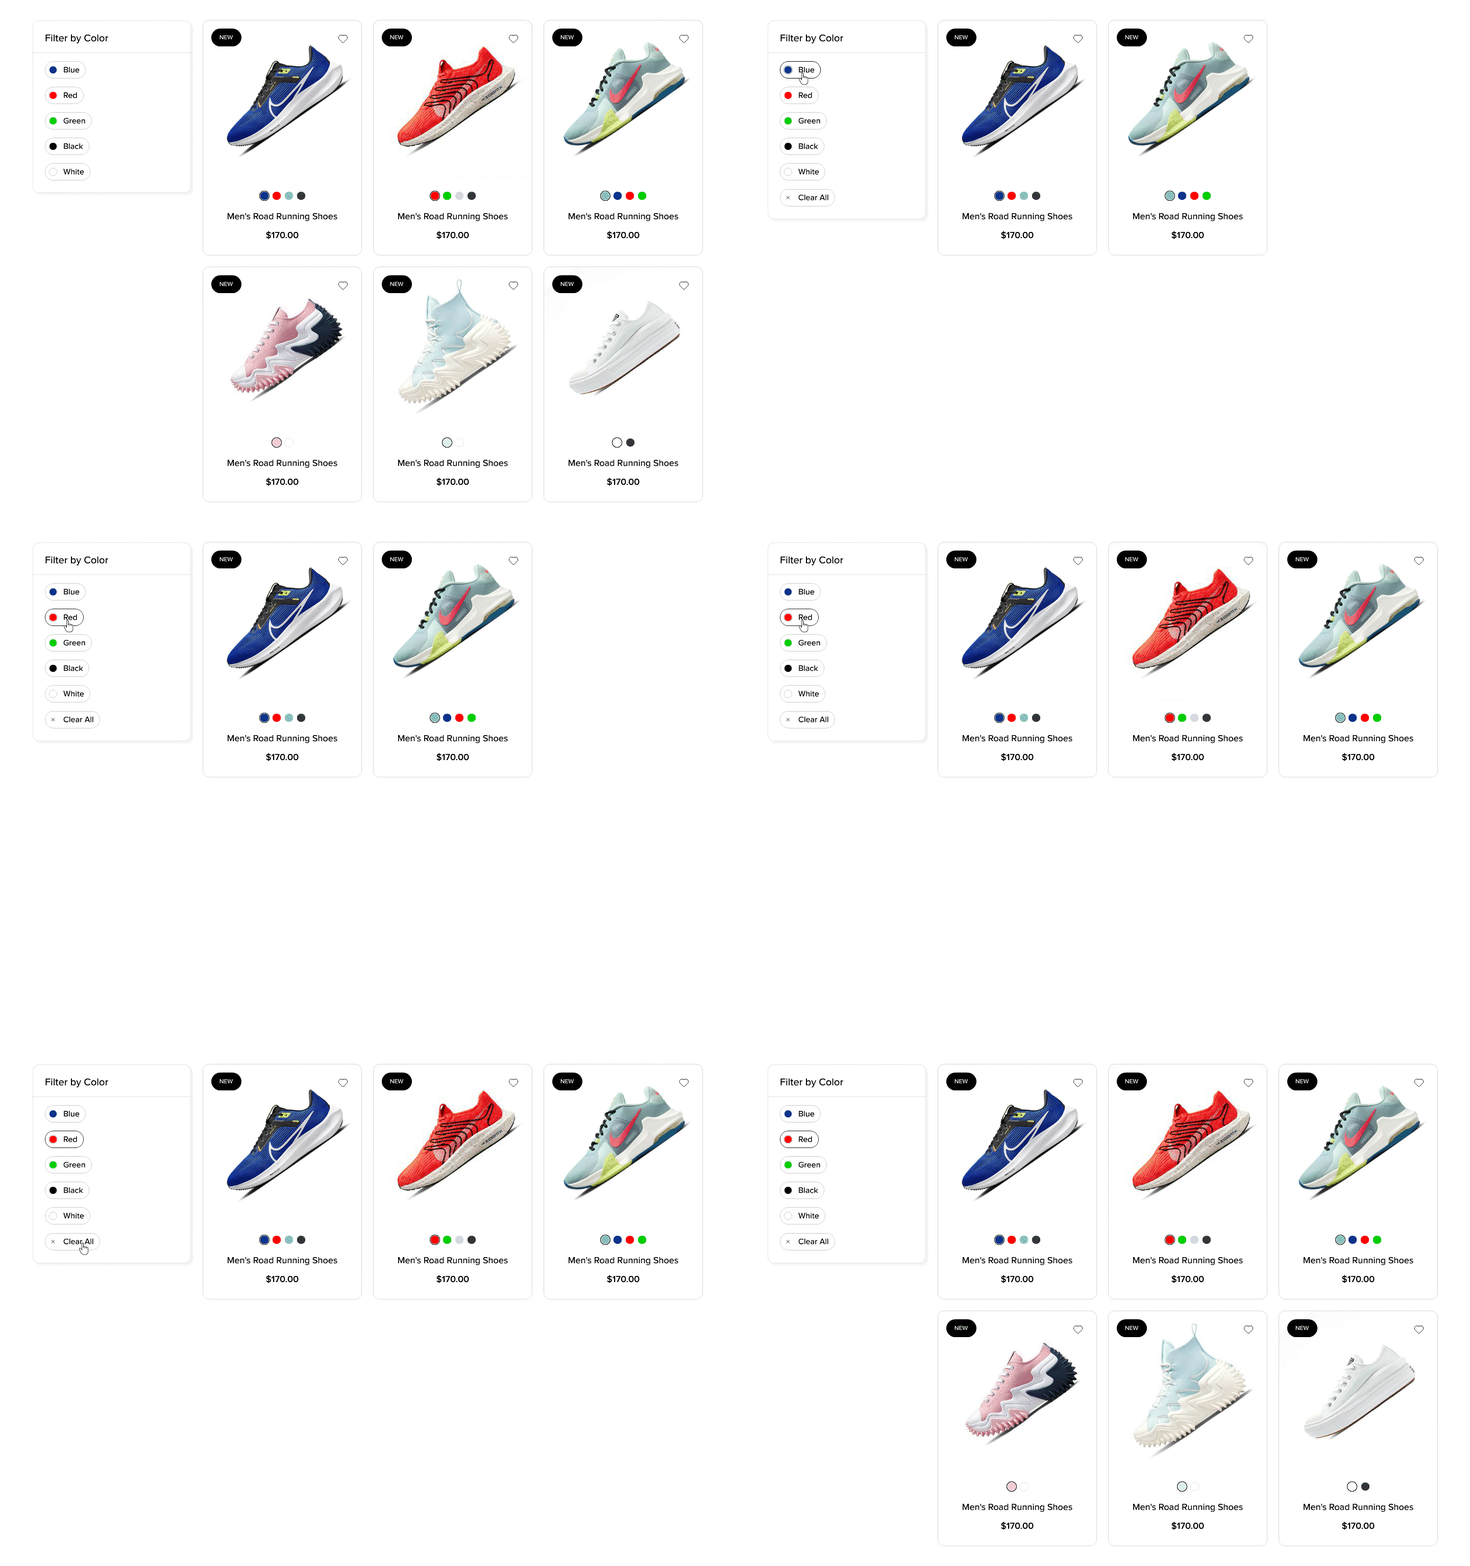
Filtering only works with global attributes. This is the single strongest reason to prefer them.
WooCommerce gives you two generations of tools here.
The newer way: the Product Filters block. The Product Filters block lets shoppers narrow the products in a Product Collection by price, rating, attribute, availability, category, brand, or tag.
To set it up, add the Product Filters block to a page or template that contains a Product Collection block. For your shop catalogue, open Appearance → Editor → Design → Templates, select the Product Catalog template, and add Product Filters near the Product Collection.
Then add an Attribute Filter inside it. You choose the attribute when adding the block, then pick a List or Chips style and decide whether to show a product count for each option.
One requirement is easy to miss: the store needs at least one product with the selected attribute before that filter can show meaningful options. An empty filter usually means no product is using the attribute yet — not a broken block.
By default, filters update the product list without reloading the page. If the surrounding Product Collection block has “Reload full page” enabled, the storefront reloads instead.
The older way: widgets and shortcodes. WooCommerce still lists legacy options for displaying products by attribute through widgets and shortcodes. These are what most classic themes use. They work, but new development is going into the blocks.
Attribute Archive Pages: A Free SEO Win
When you create a global attribute, you can tick Enable Archives.
This gives you a page listing every product that has a given term. If archives are on and “black” is a term under “color”, you can link to yourstore.com/color/black/ to show only black items.
That is a real landing page. If people search for “black leather boots” and you sell them, an attribute archive can rank for it.
Two cautions before you switch archives on for everything:
- Thin archives hurt more than they help. A term page with two products and no description is not a useful search result.
- Turning archives on for every attribute can create hundreds of near-identical pages. Pick the two or three attributes shoppers actually search by — usually color, material, or brand — and leave the rest off.
Common Attribute Problems and How to Fix Them
- The attribute does not show on the product page. Check Visible on the product page. If that is ticked, check whether your theme hides the Additional information section. Page builders often do.
- The attribute does not appear in the filter. It is almost certainly a custom attribute. Filters need global attributes. Recreate it under Products → Attributes.
- The terms are in the wrong order. Change Default sort order on the attribute. For numbers, use Name (numeric). For a manual order, use Custom ordering and drag the terms.
- The same color appears twice with different spellings. This happens when custom attributes are typed by hand on each product. “Navy”, “navy blue”, and “Navy Blue” become three separate values. Global attributes prevent this.
- Variations stop behaving normally past about 30 combinations. Once a product passes roughly 30 variations, WooCommerce switches to loading them over AJAX instead of all at once. Custom snippets that worked on a small product often stop working at this size. Plan for it before you build a product with 200 variations.
- Attributes disappeared after an import. Importers create custom attributes by default unless the column is mapped to a global taxonomy. Check the import mapping, not the products.
Turning Attribute Dropdowns Into Swatches
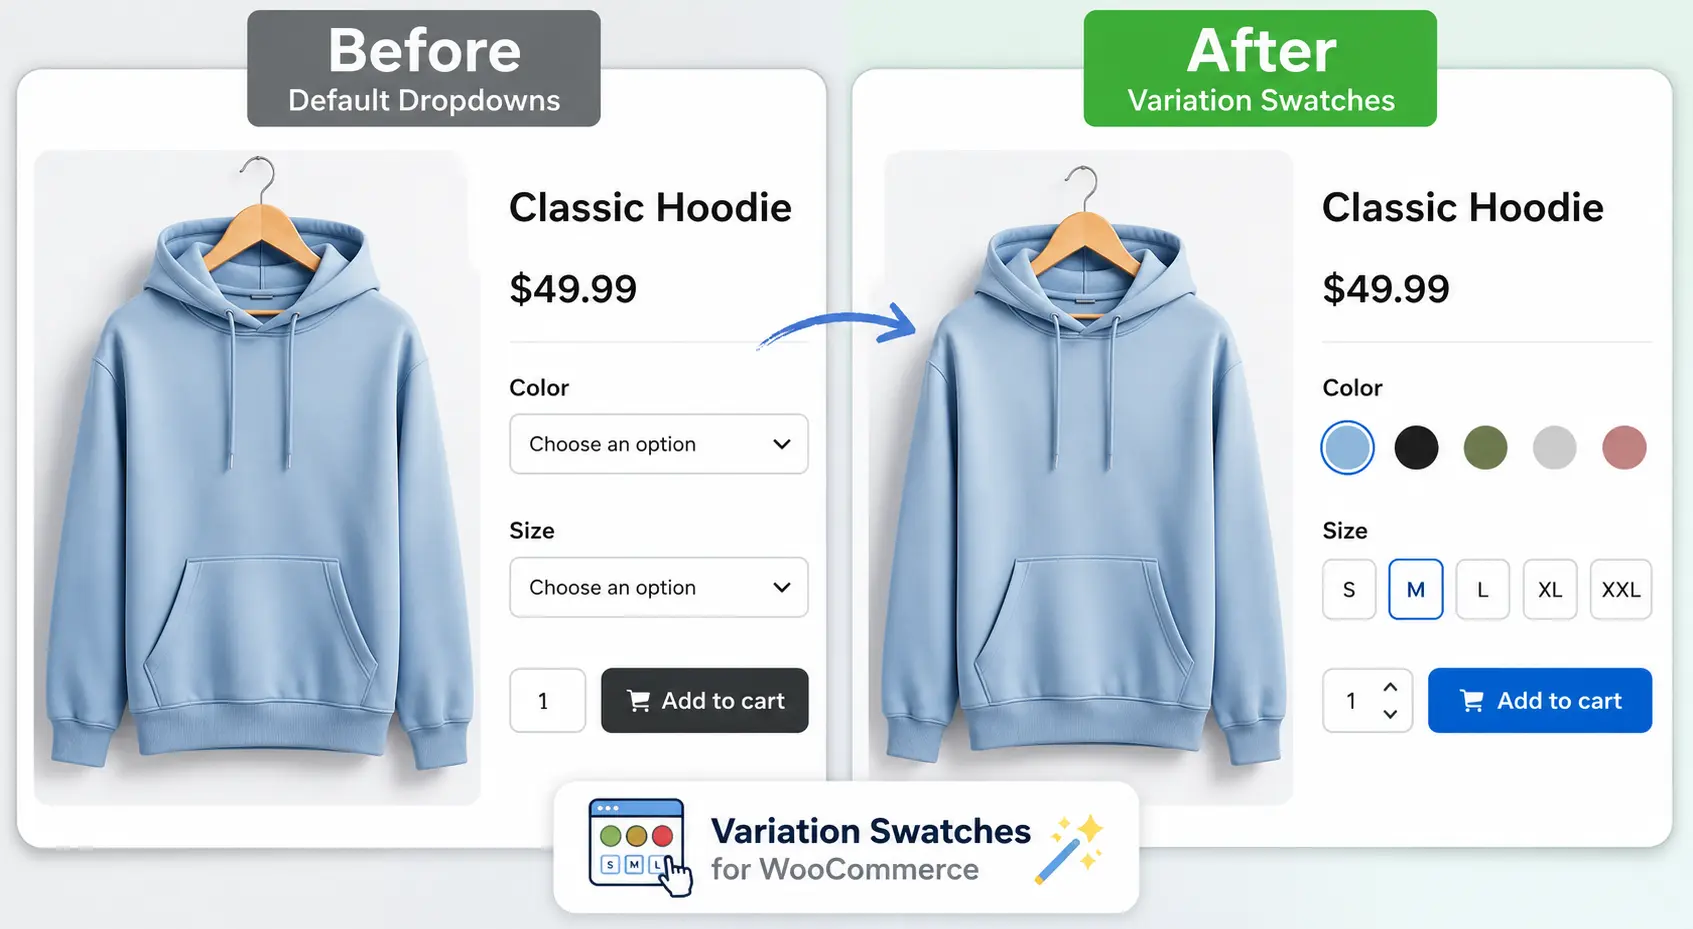
Everything above is free and built into WooCommerce. Nothing in this guide needs a plugin.
But there is one thing core WooCommerce still does not do well on most stores: it shows variation attributes as plain dropdown menus. A shopper cannot see that you sell the shirt in eight colors until they open the menu.
There is now a partial native answer, but it comes with strict conditions. You need WooCommerce 10.9 or newer, and your site must be running a block theme. If either is not true, the setting will not appear at all.
When both are true, go to WooCommerce → Settings → Advanced → Features and turn on Color swatches for attributes. A new Color / image type then appears when you create or edit an attribute under Products → Attributes, along with color and image fields on the term screens.
Two limits to know before you rely on it:
- Turning the feature on does not convert anything by itself. Swatches only show for attributes you set to Color / image, on terms that have a color or image saved.
- It covers color and image only. There is no button/label type and no radio type.
The Attribute Filter block picks this up too — when an attribute uses the Color / image type, the List style can show each term’s swatch beside its label.
How to check whether this applies to you. Look at WooCommerce → Status for your version number. Then look at your Appearance menu: if you see Editor, you are on a block theme. If you see Customize and Widgets instead, you are on a classic theme, and this feature is not available to you at all.
That last point matters more than it sounds. Most popular WooCommerce themes — Flatsome, Divi, Astra, OceanWP, Woodmart — are classic themes. If you are on one of them, native swatches are not an option today, whatever your WooCommerce version.
Variation Swatches for WooCommerce covers the rest. It adds Color, Image, and Button/Label types to your attributes, and turns the dropdowns into clickable swatches on classic and block themes alike. The free version is on WordPress.org with 300,000+ active installs and a 4.8 out of 5 rating from 919 reviews.
Here is the honest split between free and premium:
| Feature | Free | Premium |
|---|---|---|
| Color, image, and button/label swatches on global attributes | ✅ | ✅ |
| Auto-convert dropdowns to button swatches on install | ✅ | ✅ |
| Rounded and square shapes (site-wide) | ✅ | ✅ |
| Swatch size control on the product page | ✅ | ✅ |
| Tooltips | ✅ | ✅ |
| Blur, hide, or cross out-of-stock variations | Up to ~30 variations | Unlimited |
| Radio button swatches | ❌ | ✅ |
| Swatches on shop, category, and archive pages | ❌ | ✅ |
| Swatches from custom (product-level) attributes | ❌ | ✅ |
| Swatches in the Filter Products by Attribute widget | ❌ | ✅ |
| Dual-color swatches | ❌ | ✅ |
| Per-product color or image overrides | ❌ | ✅ |
| Change the gallery from one attribute, Amazon-style | ❌ | ✅ |
| Shareable direct variation links | ❌ | ✅ |
Premium starts at $49 per year for one site, or $149 for a lifetime licence.
When you do not need any of this. If you sell a handful of products with two or three text attributes, the default dropdown is fine. Shoppers understand dropdowns. If you are on a block theme and only need color swatches, the experimental core feature may be enough. Swatches earn their place when your catalogue is visual and large enough that shoppers need to see the options before they click.
Frequently Asked Questions
What is the difference between a product attribute and a variation in WooCommerce?
An attribute is a feature, such as Size. A variation is one buyable combination of attribute terms, such as Medium in Blue, with its own price and stock. Attributes describe; variations sell.
Can I use custom attributes for filtering?
No. Filter blocks and widgets read global attributes only. If you need filtering, create the attribute under Products → Attributes.
How many attributes can one product have?
WooCommerce does not set a hard limit. The practical limit is variation count — every extra attribute multiplies the combinations, and things get slow and awkward past a few hundred.
Why are my attributes not showing on the product page?
The most common cause is that “Visible on the product page” is unticked. WooCommerce only shows the Additional Information tab when the product has visible attributes, weight, or dimensions. Some themes and page builders also hide that section.
Can I change a custom attribute into a global one?
Not with a single button. You create the global attribute, add it to the product, remove the custom one, and re-save. On a large catalogue, an import or a bulk tool is faster.
Do attributes help SEO?
Indirectly. Attribute archive pages can rank for specific searches like “blue running shoes”, and visible attributes give search engines structured product detail. Enable archives selectively — thin term pages do more harm than good.
Does WooCommerce have color swatches built in?
Partly, and only under two conditions. You need WooCommerce 10.9 or newer, and a block theme. Then you can turn on “Color swatches for attributes” under WooCommerce → Settings → Advanced → Features and set an attribute to the Color / image type.
I cannot find “Color swatches for attributes” in my settings. Why?
Almost always one of two reasons. Either your WooCommerce is older than 10.9, or your site runs a classic theme rather than a block theme — the toggle is hidden entirely on classic themes. Check your version under WooCommerce → Status, and check your Appearance menu: an Editor item means a block theme, while Customize and Widgets mean a classic one.
Final Words
Attributes are the foundation. Get them global, get them named consistently, and everything downstream — variations, filters, swatches, archives — becomes easier.
Start with one attribute. Make it global. Add the terms. Then check that it filters correctly on your shop page. Once that works, the rest is repetition.

