01. Installation Back To Top
AUTOMATIC INSTALL FROM WORDPRESS DASHBOARD
- Login to the WordPress admin panel
- Navigate to Plugins -> Add New
- Search for Variation Swatches For WooCommerce in the search field. Install and Activate Variation Swatches For WooCommerce Plugin by Emran Ahmed.
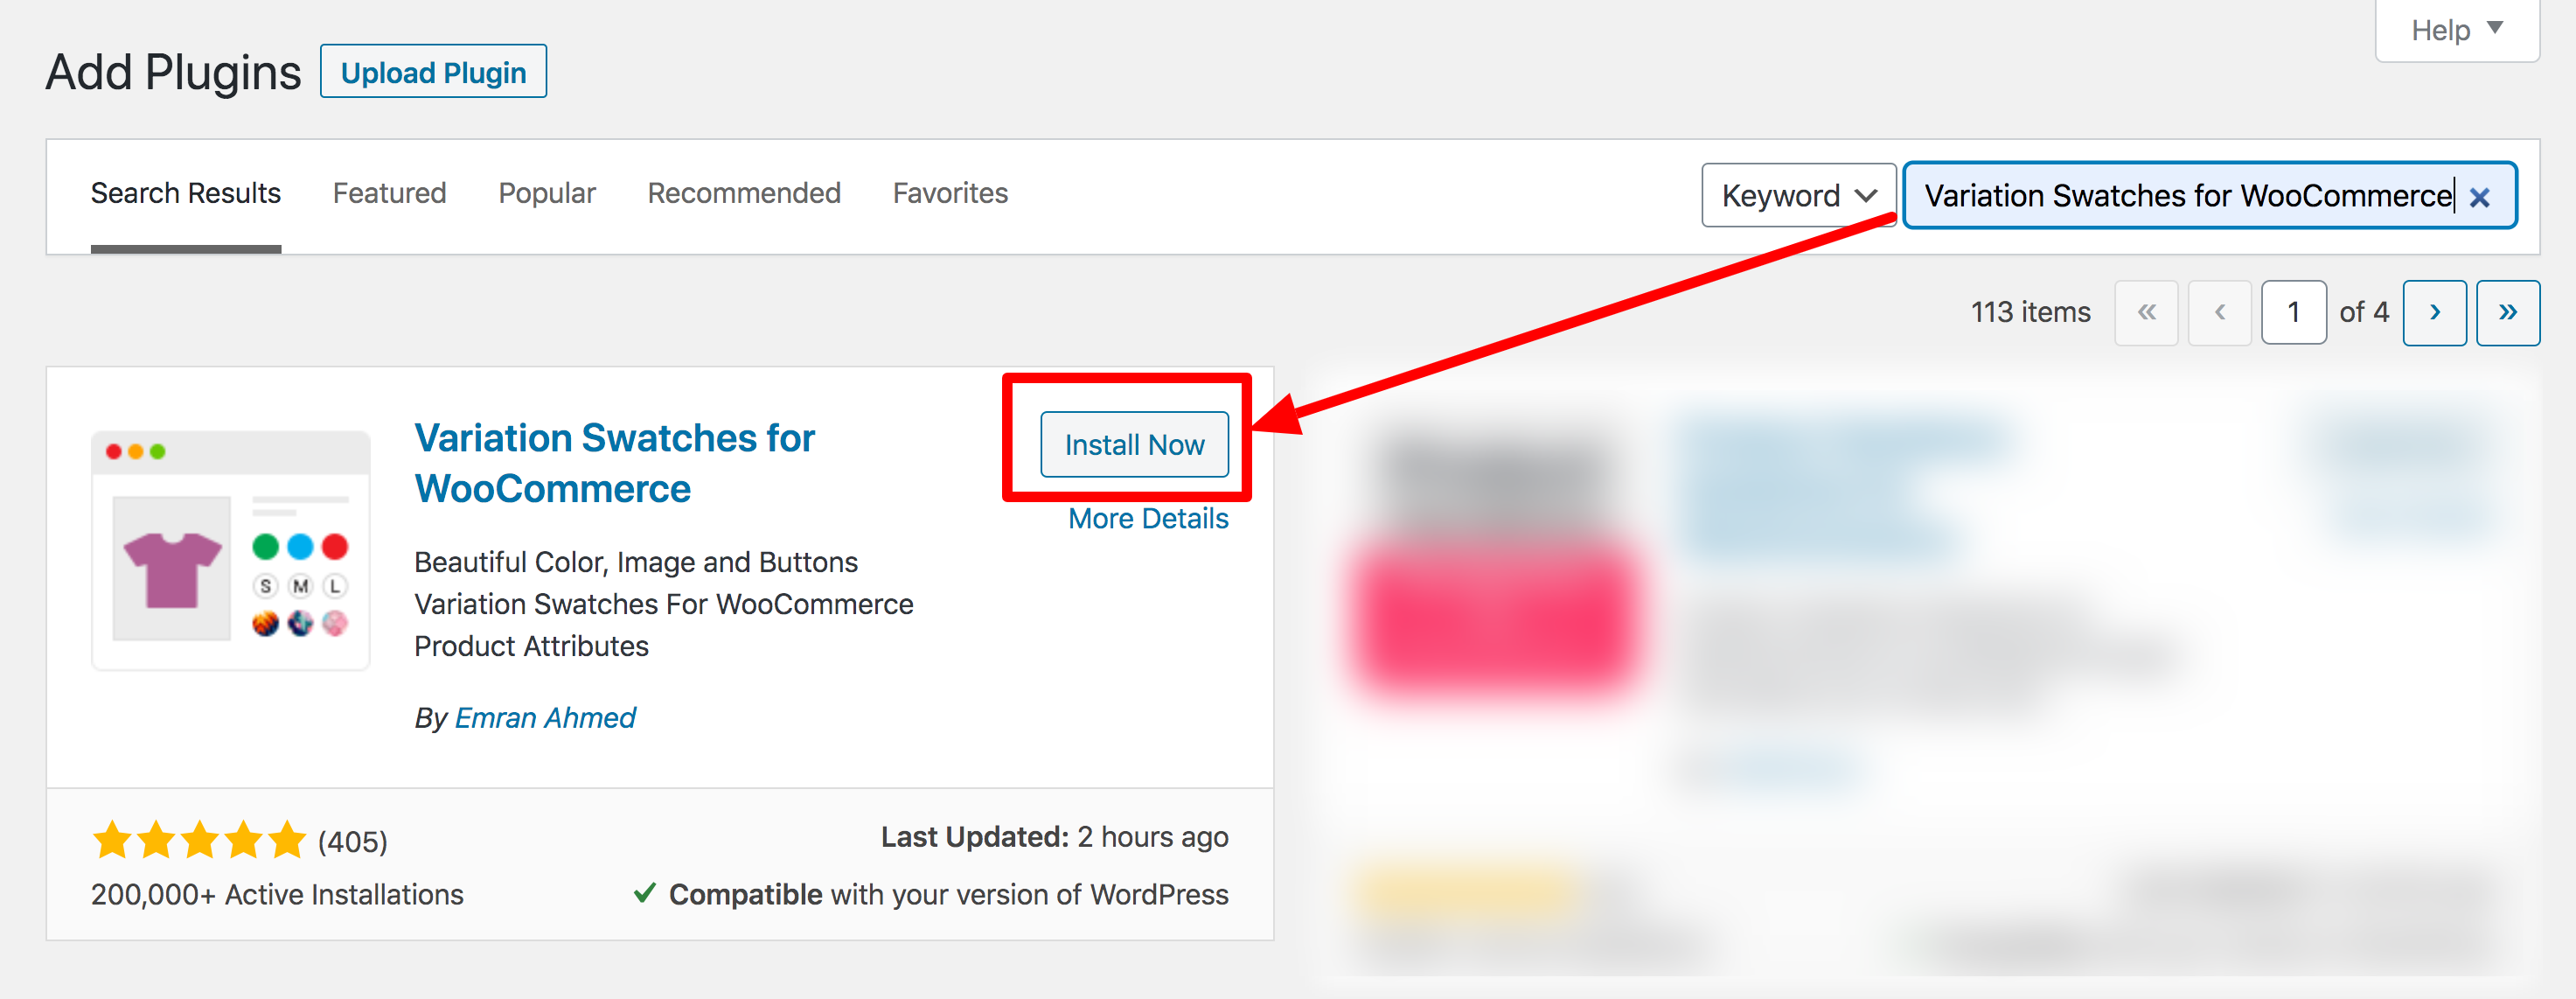
- Click install and activate.
MANUAL INSTALL FROM WORDPRESS DASHBOARD
If your server is not connected to the Internet, then you can use this method-
- Download the plugin by clicking on the red button above. A ZIP file will be downloaded.
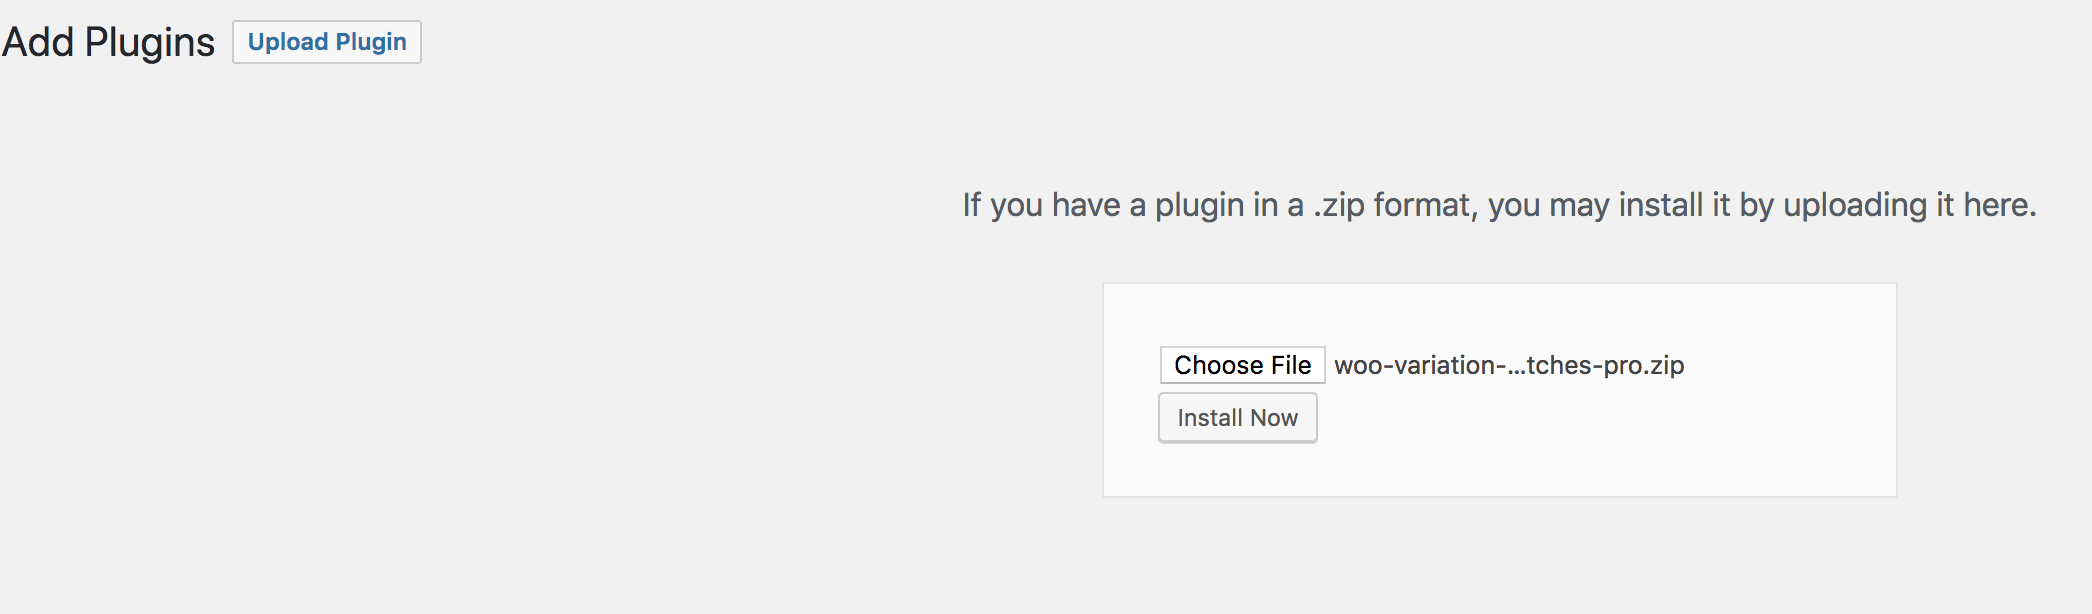
- Login to your site’s admin panel and navigate to Plugins -> Add New -> Upload.
- Click choose file, select the plugin file and click install
INSTALL USING FTP
If you are unable to use any of the methods due to internet connectivity and file permission issues, then you can use this method-
- Download the plugin by clicking on the big download button.
- A ZIP file will be downloaded.
- Unzip the file.
- Launch your favorite FTP client. Such as FileZilla, FireFTP, CyberDuck, etc. If you are a more advanced user, then you can use SSH too.
- Upload the folder to
wp-content/plugins/ - Log in to your WordPress dashboard.
- Navigate to Plugins -> Installed
- Activate the plugin
02. Installation (Advanced) Back To Top
The advanced feature of WooCommerce Variation Swatches has been packed in an extension. To enable advanced version of this plugin on your site, you need to enable premium extension besides the Free Version.
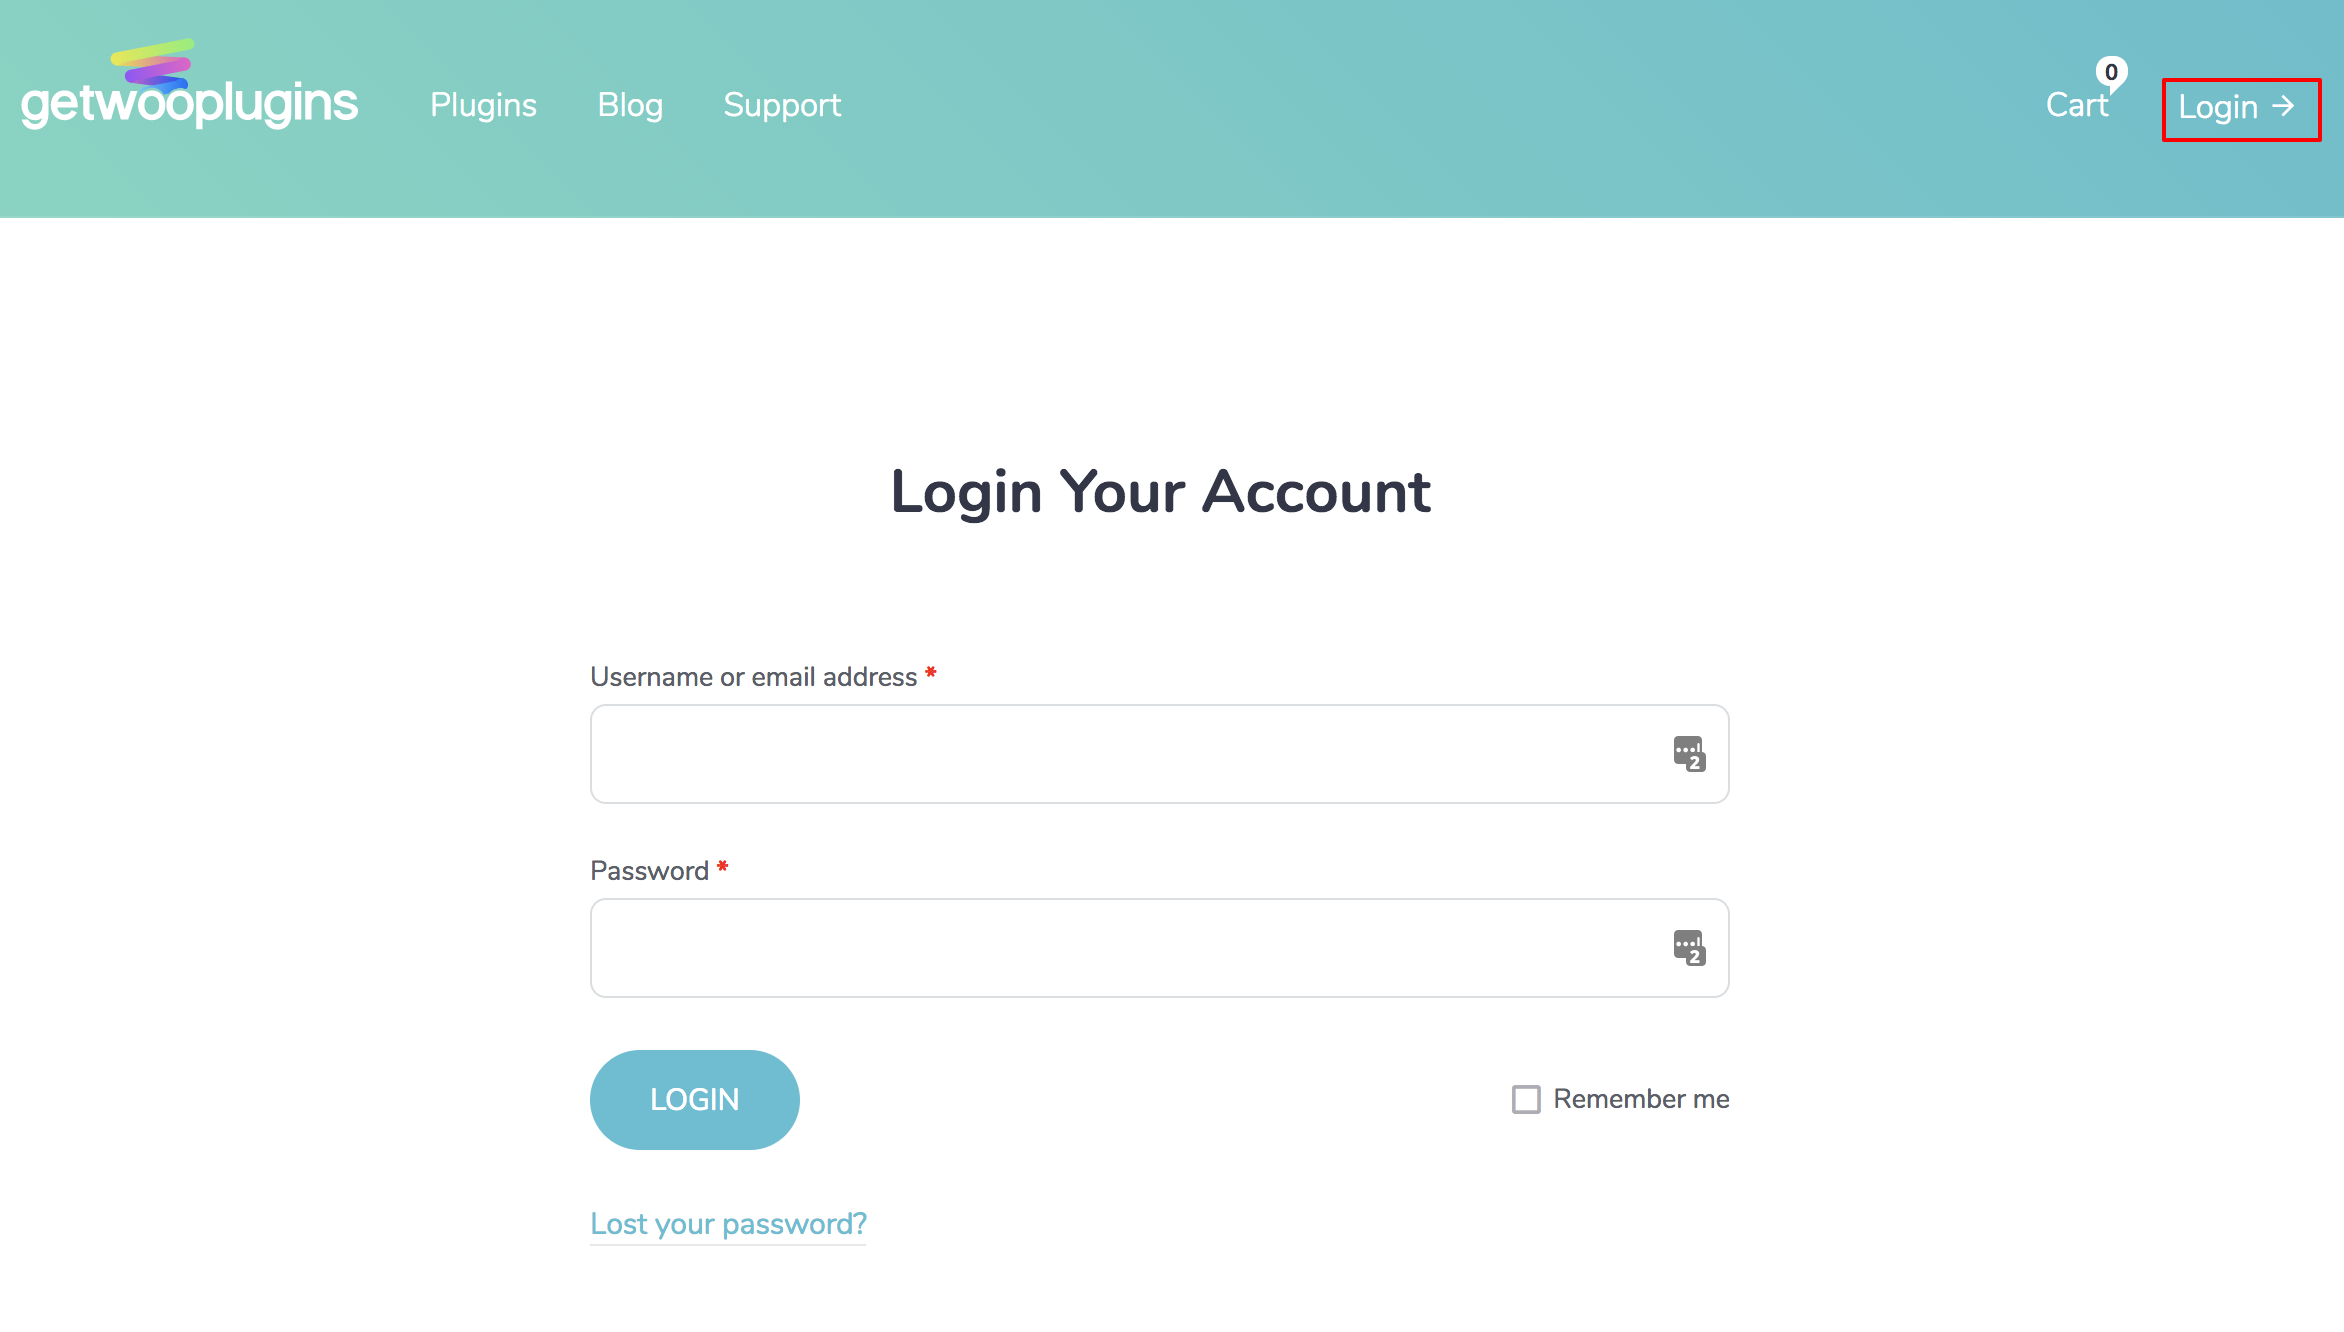
=> 1. Login to GetWooPlugins.com website.
=> 2. Head to the My Downloads from My Account.
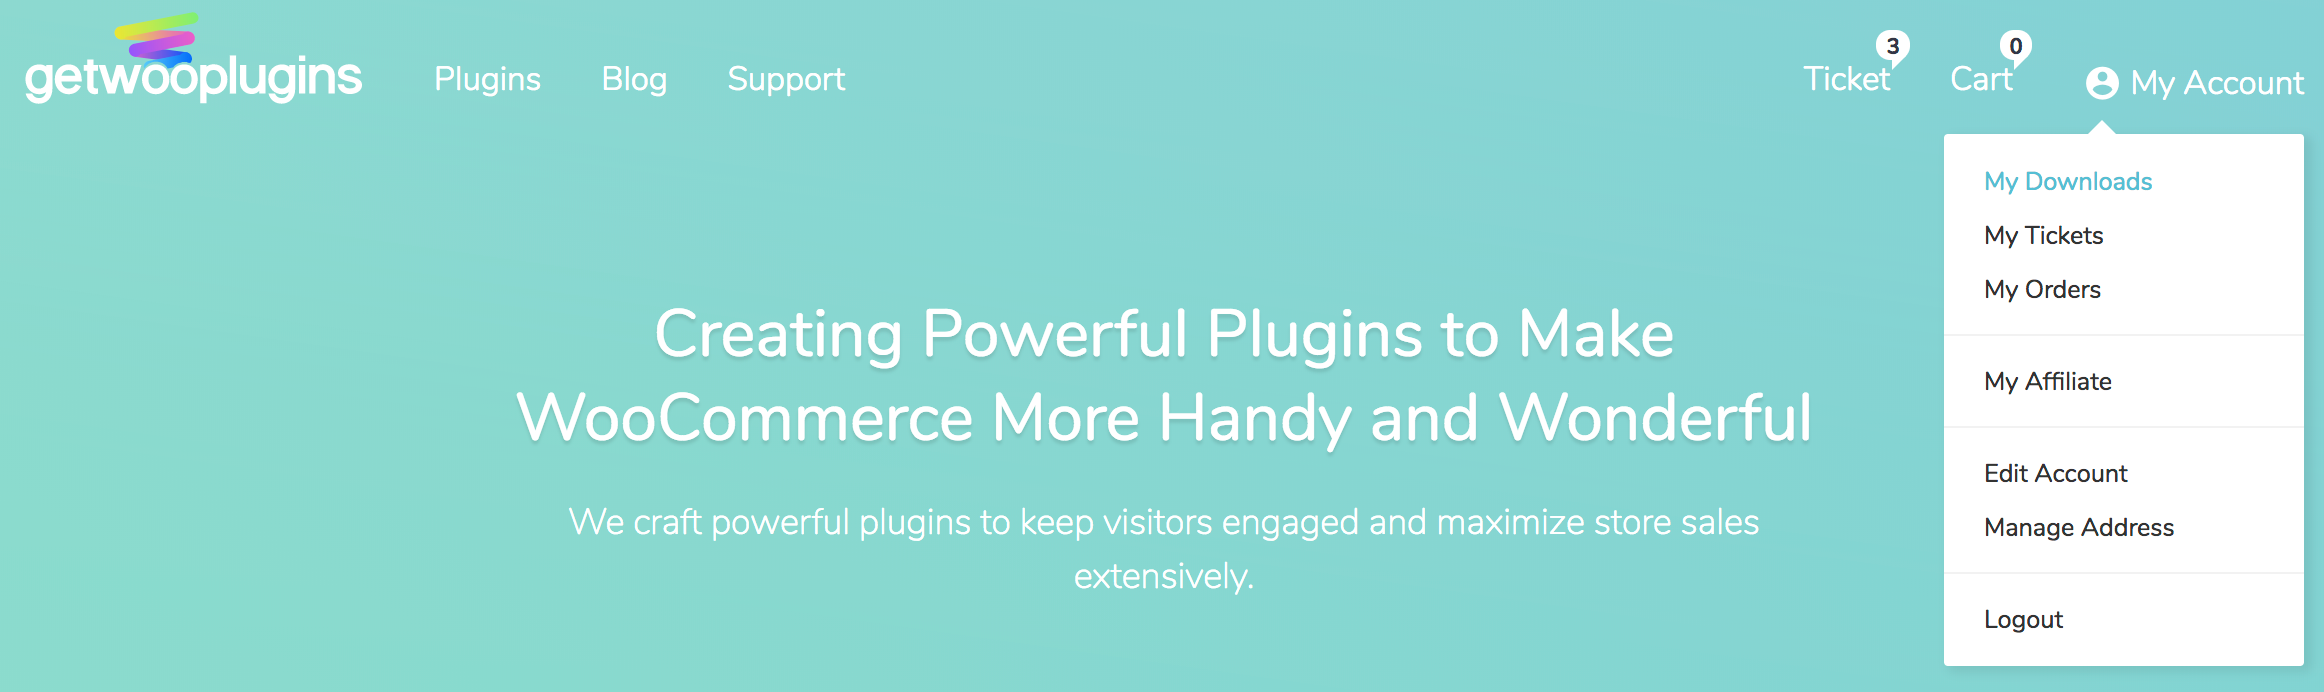
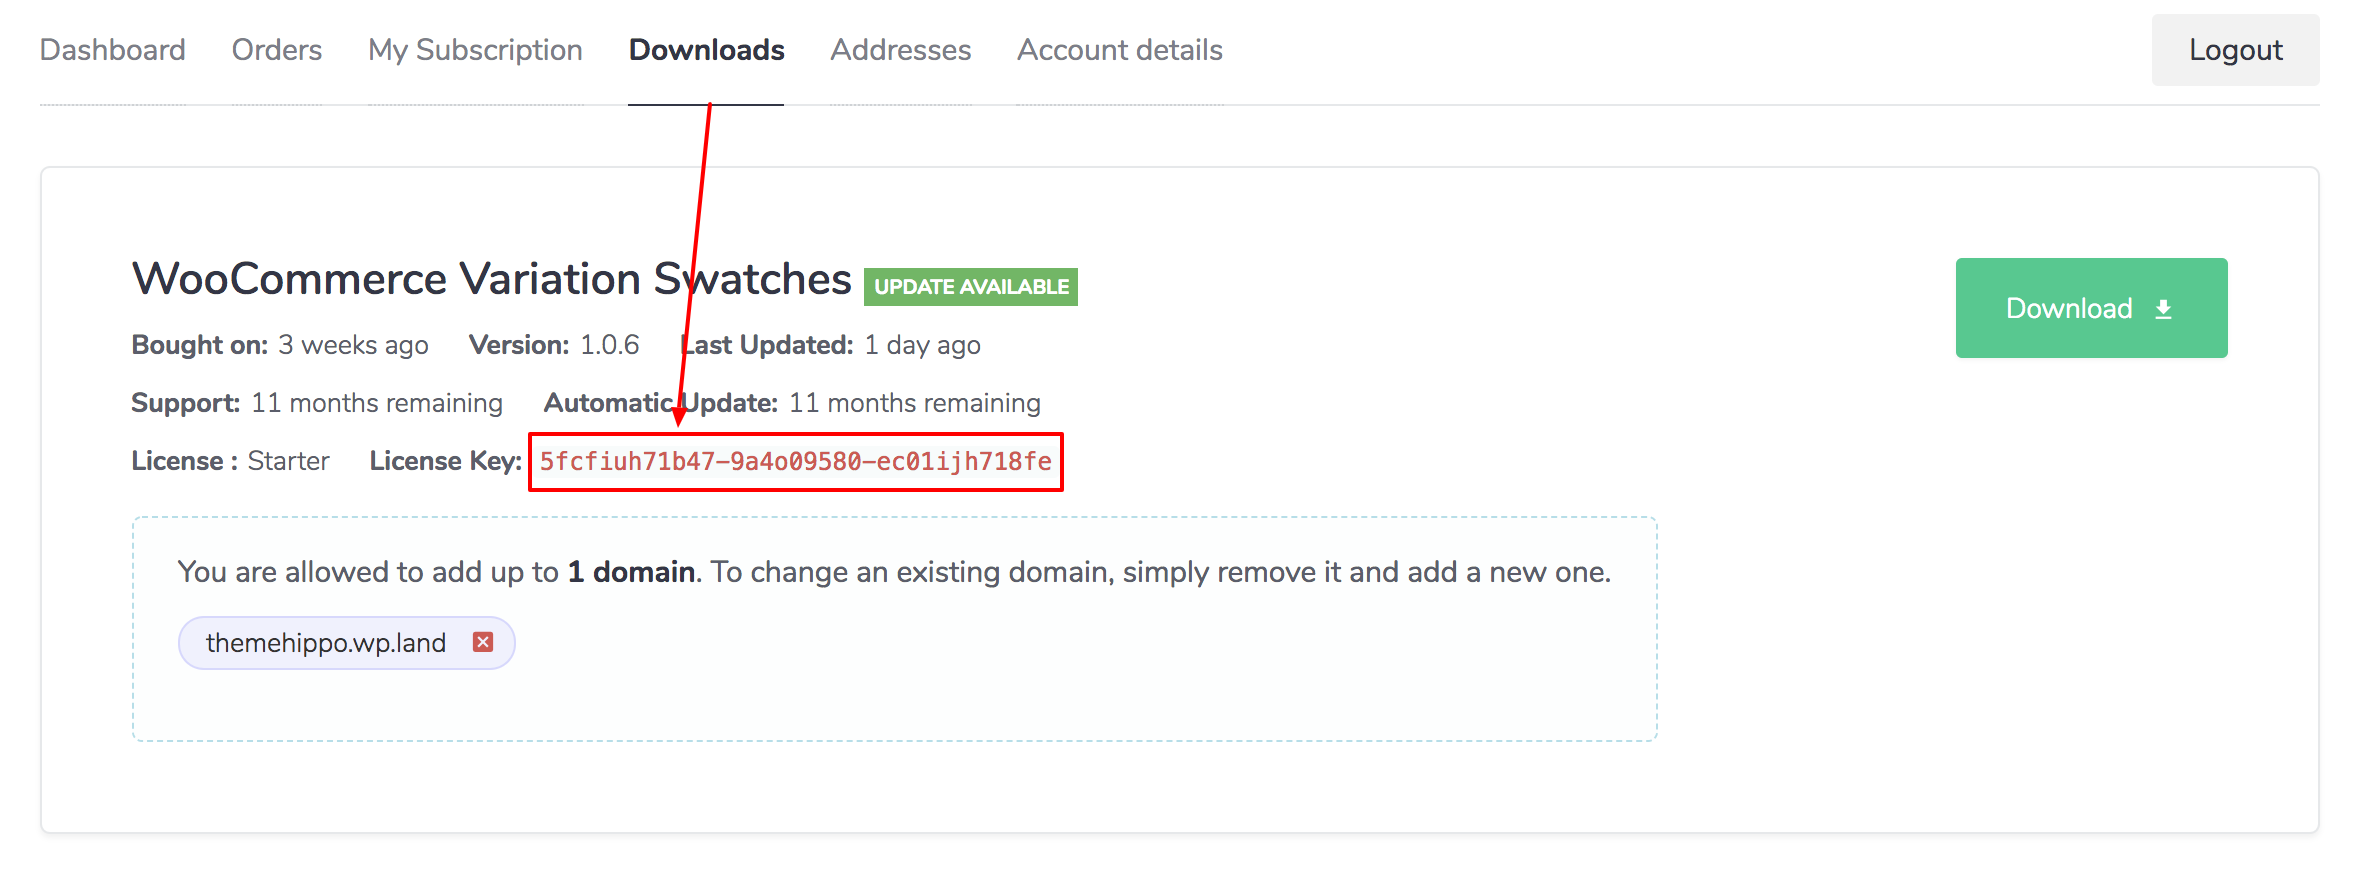
=> 3. Press Download button to download WooCommerce Variation Swatches Pro plugin.
=> 4. Navigate to Plugins >> Add New and Press Upload Plugin to Install and Activate download woocommerce-variation-swatches-pro plugin.
=> 5. After Installing Premium version of WooCommerce Variation Swatches plugin. It would appear after free version

03. Automatic Update For Premium Version Back To Top
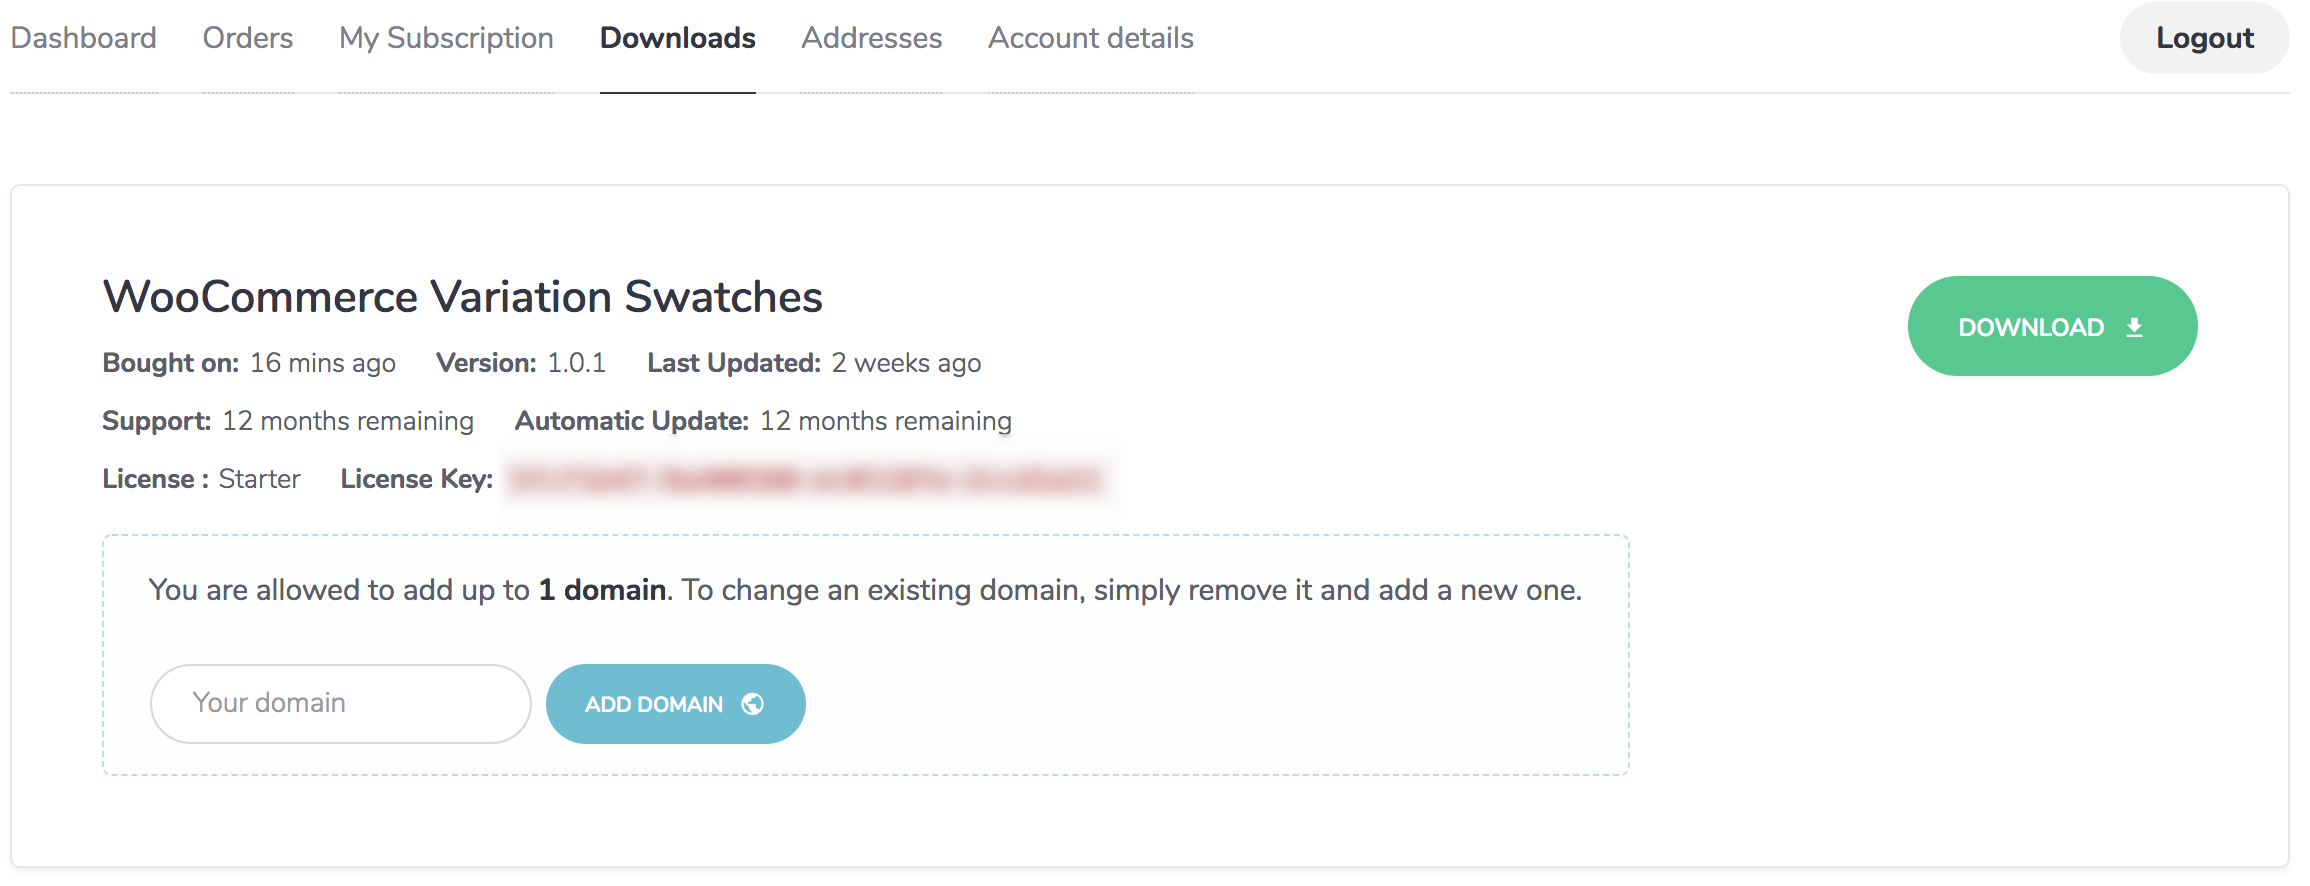
Navigate to to your My Account >> My Downloads from GetWooPlugins.com.
Firstly, register your domain where automatic update for WooCommerce Variation Swatch Pro plugin needs to activate. Enter you domain name in domain area and press Add Domain button.
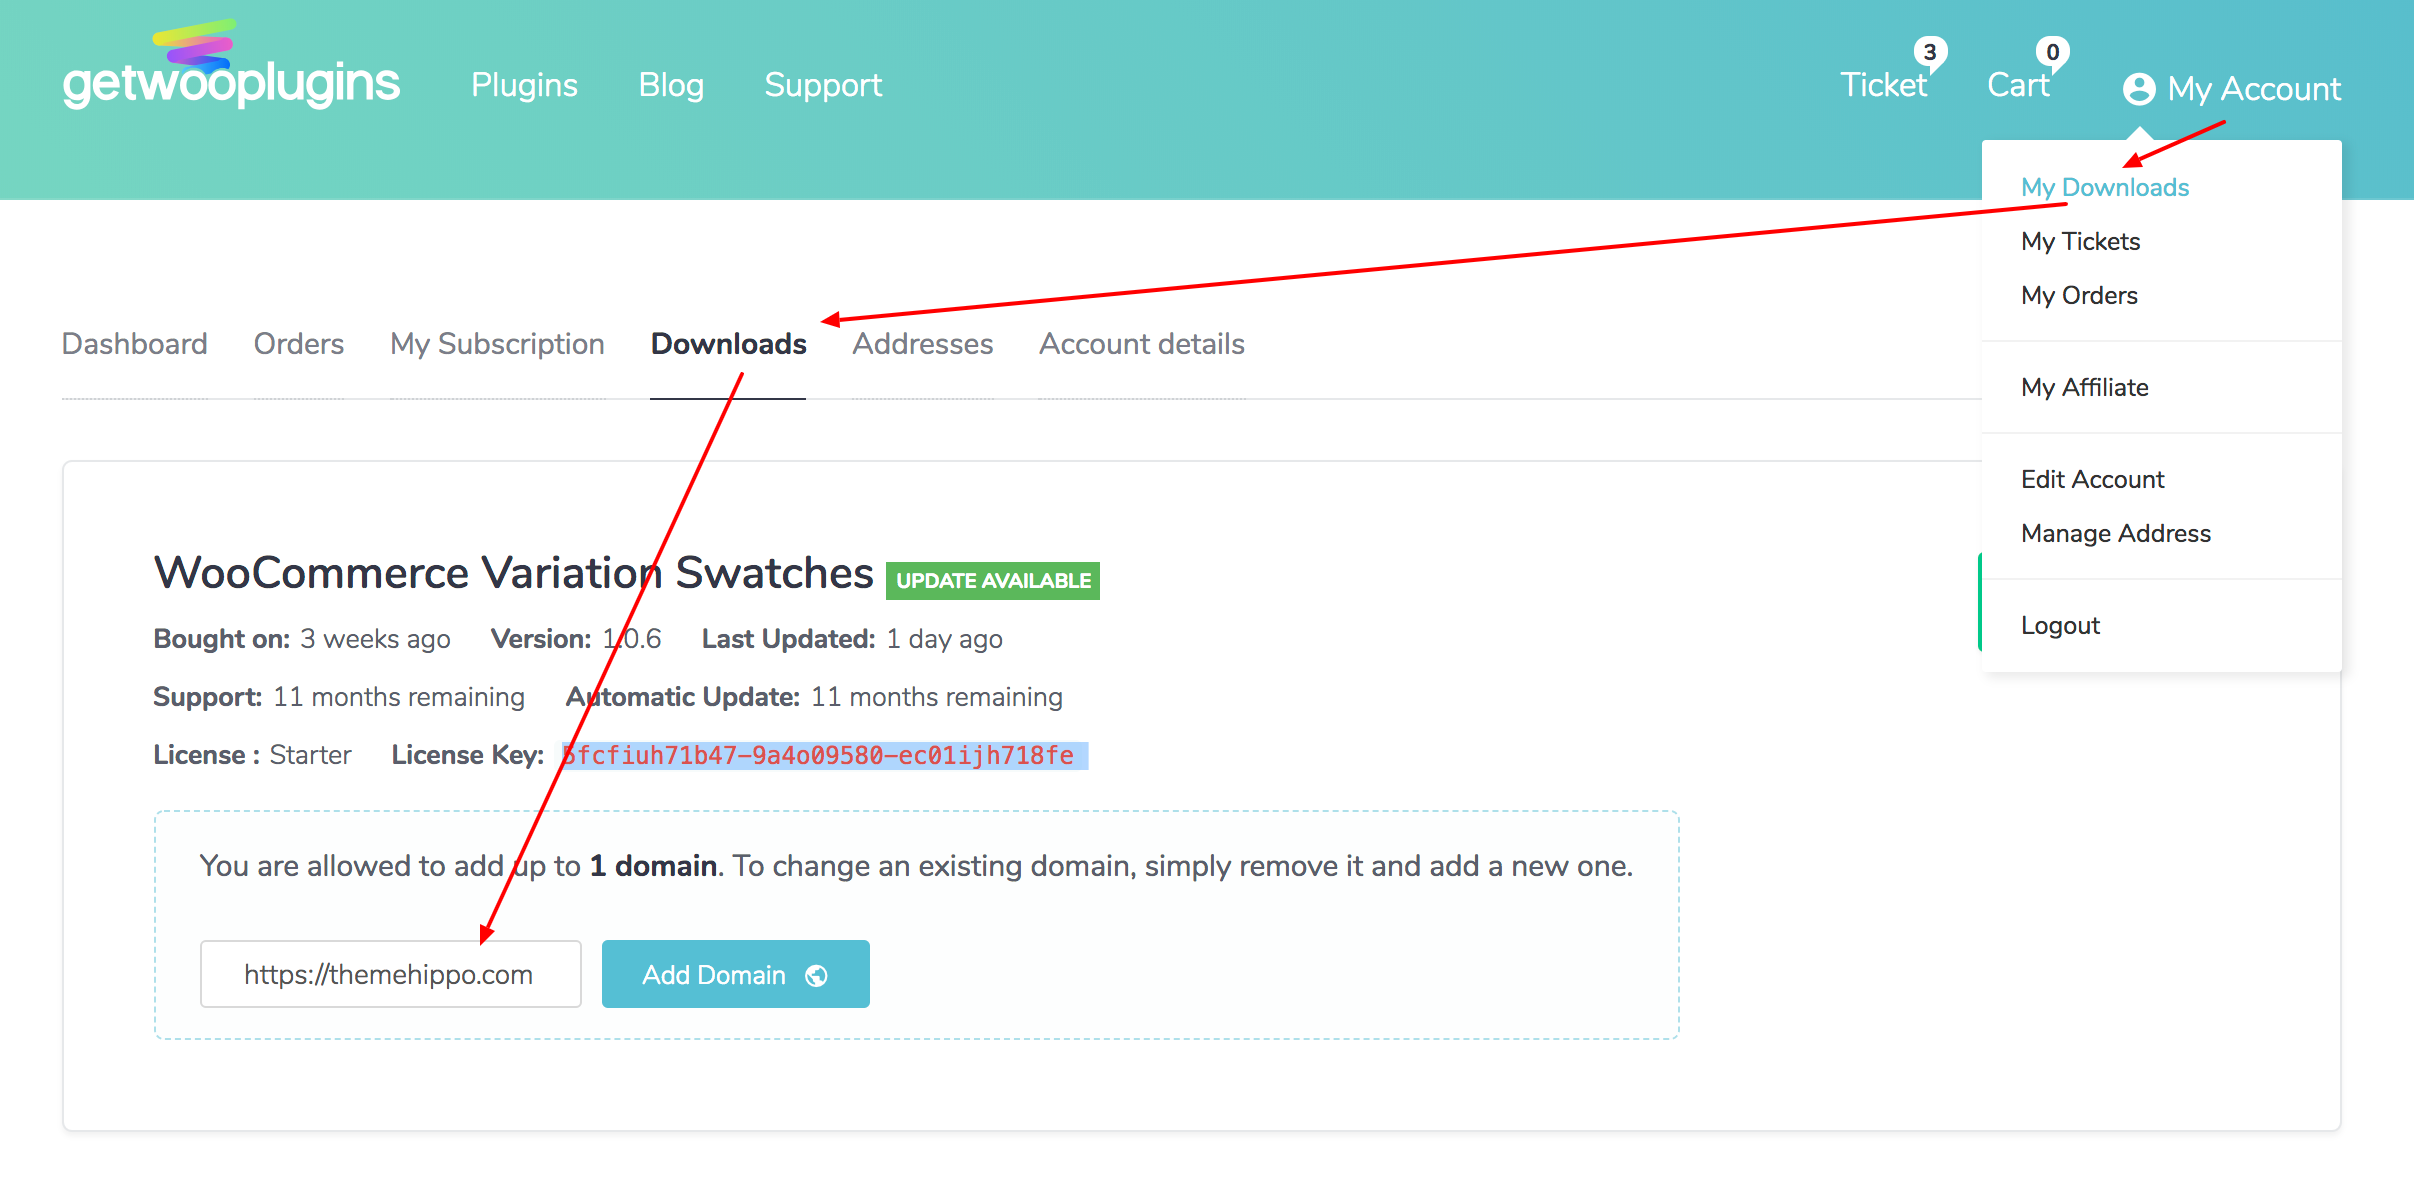
Secondly, Each purchase of item comes with license key, Copy the license key from the Downloads section.
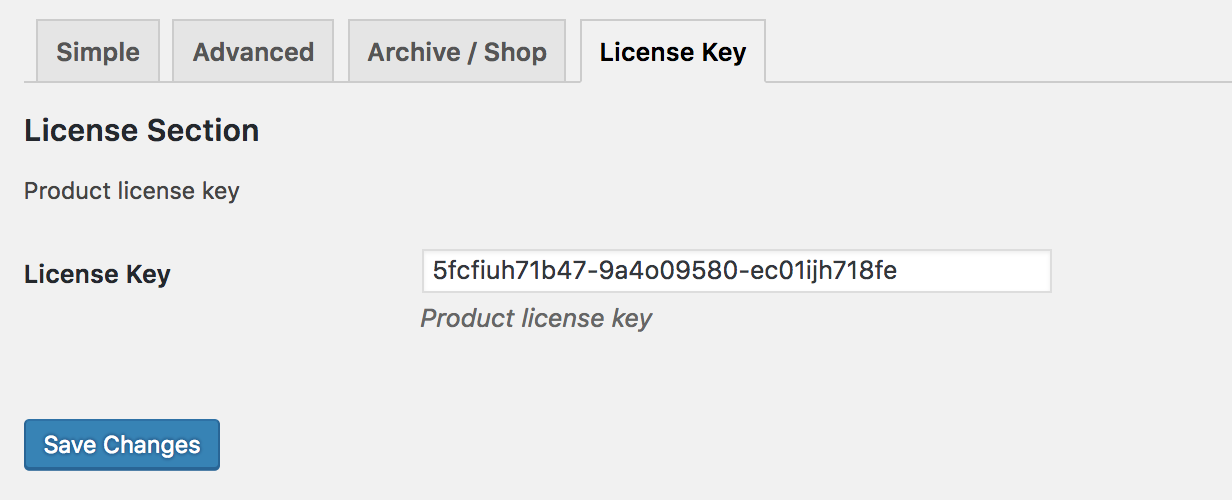
After copying the License Key, head to the site backend where automatic update needs to activate. Navigate to Swatches Settings >> License Key. Paste the copied License Key code in License Key field. When it's done, press the Save Changes button.
Finally, after successfully registering domain name in the dashboard given at getwooplugins.com and adding purchase key plugin's License Key section. The following update notice would appear in Plugins section.

Manually Update For Premium Version
Sometimes, you may not receive the latest update notice in Variation Swatches For WooCommerce. In this case, yo have to update plugin manually.
04. Configuring attributes Back To Top
Even this plugin has been installed and activated on your site, variable products will still show dropdowns if you’ve not configured product attributes.
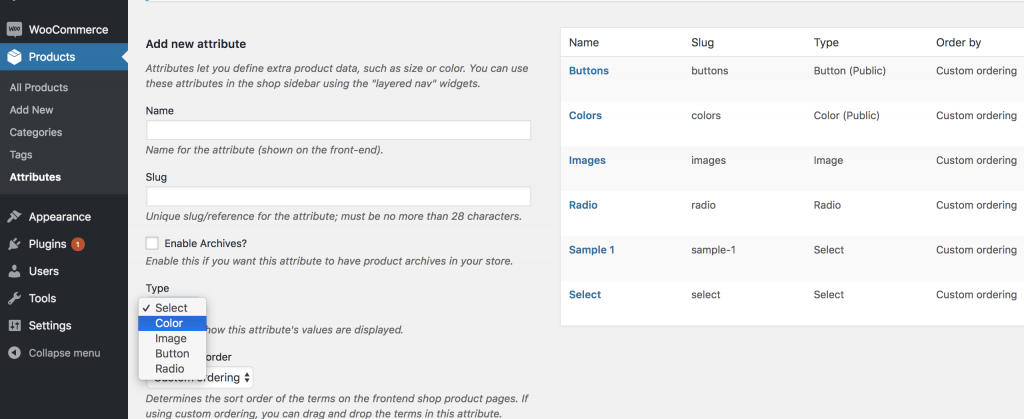
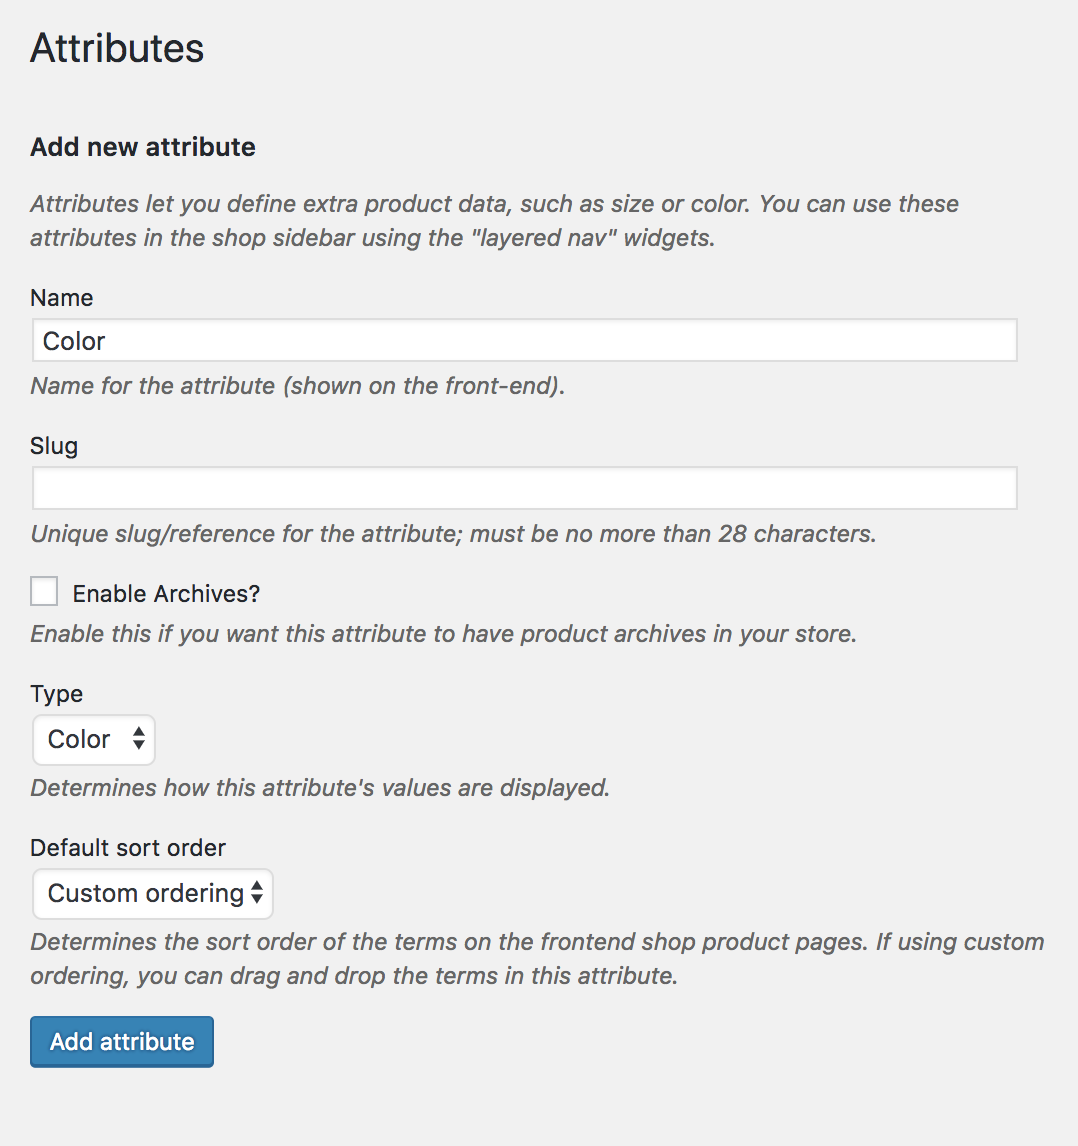
- Log in to your WordPress dashboard, navigate to the Products menu and click Attributes.
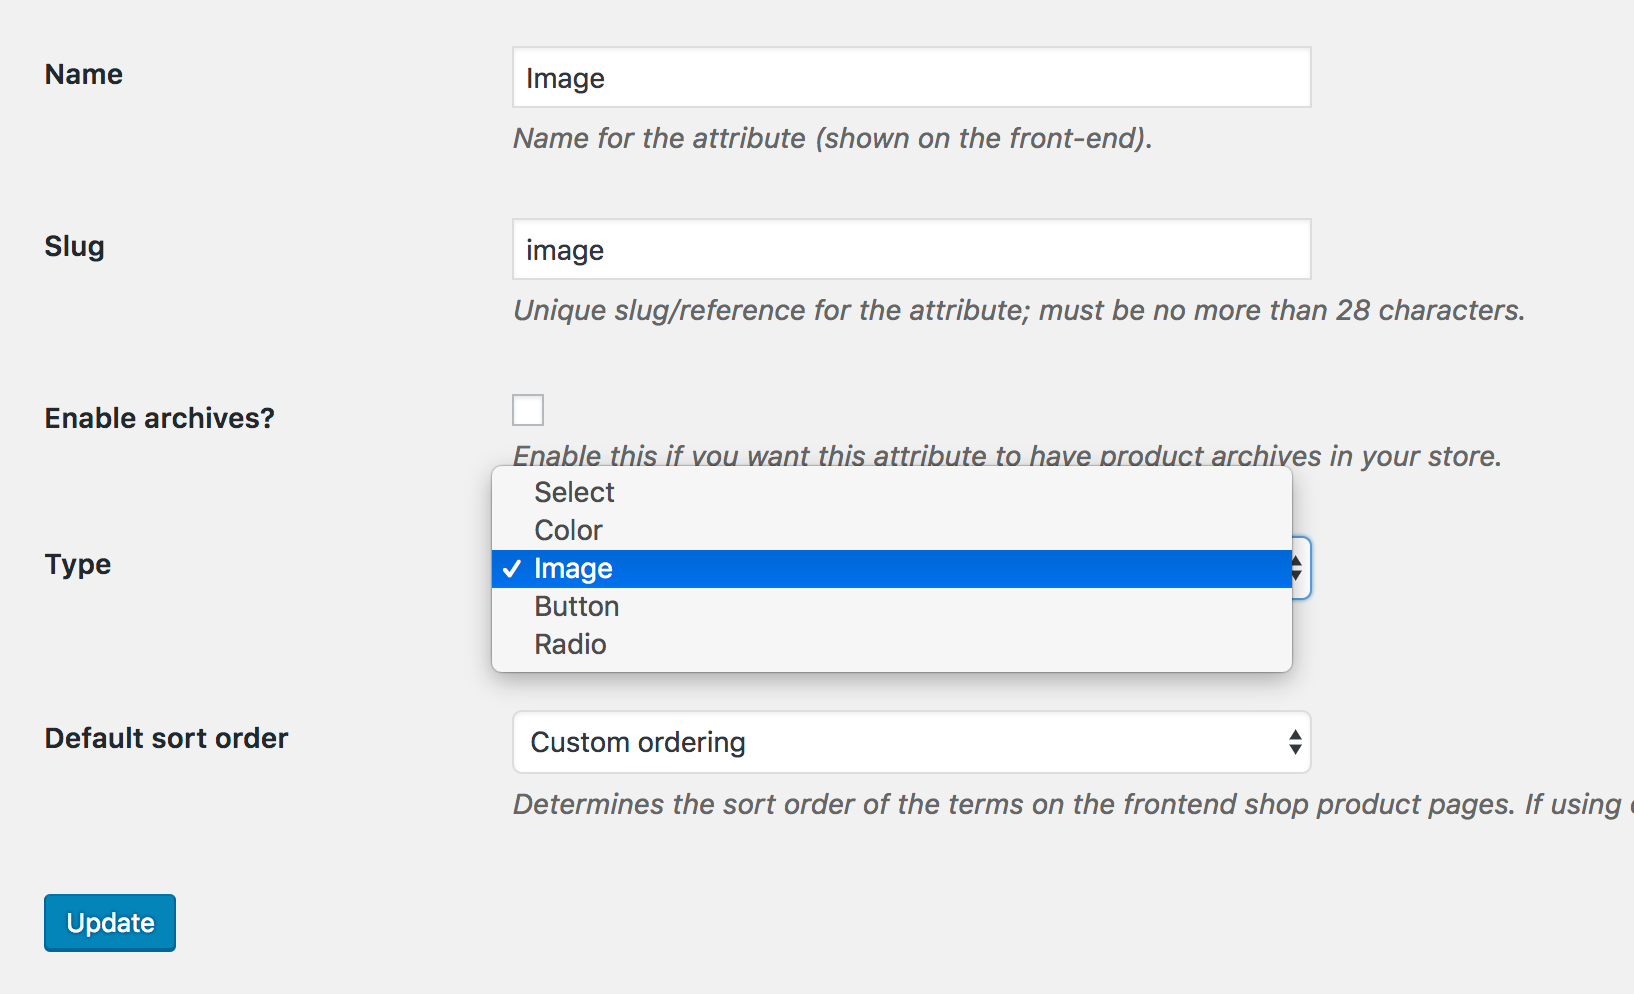
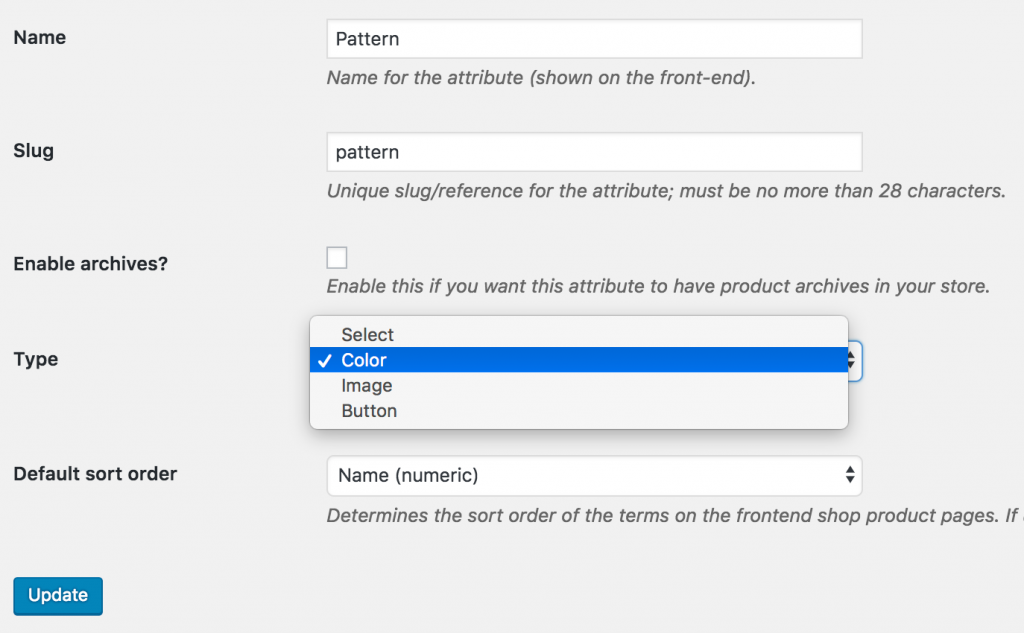
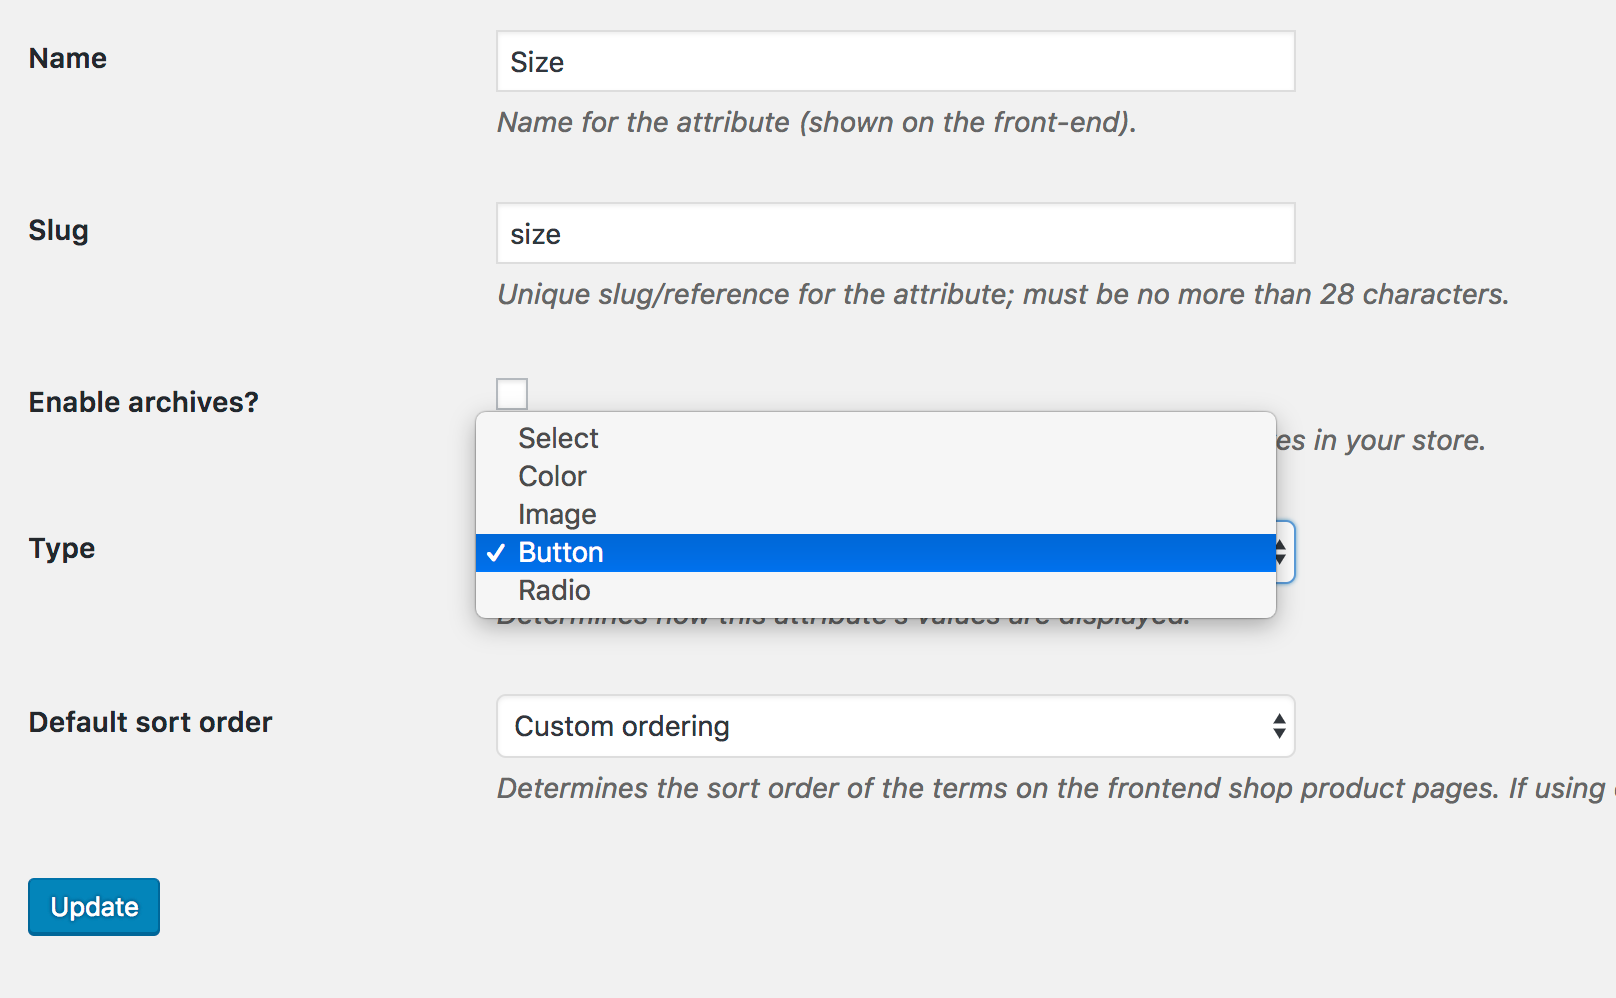
- Click to attribute name to edit an exists attribute or in the Add New Attribute form you will see the default Type selector.
- Click to that Type selector to change attribute’s type. Besides default options Select and Text, there are more 3 options Color, Image, Button/Label to choose.
- Select the suitable type for your attribute and click Save Change/Add attribute
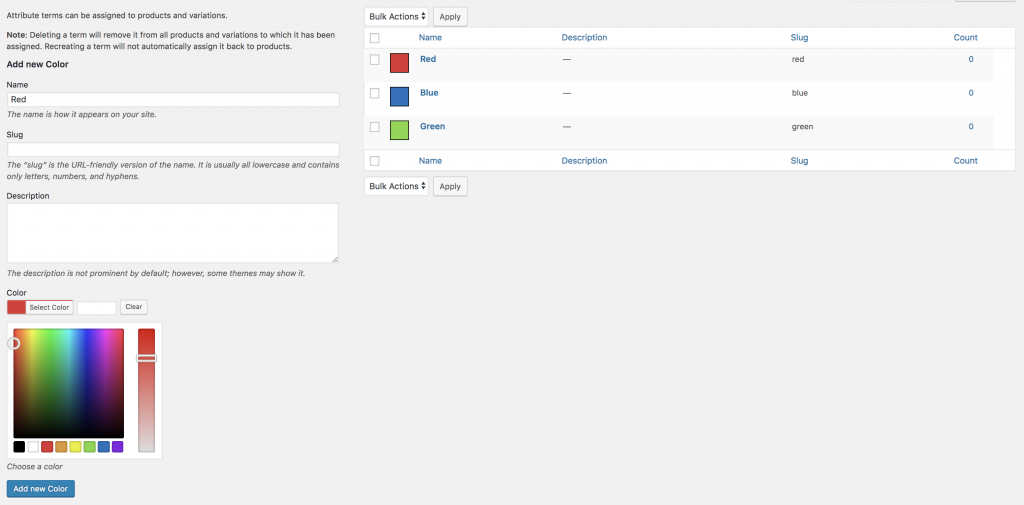
- Go back to manage attributes screen. Click the cog icon on the right side of attribute to start editing terms.
- Start adding new terms or editing exists terms. There is will be a new option at the end of form that let you choose the color, image or choose as a button for those terms.
05. How To Import Swatches on Existing Website Back To Top
If it needs to activate image, color and label swatches on existing variable products, you can give a go from here. Check the following screenshot. The default variation select dropdown, would be turn into swatches.
Step 01 Editing Attribute:
Head to the Products >> Attributes. All existing global attributes are listed in attribute section. After installing WooCommerce Variation Swatches plugin, it adds Type field. By default it would show select under Type title.
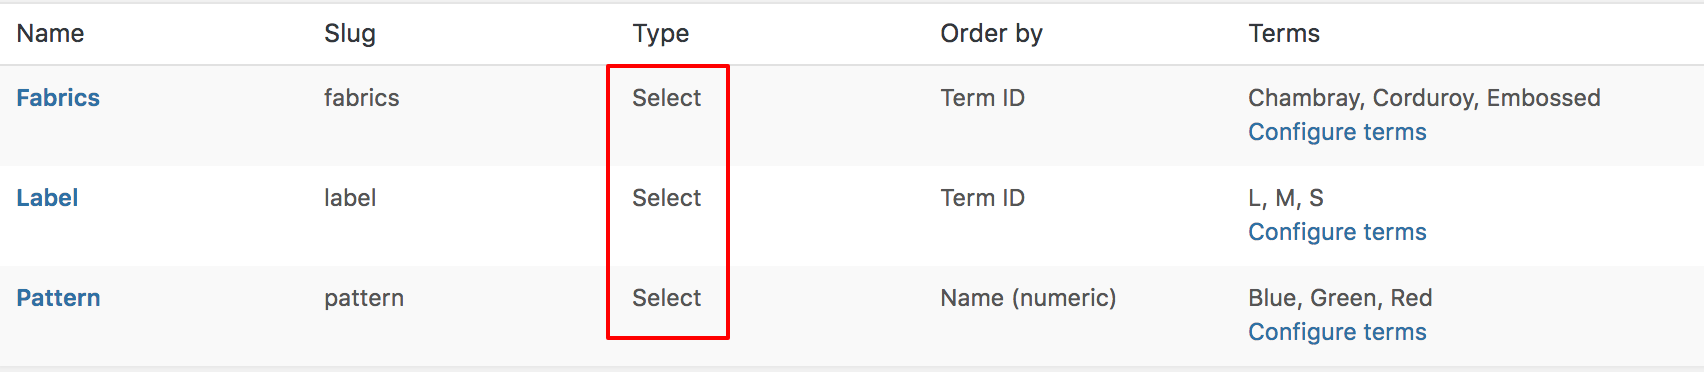
As WooCommerce Swatches Plugin comes with Three attribute types: Color, Image, Button. You can set any of attribute type for your desired attribute.
For demonstration purpose, Fabrics, Pattern and Label attribute has been created. Add Color attribute type for Pattern attribute, Image attribute type for Fabrics attribute and Button attribute type for Label Attribute.
To set color attribute type to color attribute, click on Edit.
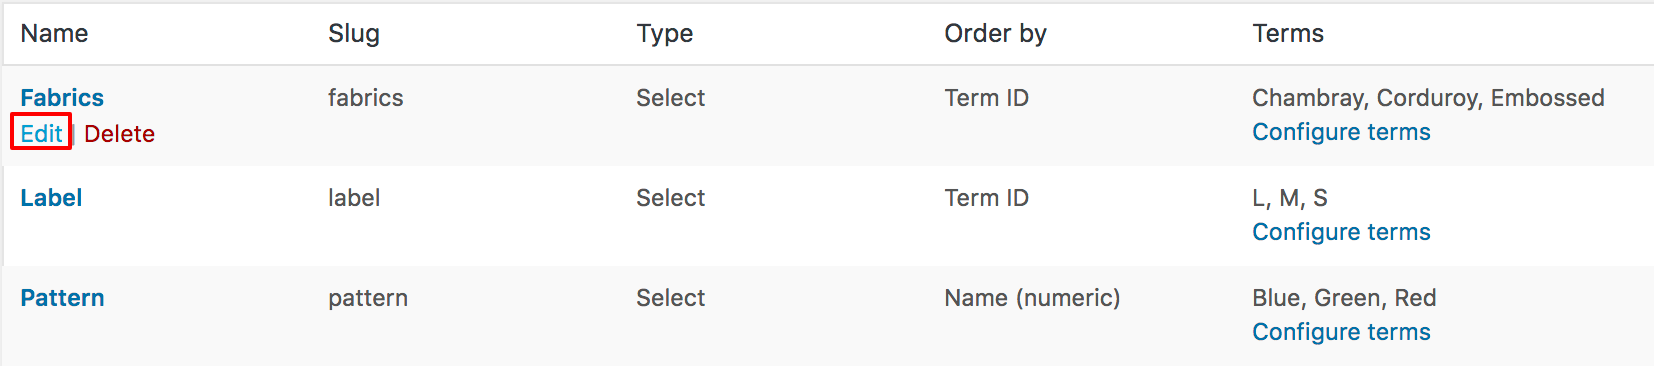
Select Color Type from the type dropdown.

Get back Products >> Attributes. Edit Image attribute like Color attribute.

Get back Products >> Attributes again. Edit Label attribute like Color and image attribute.

When attribute type selection is completed, get back to the attribute list page. The Attribute list look like the following image.
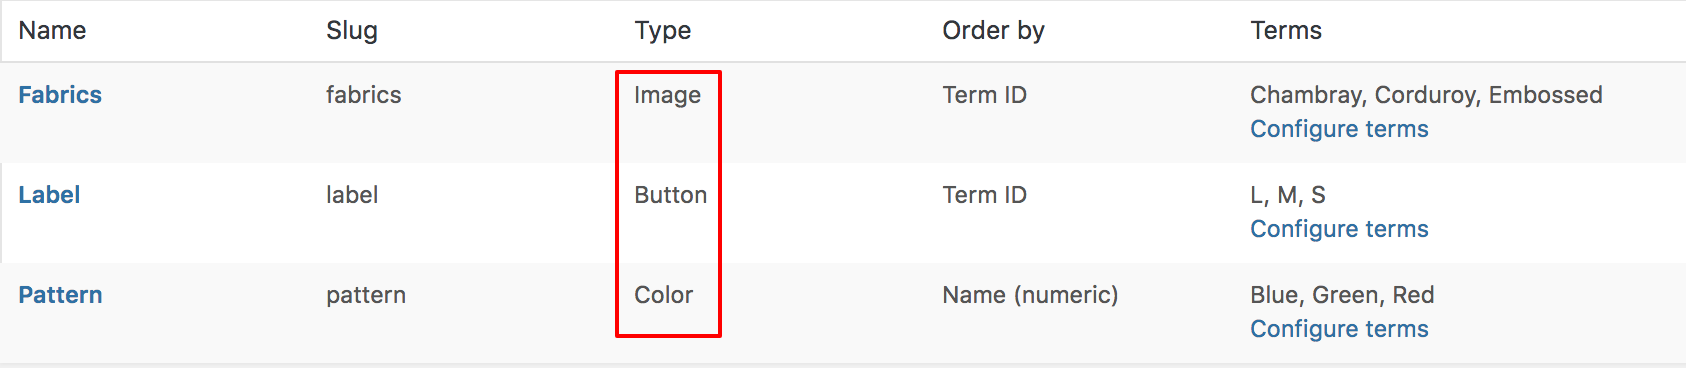
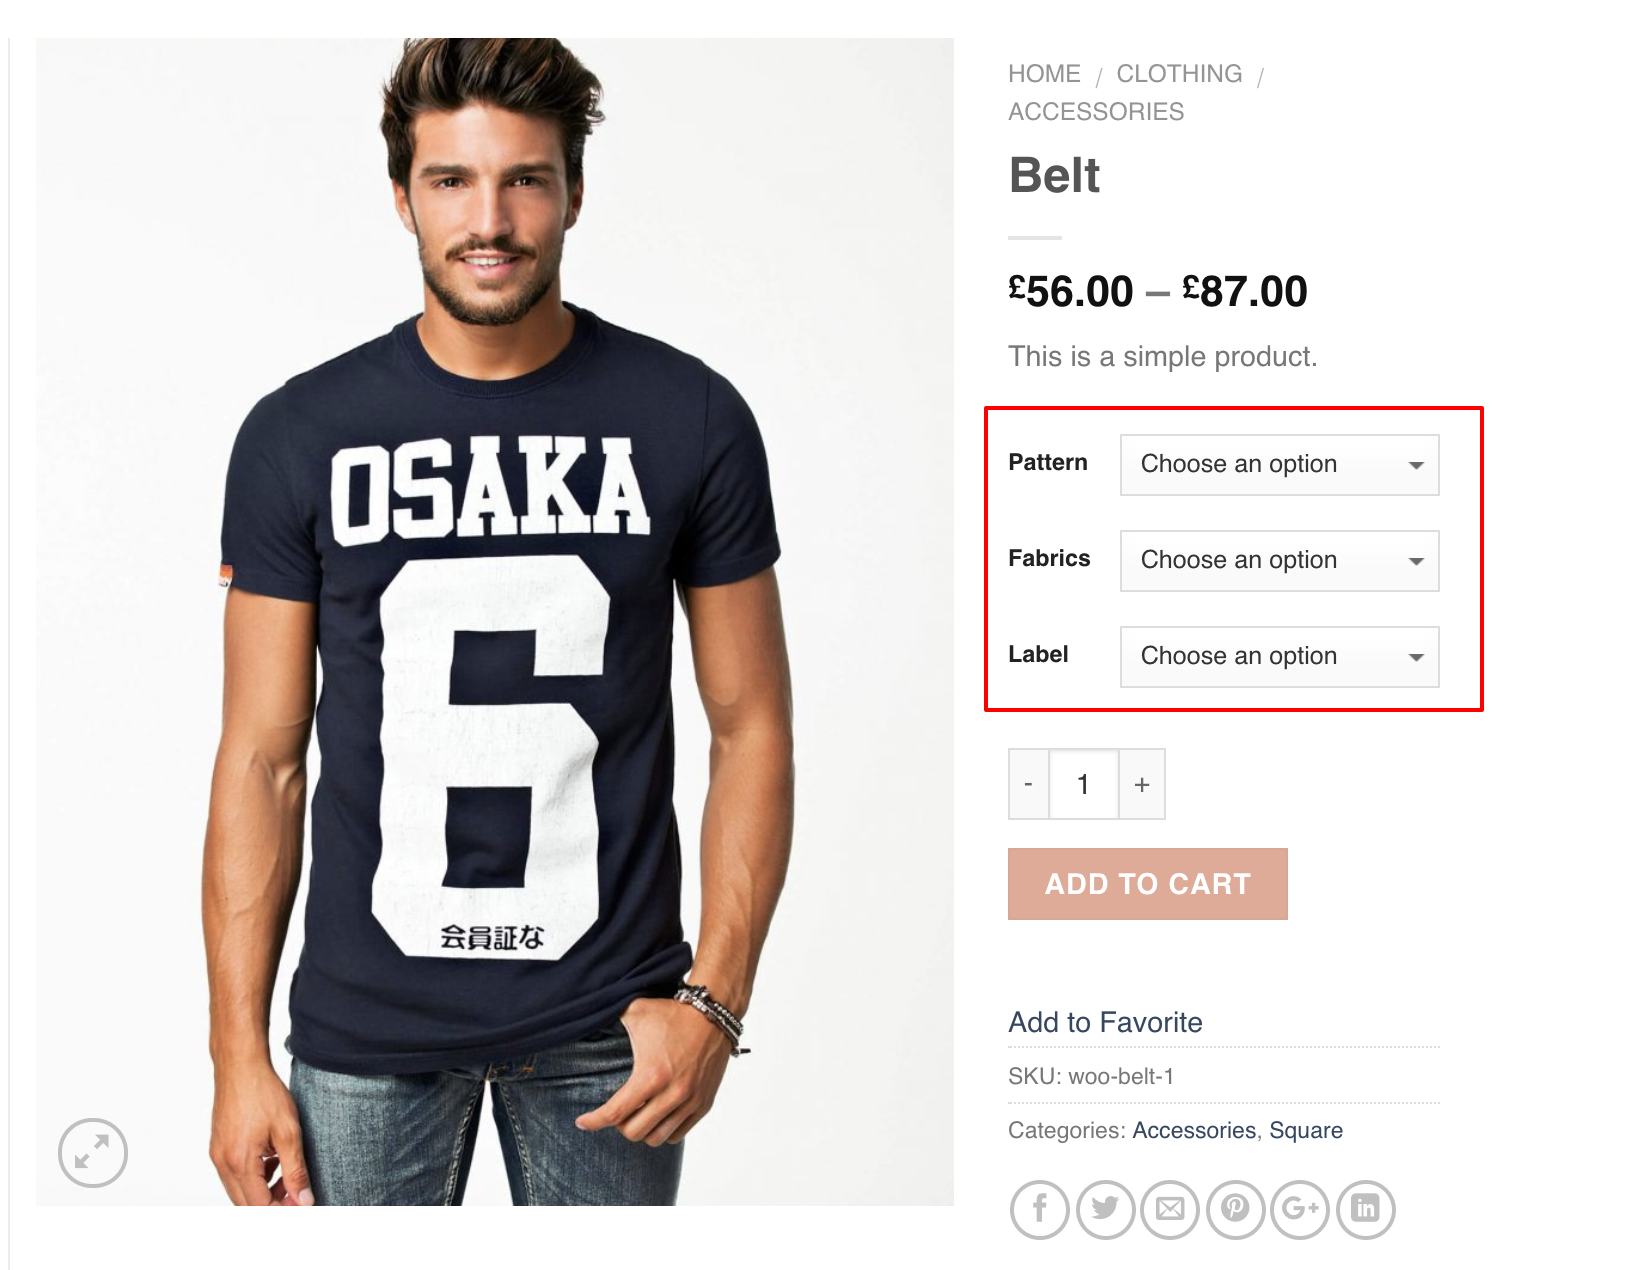
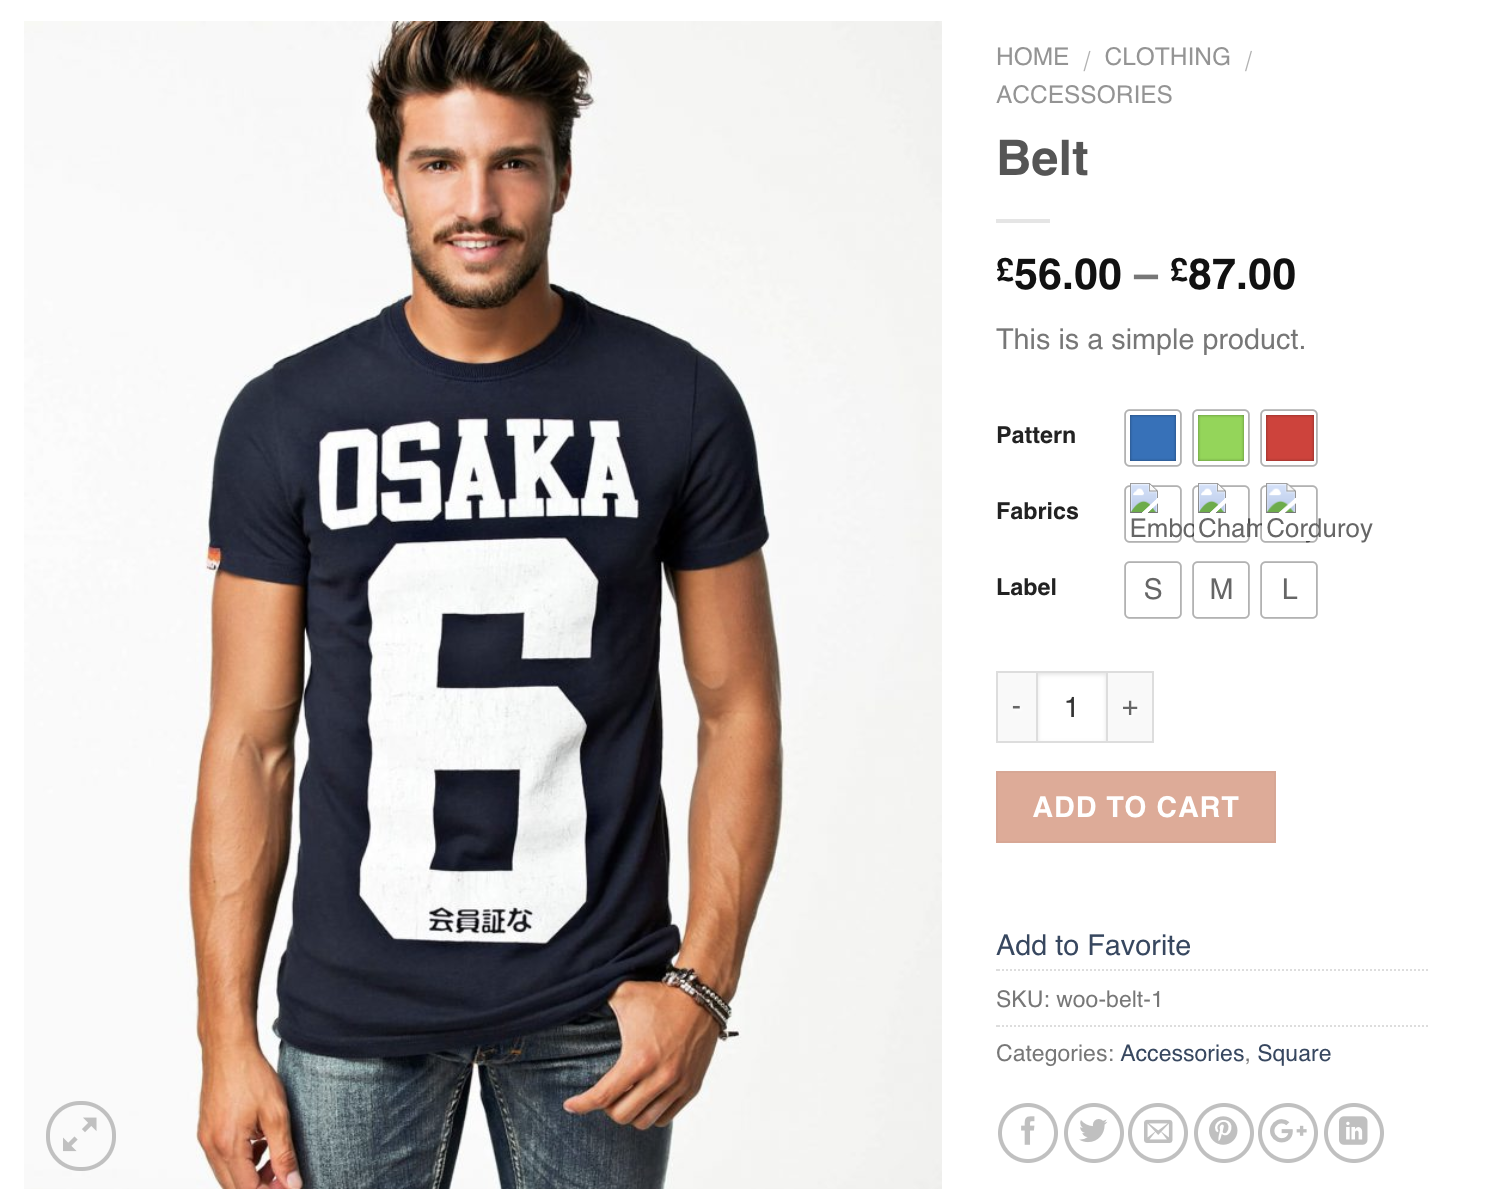
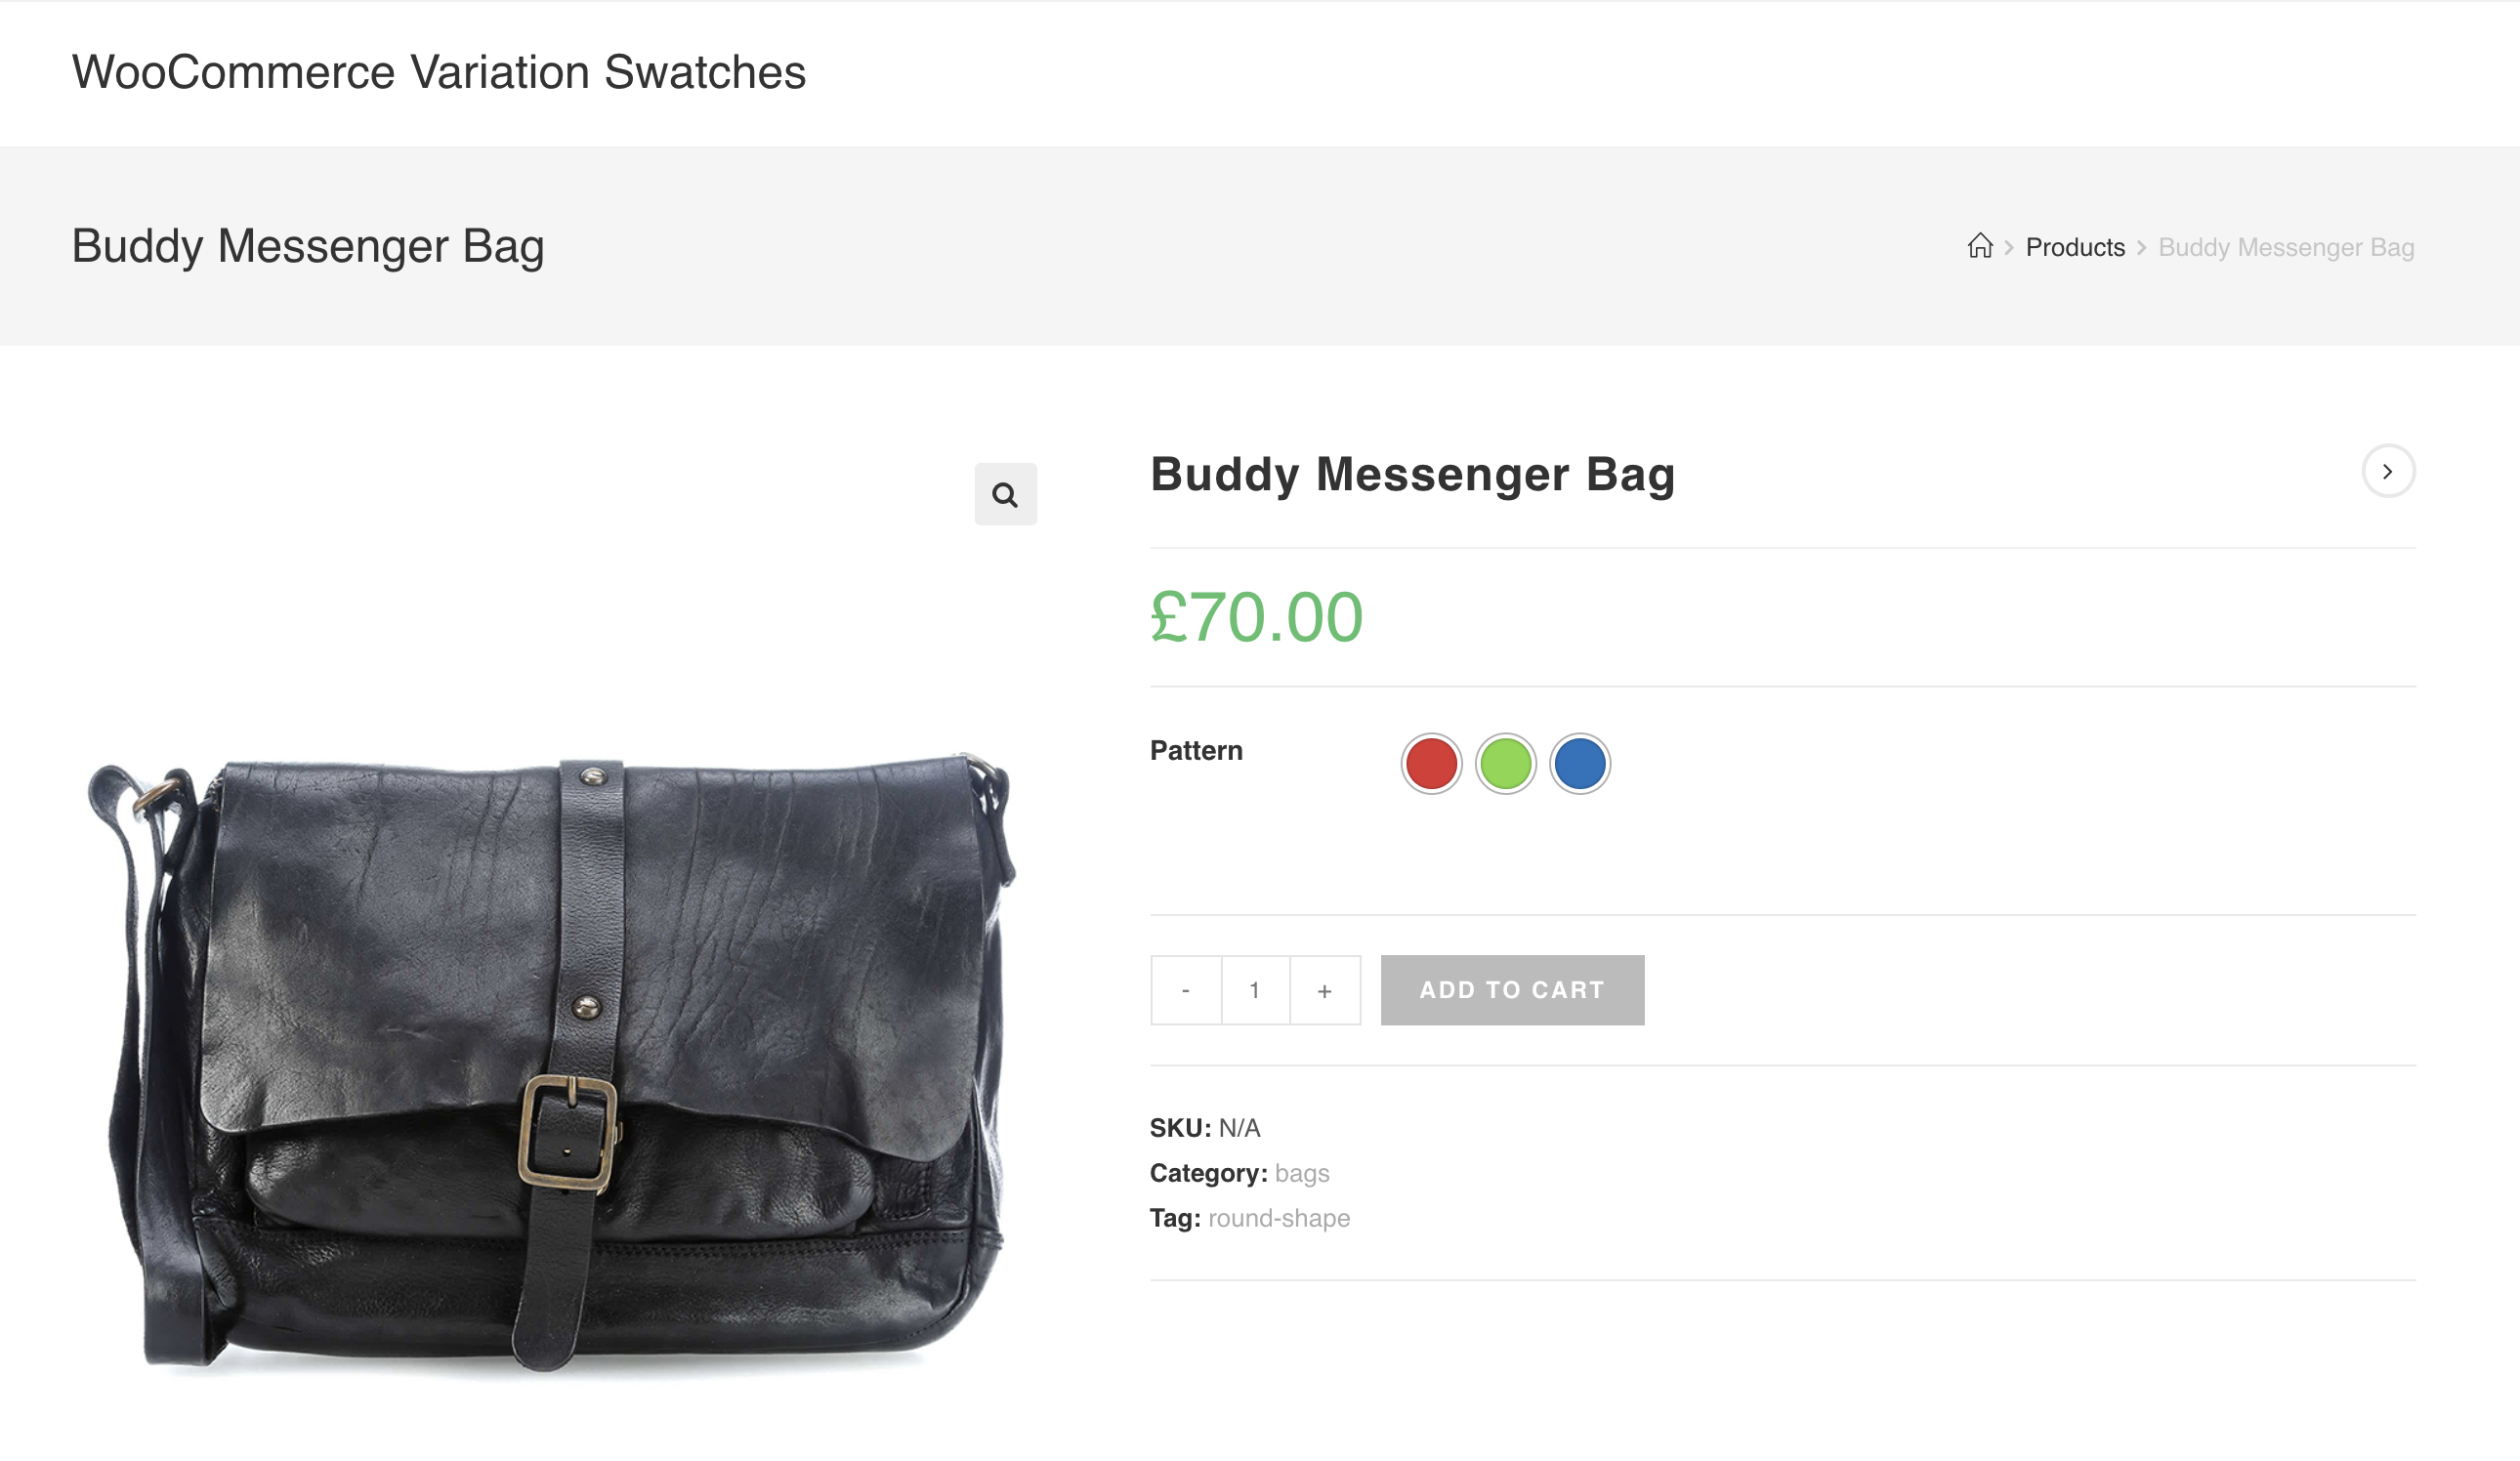
The front of the first product image would look like the following screenshot.
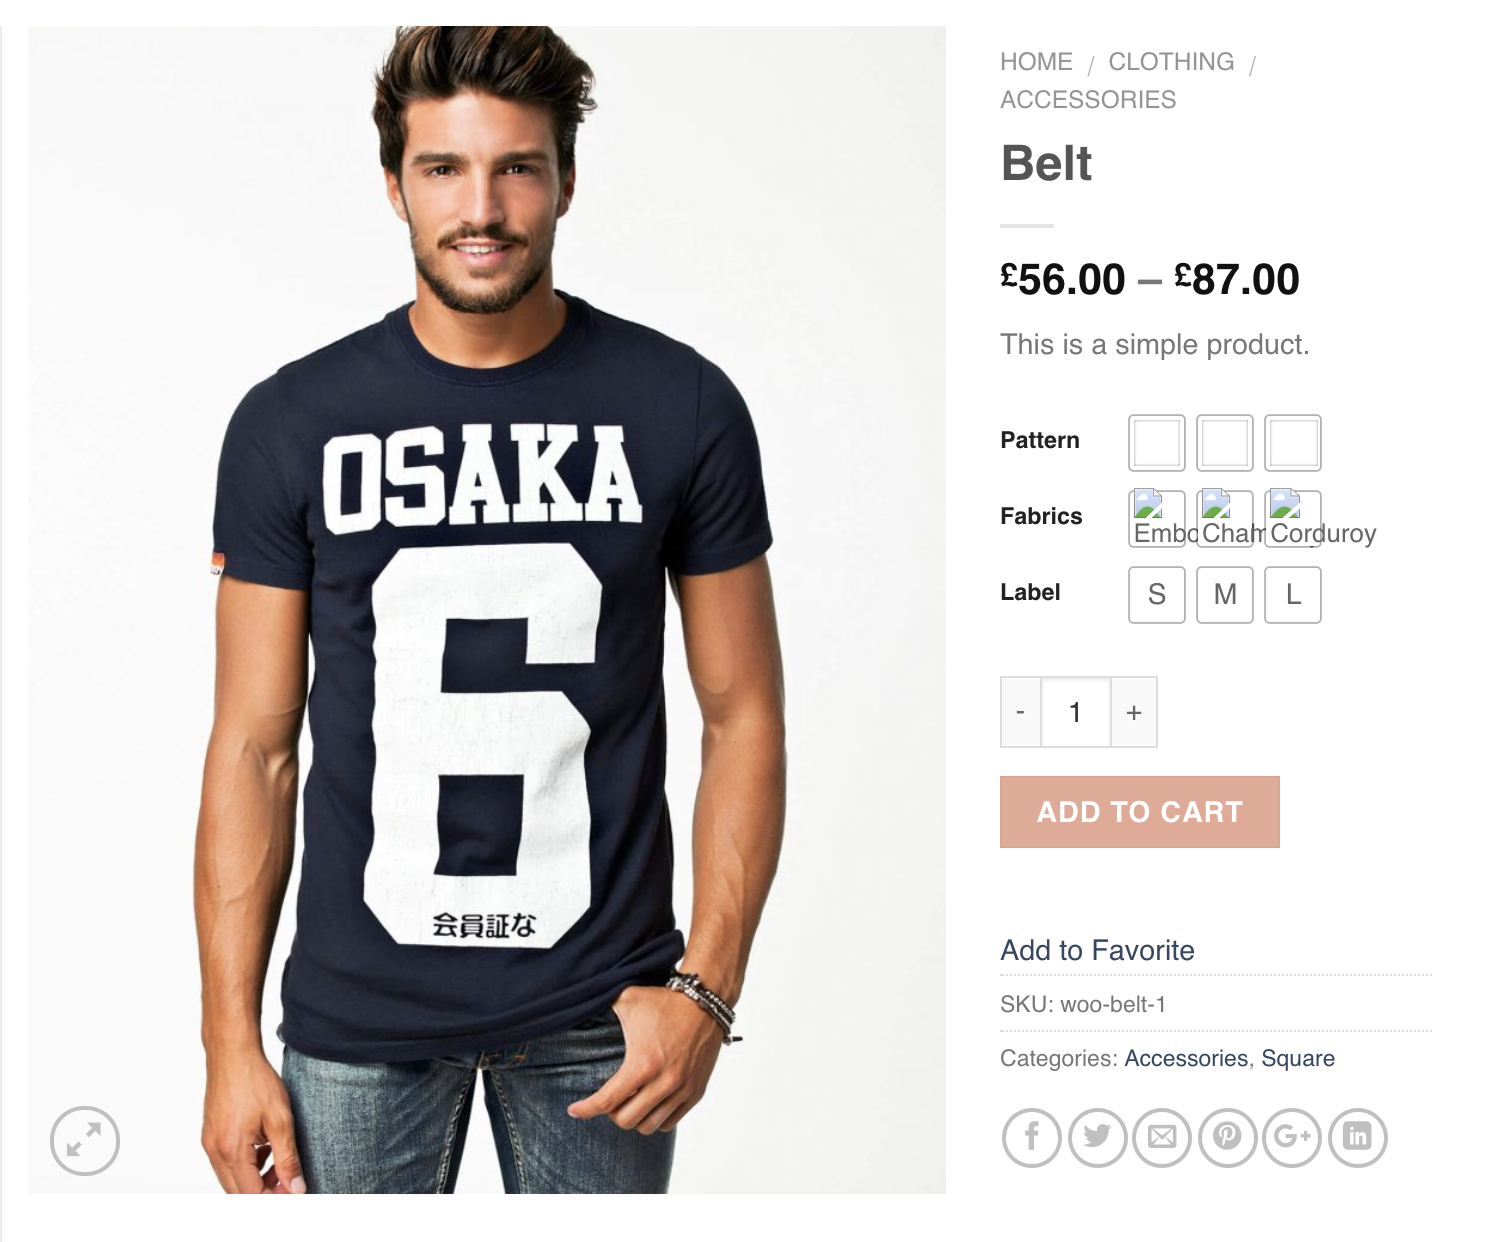
Label looks fine, but attributes for Pattern needs to define colors and attribute for Fabrics need to add swatch images.
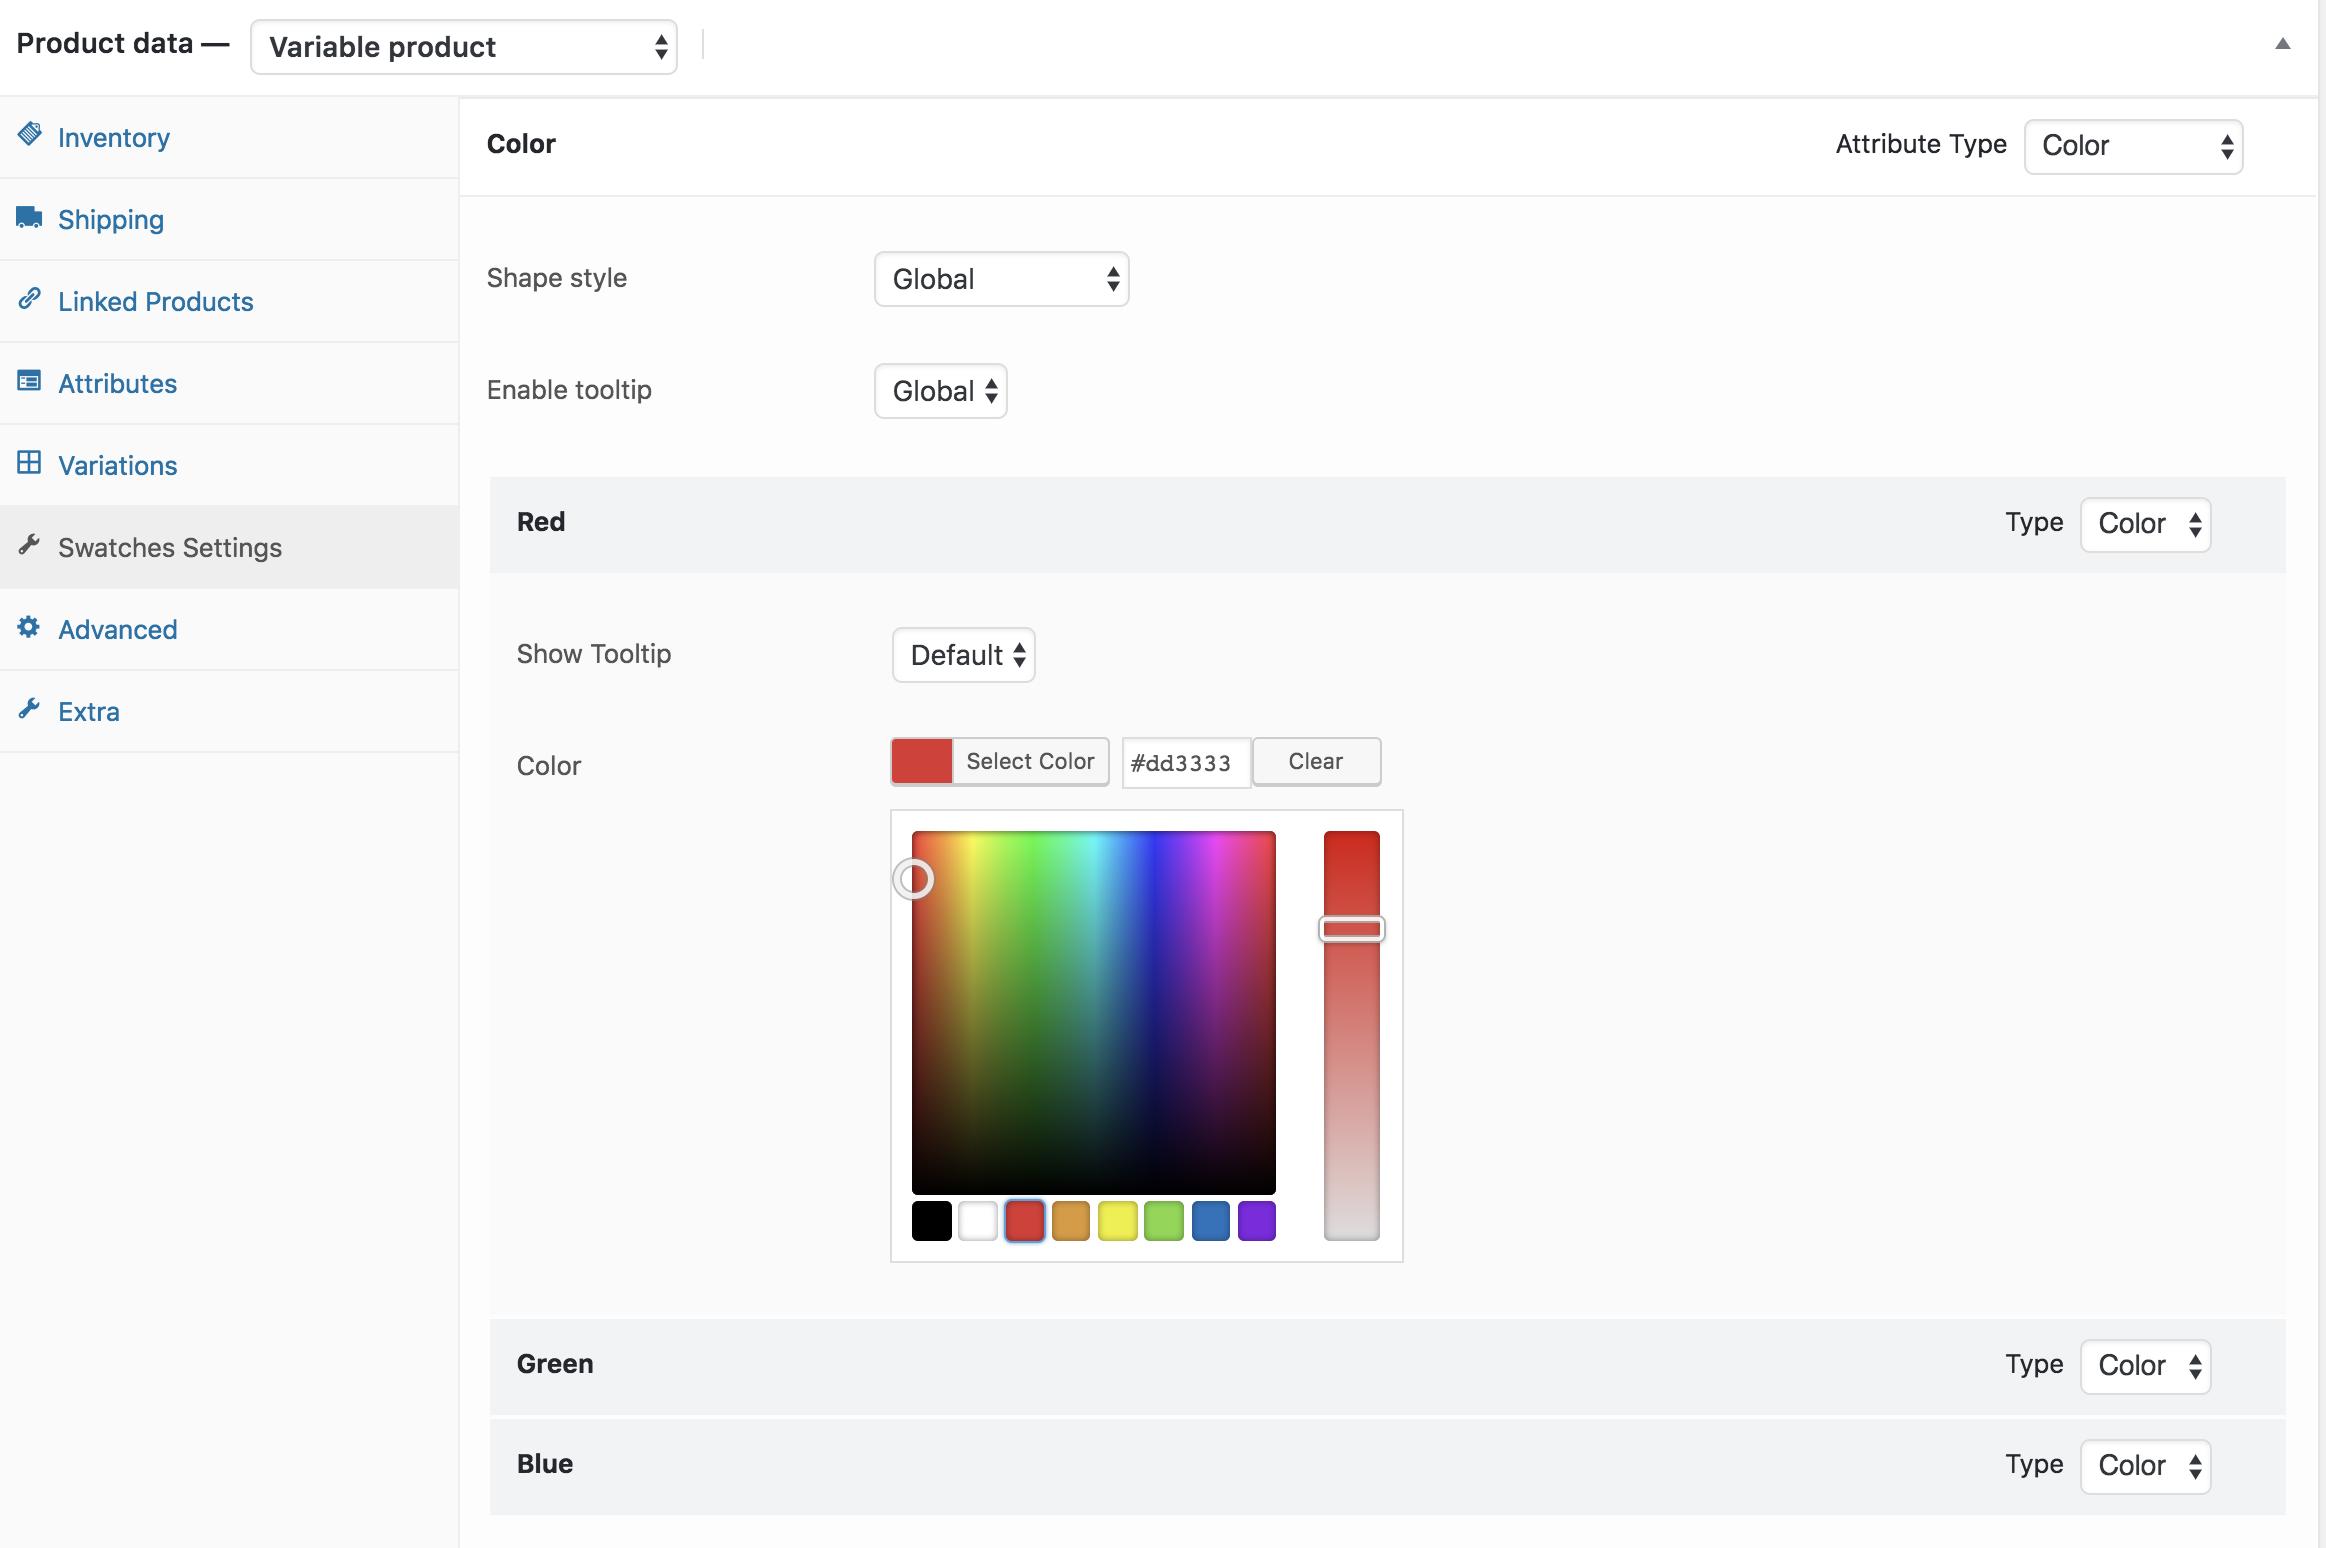
Step 02 Editing Variations:
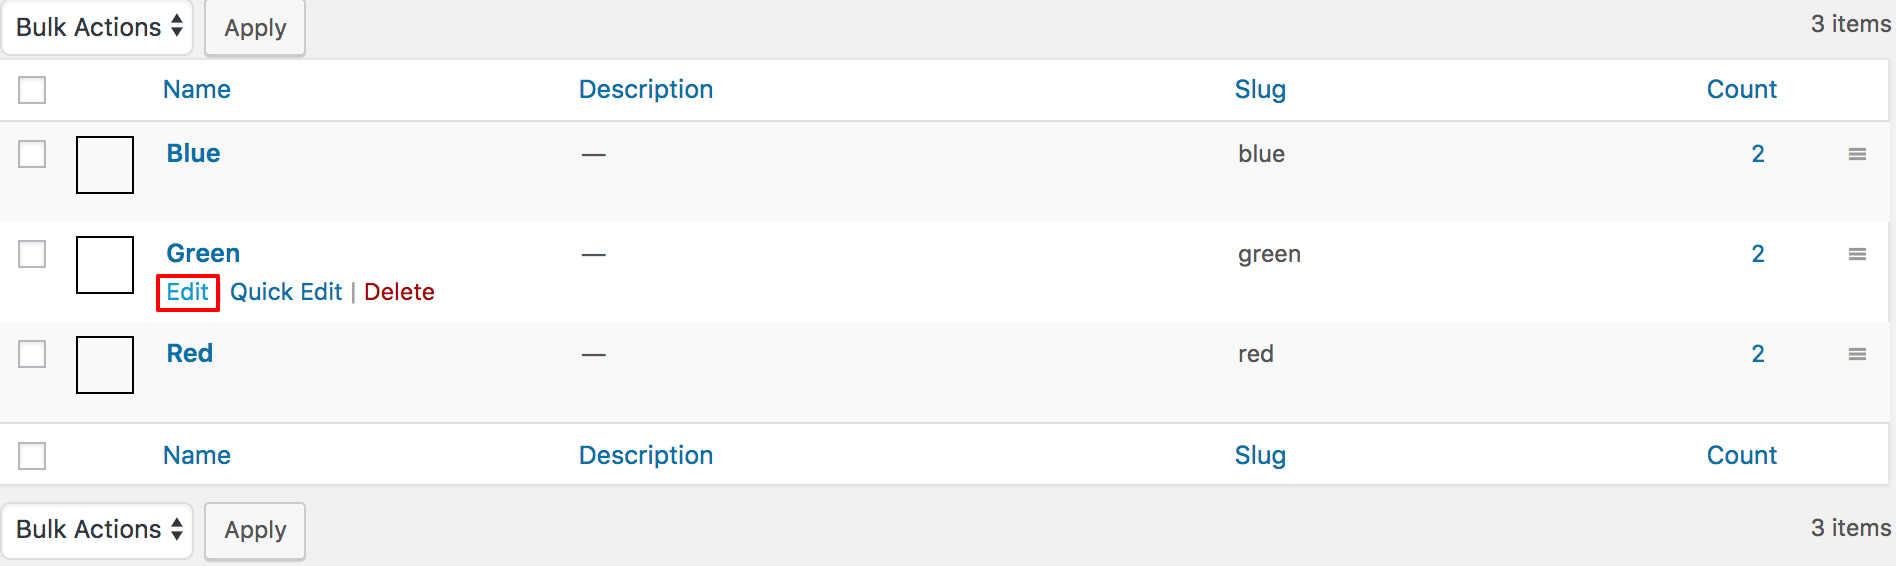
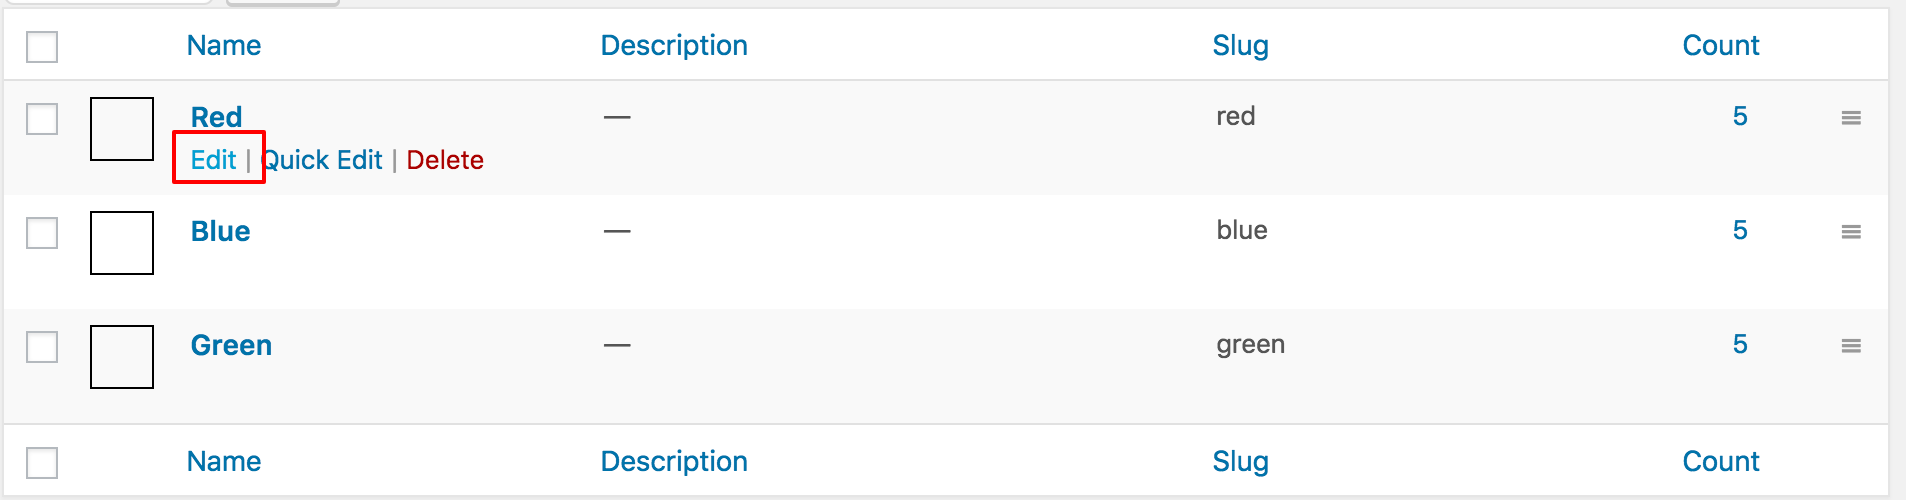
To define colors as variations inside the Pattern attribute. Head over to Products >> Attributes. Select Configure terms from Patterns attribute.

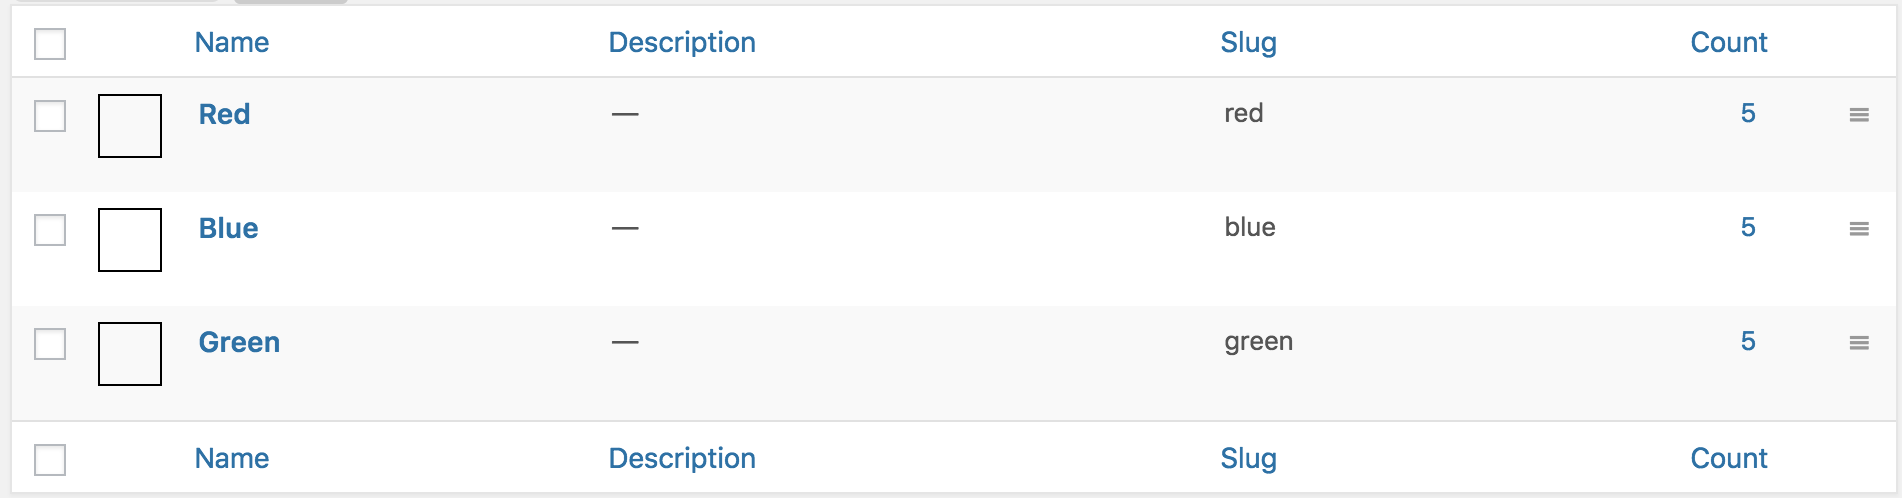
After selecting Configure terms, a list of attribute variations comes up. For Pattern, three variations: Blue, Green, and Red variations are list here. Edit each variation one by one to add variation color. For demonstration, select Edit link for Green attribute.
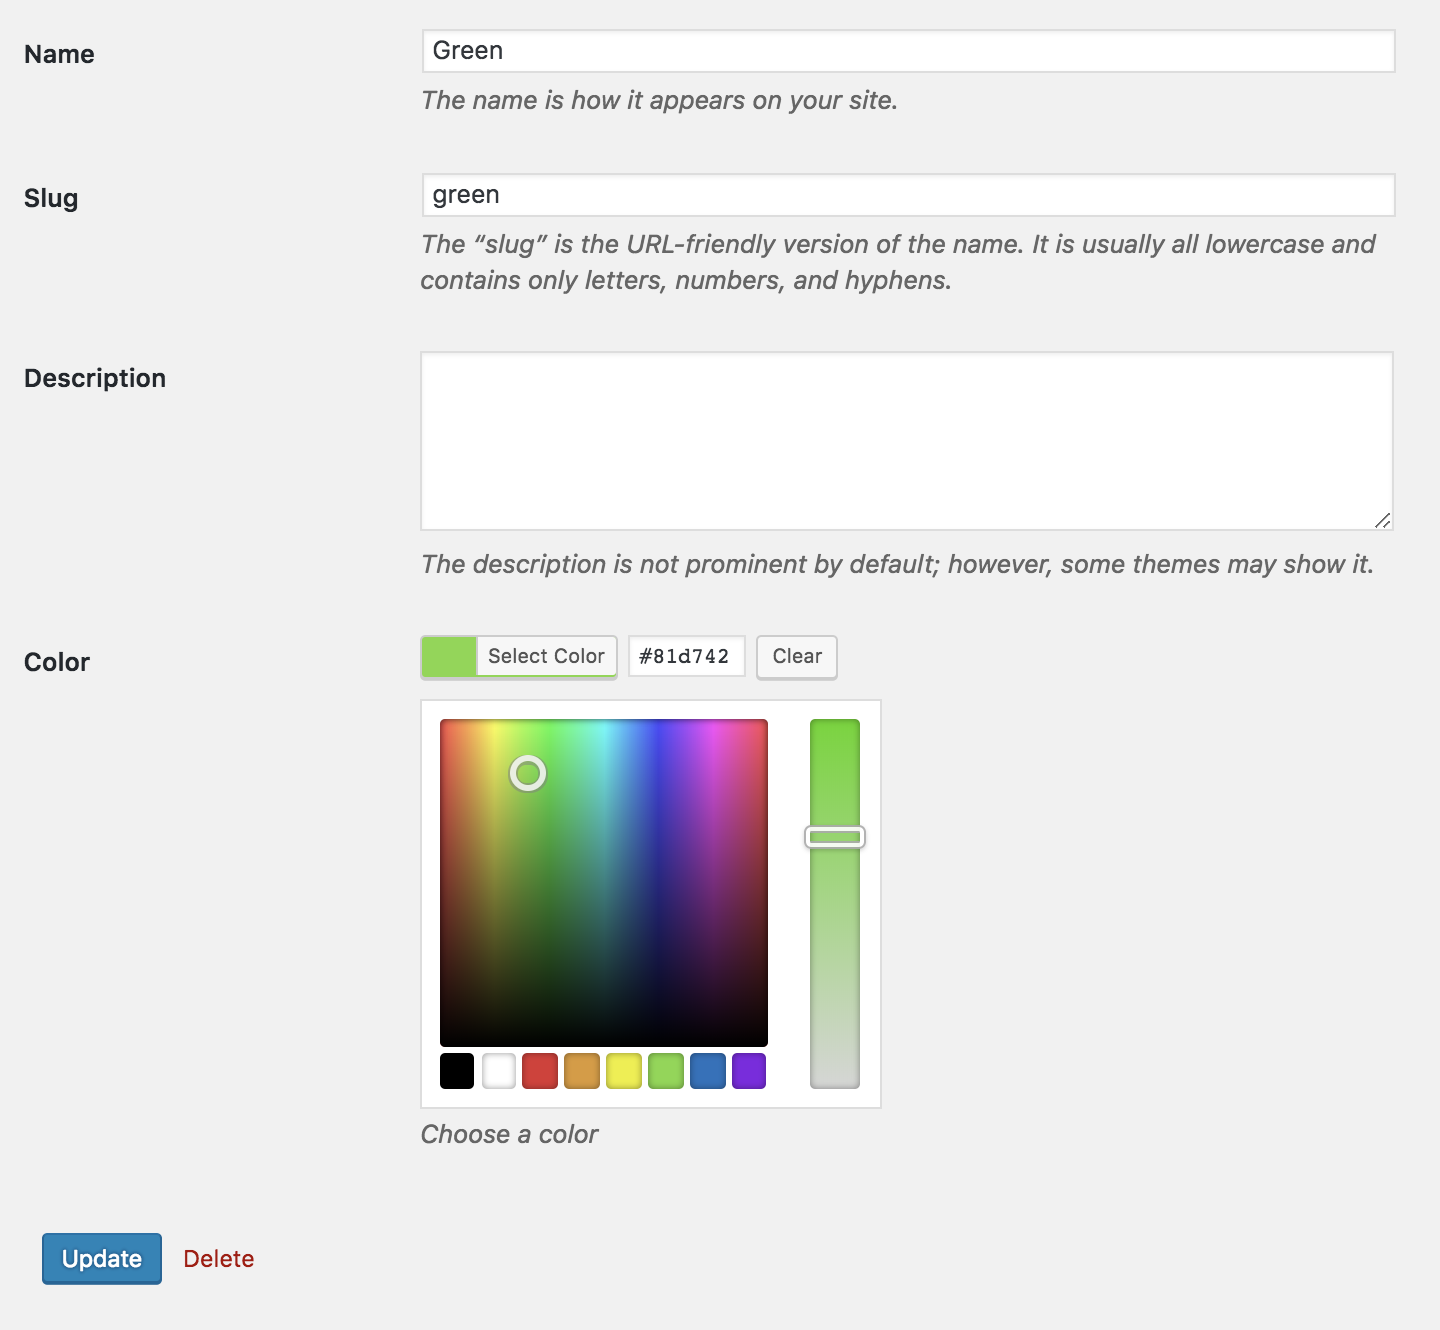
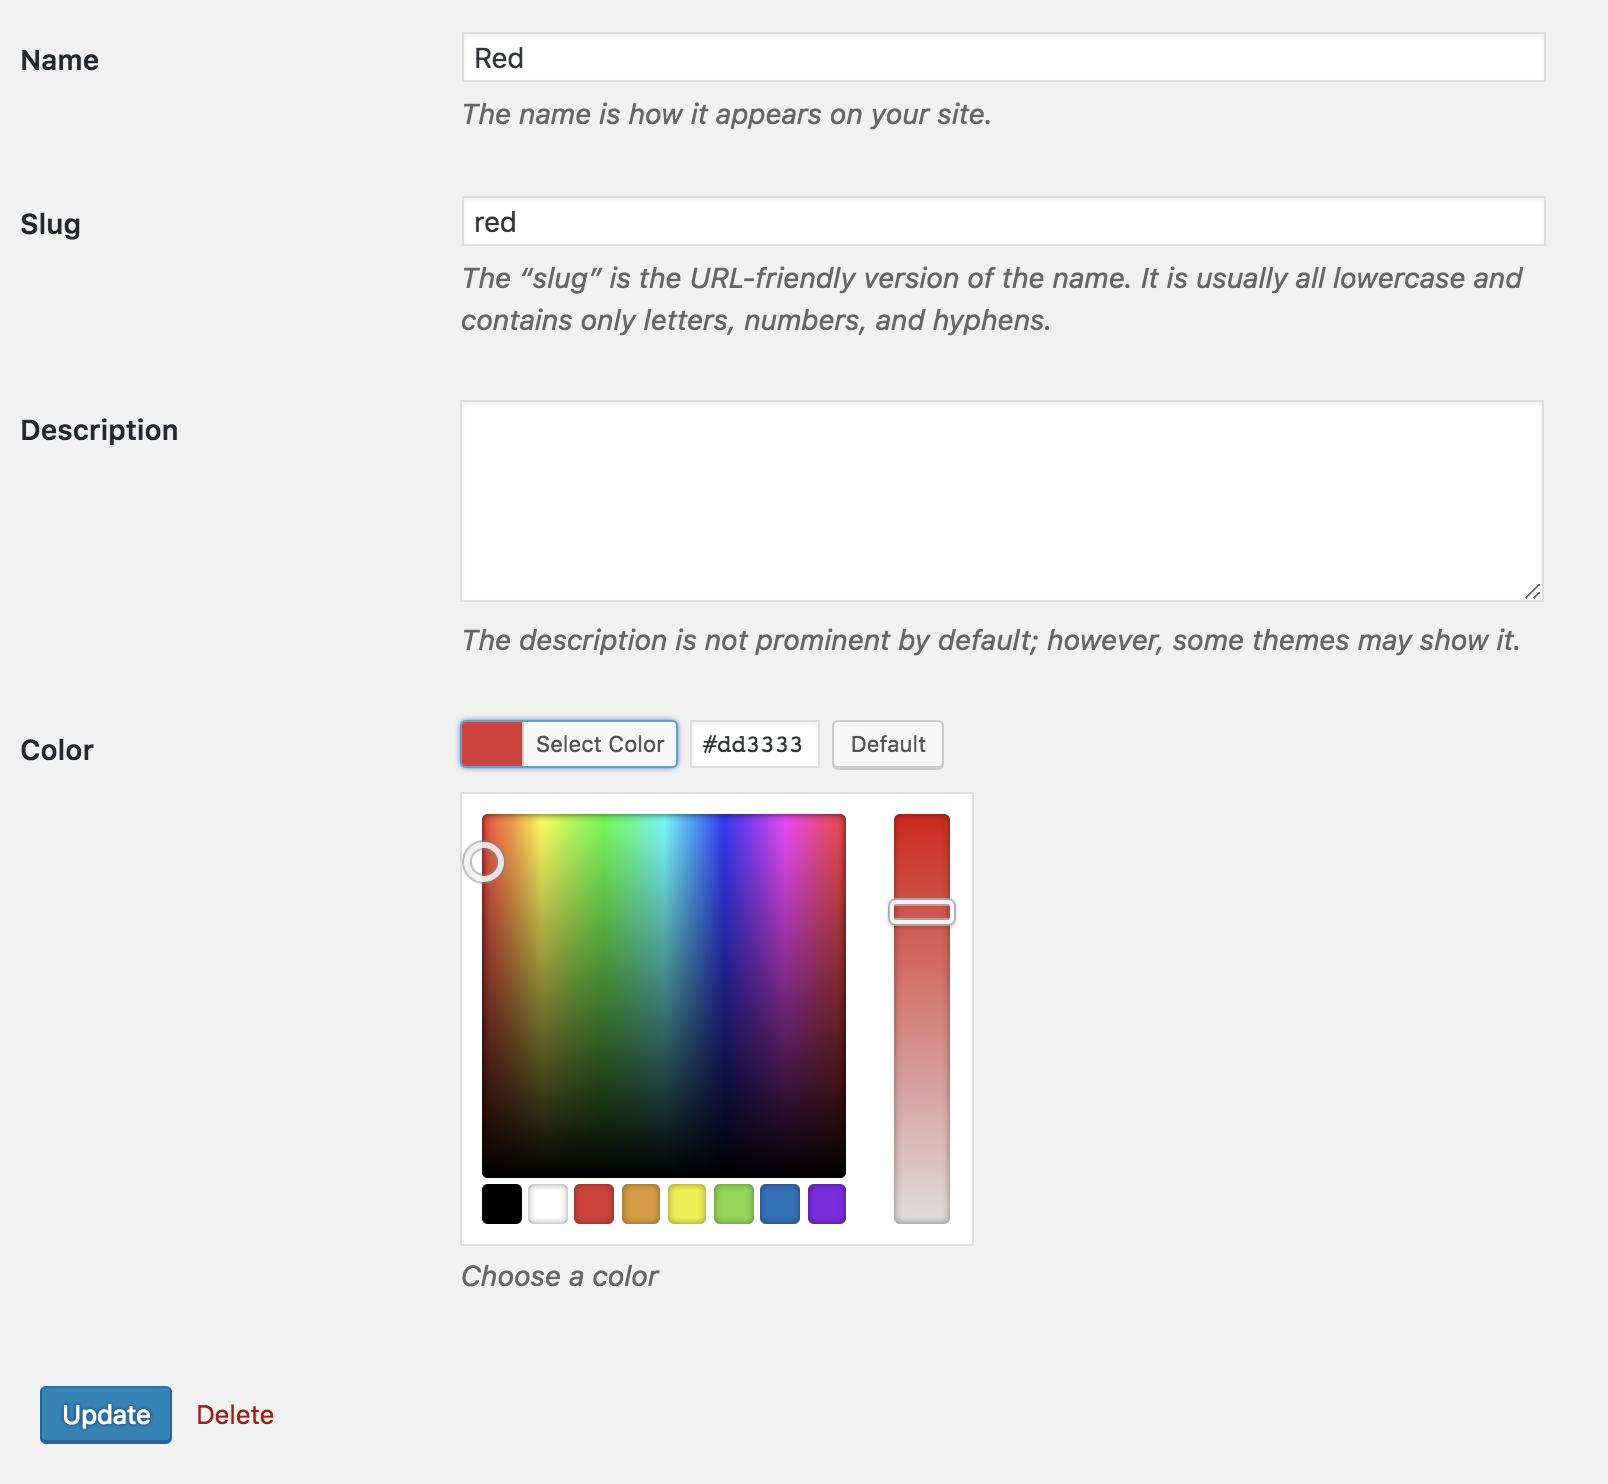
From variation edit panel. Select desired color from Colorpicker and update the changes pressing Update button.
When all variations colors are updated successfully, the frontend look likes the following.
After updating pattern attribute variations, edit Fabrics attribute selecting Configure terms like pattern attribute.
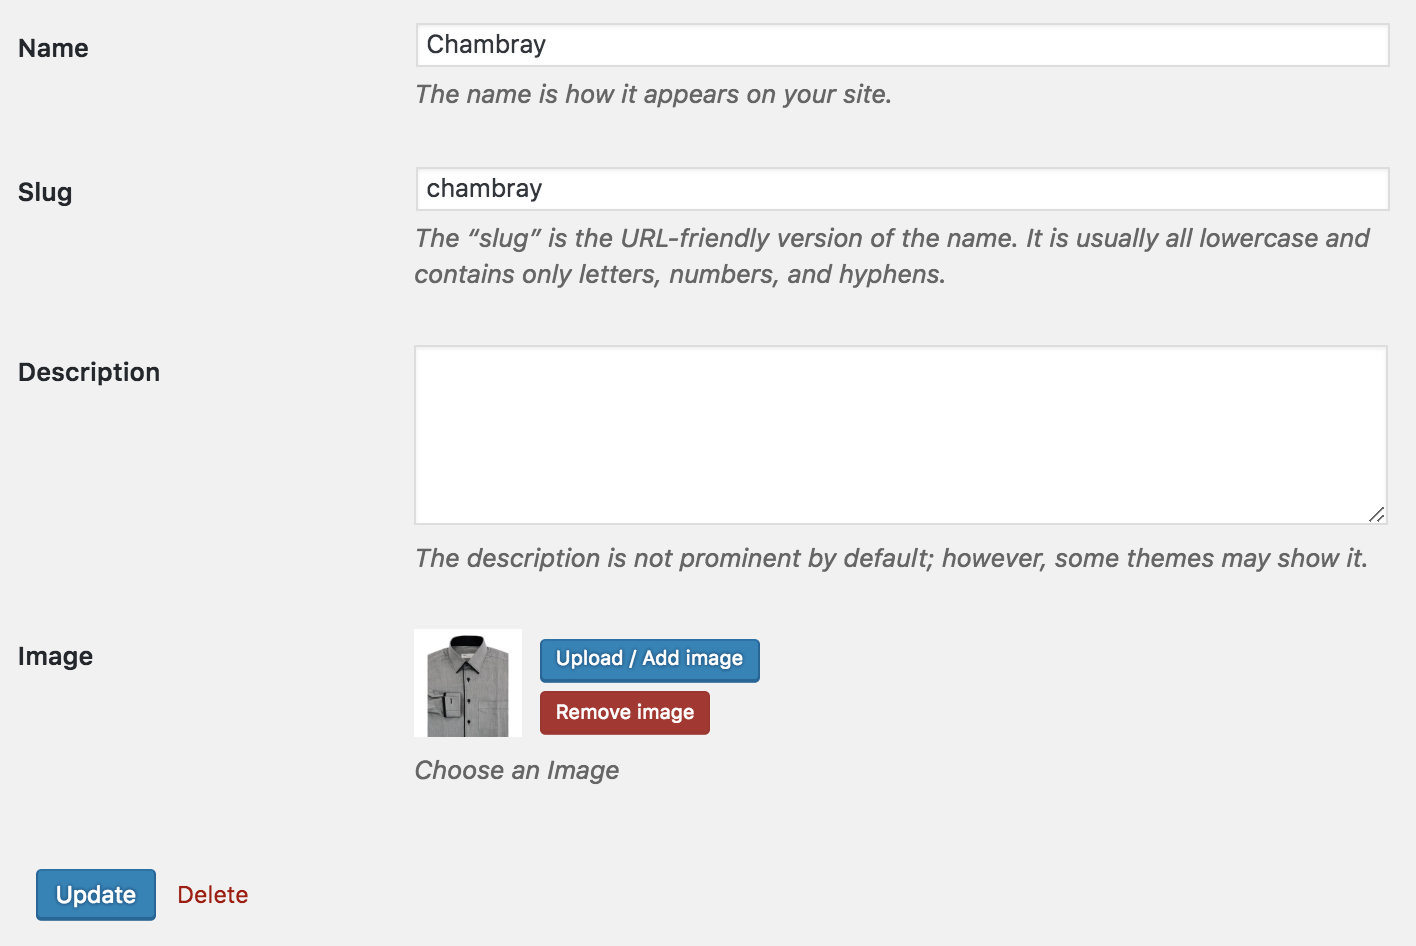
After pressing Configure terms a list of Fabrics term comes up like pattern. Edit each variation to insert variations image. For demonstration purpose, Edit link for Chambray attribute.
From variation edit panel. upload desired variation image from image and update the changes pressing Update button.
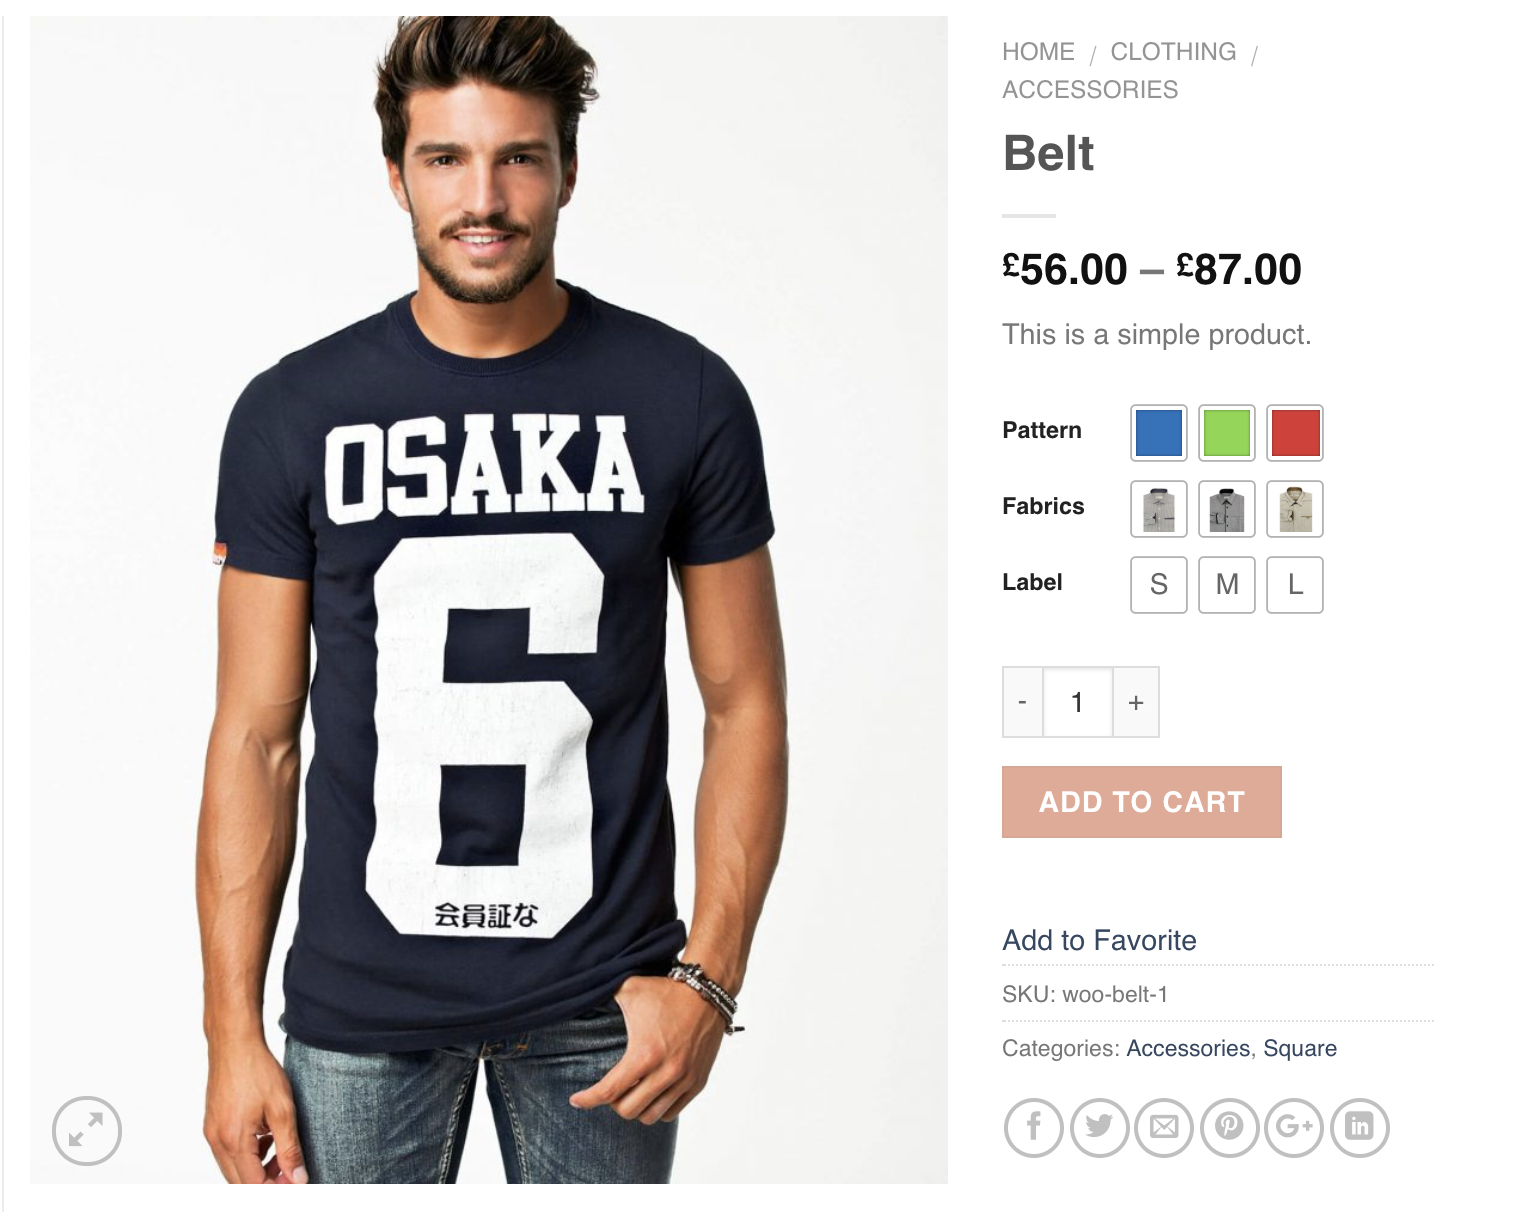
After updating images for all variations, the frontend would like this the following screenshot.
How To Enable Image Swatches Back To Top

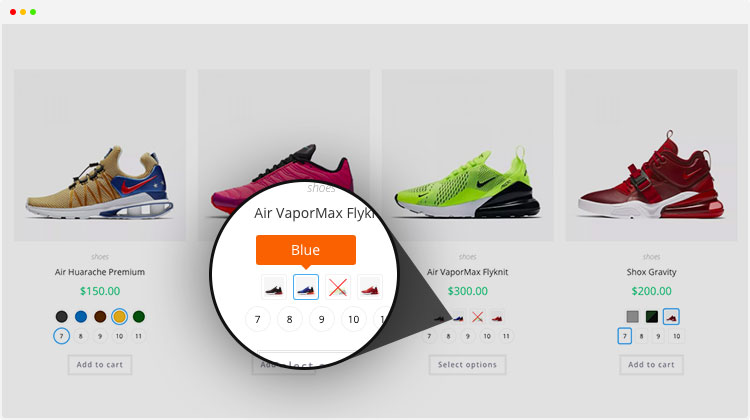
Frontend Preview
- How To Create To Image Variation Swatches For Global Attributes
- How To Create To Image Variation Swatches For Manual Attributes
- How To Create To Image Variation Swatches From Scratch
.
How To Create Image Variation Swatches For Globally Created Attributes
Video Tutorial
If you have variable product in your store and have attribute variation created globally in attributes >> products page. This tutorial is for you.
Step 01: Editing Attribute
Head to the Products >> Attributes. All existing global attributes are listed in the attribute list page section. After installing WooCommerce Variation Swatches plugin, it adds Type field. By default it would show Select under Type title.

As WooCommerce Variation Swatches Plugin comes with 4 attribute types: Color, Image, Button and Radio. You can set any of attribute type for your desired attribute.
For demonstration purpose, Image attribute has been created. We'll add image attribute type for Image attribute.
To set image attribute type to Image attribute, click on Edit.

After selecting button, it will open attribute editing panel. Select Image Type from the type dropdown.
When attribute type selection is completed, get back to the attribute list page. The Attribute list would look like the following image. Now Image Attribute is showing Image type instead of default Select type.

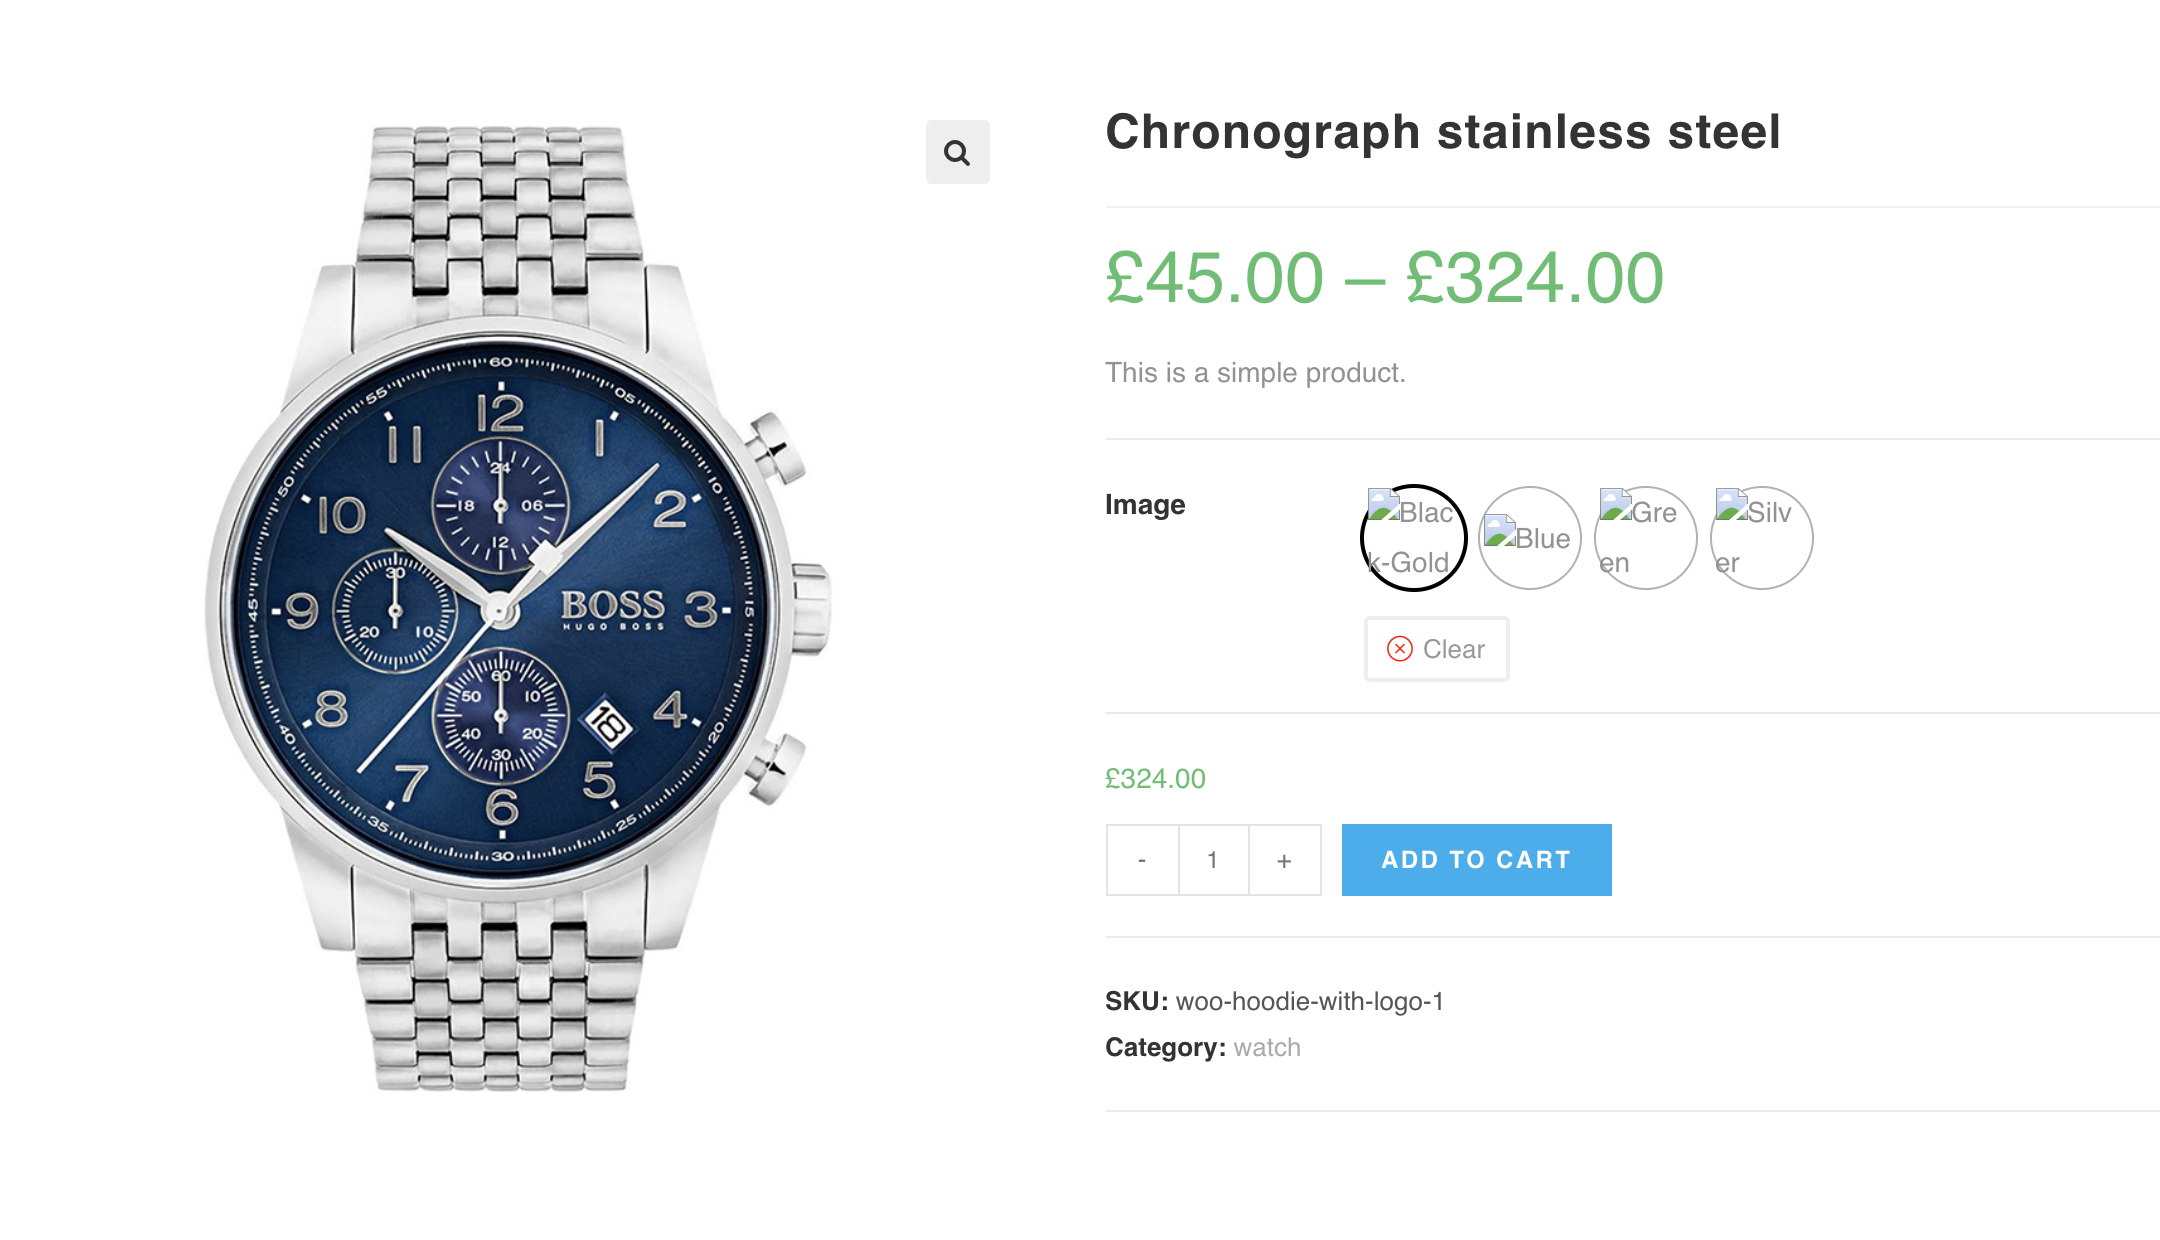
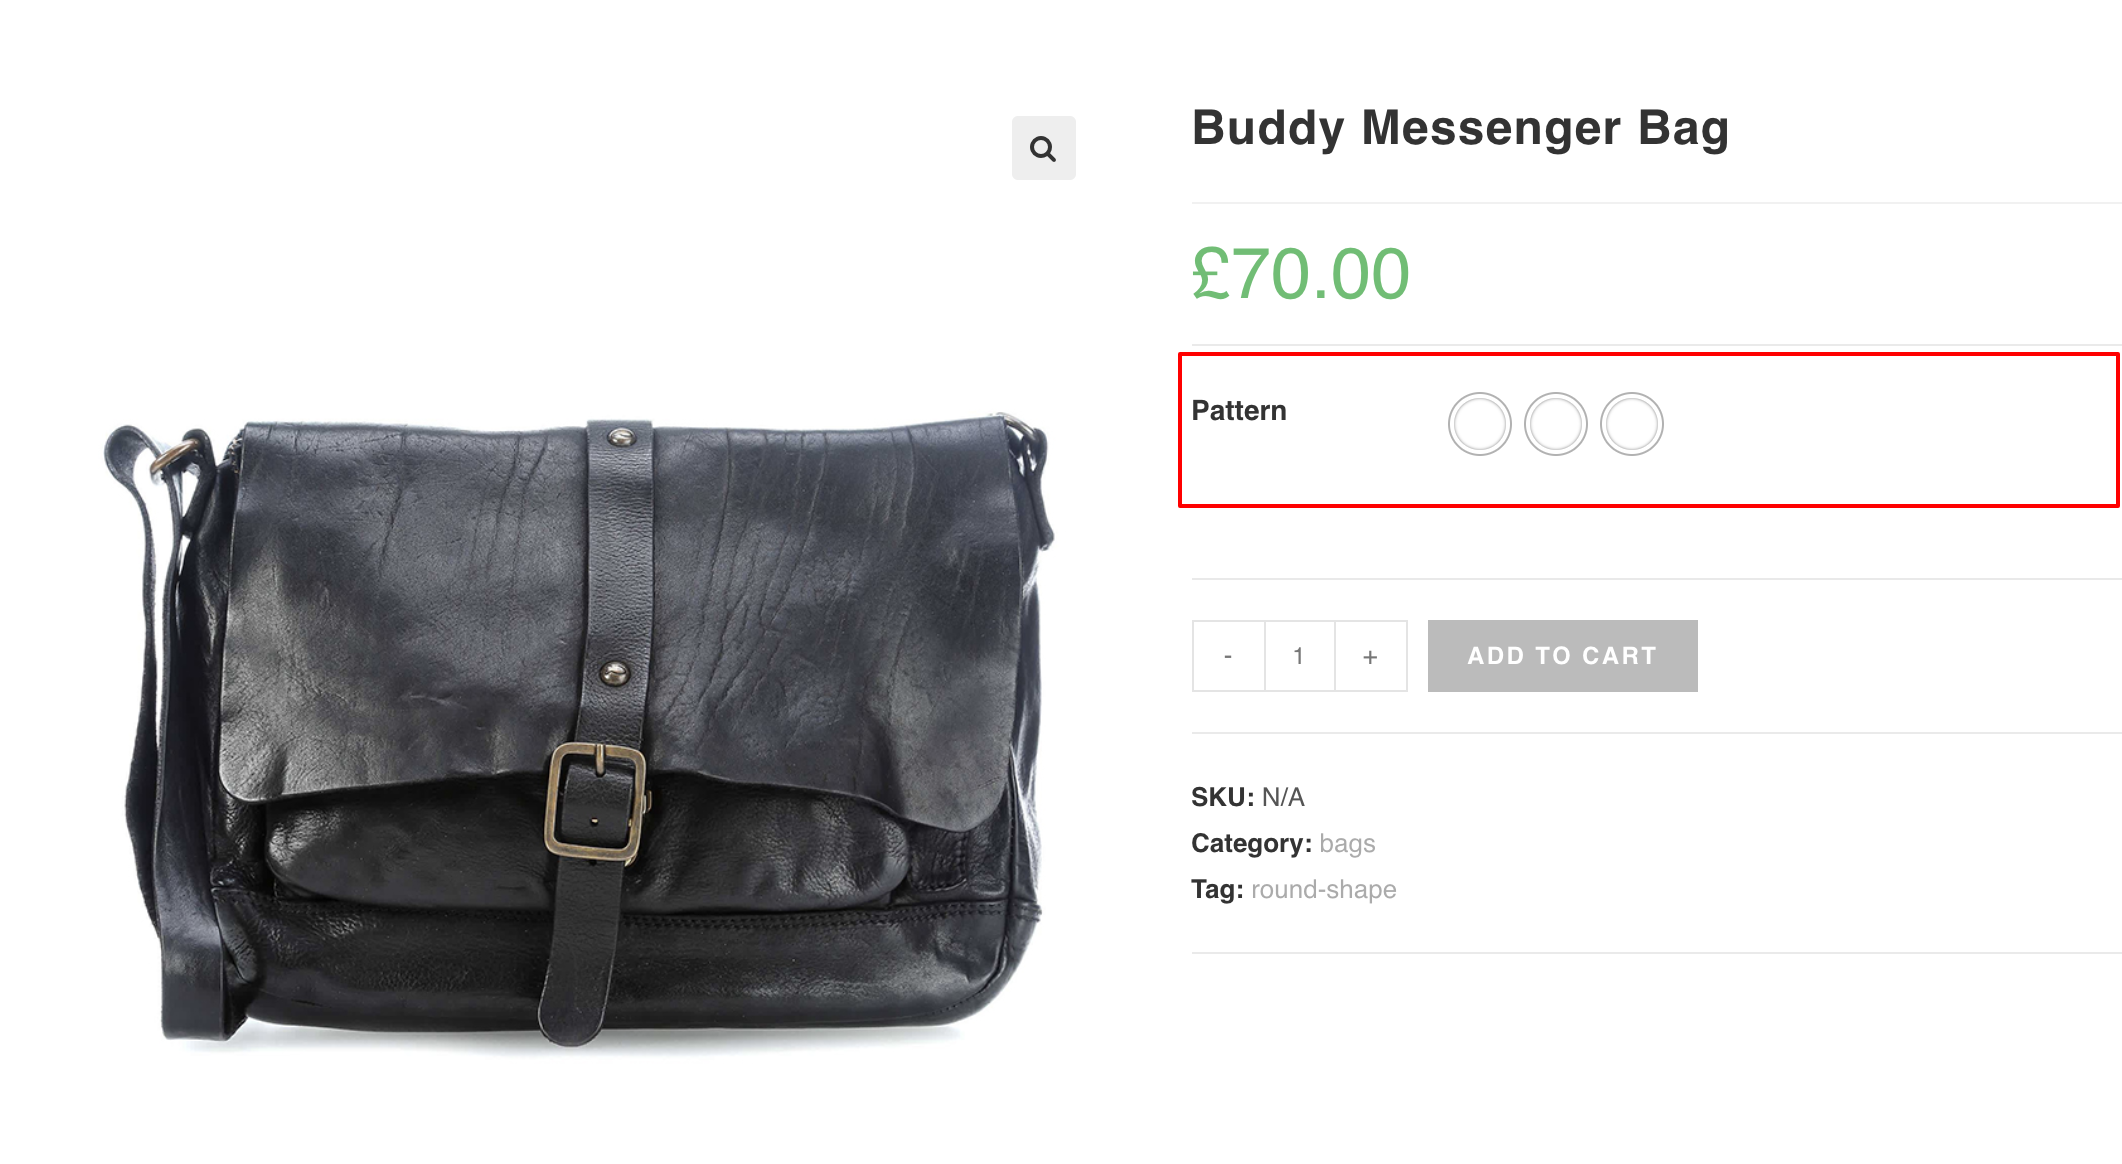
After selecting attribute type, the frontend of the product would look like the following screenshot. Don't be panic, if you find your attribute variations weird. It happens because you haven't set any image for variations yet.
Step 02: Editing Variations
To define image as variations inside the image attribute. Head over to Products >> Attributes. Select Configure terms from image attribute.

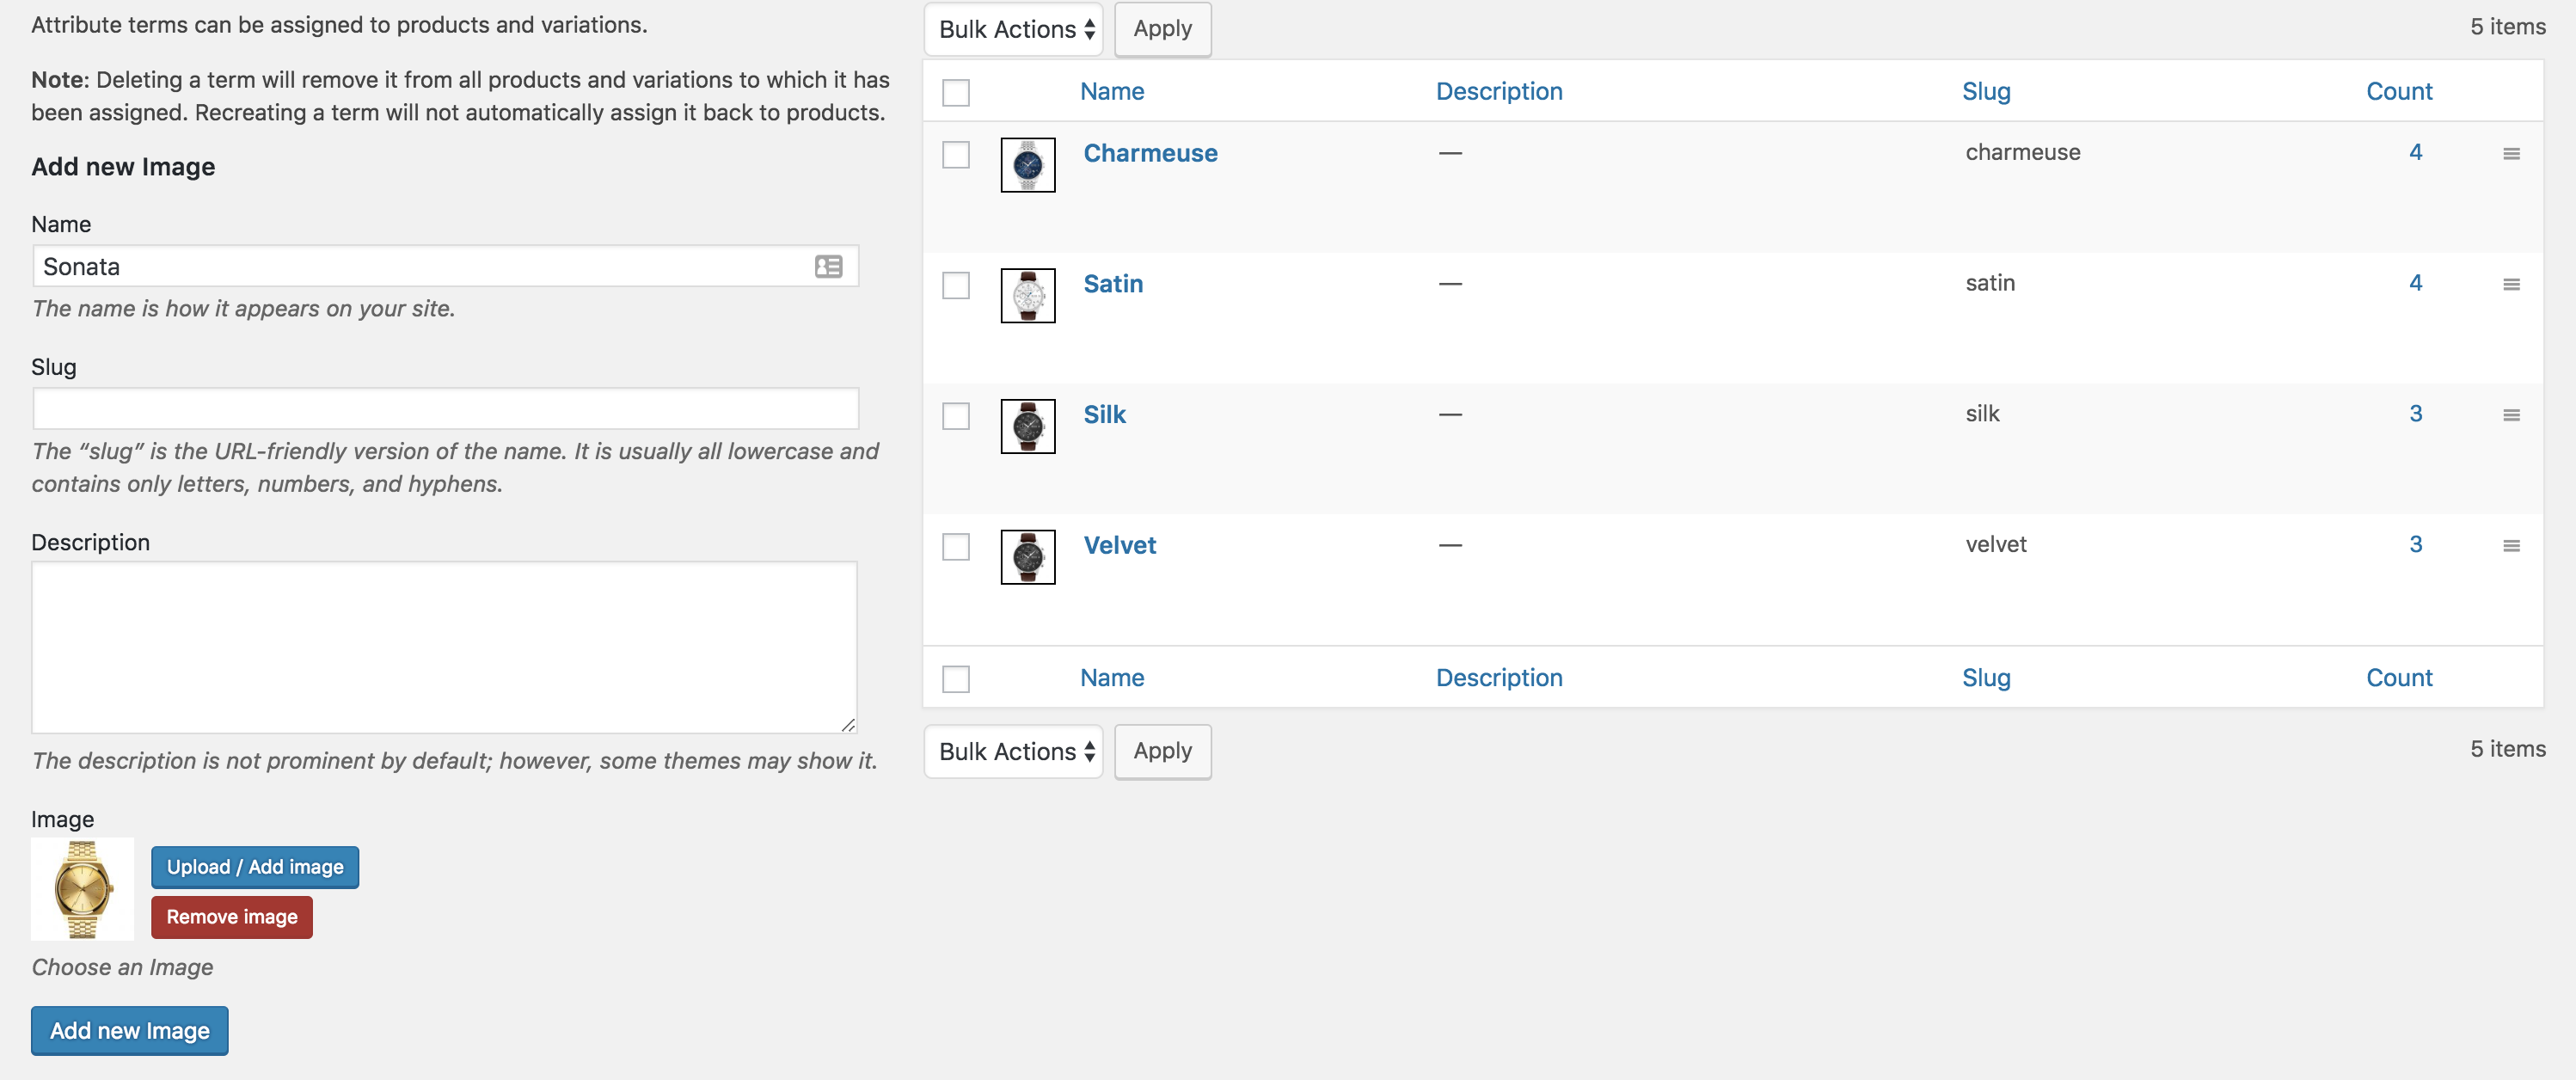
After selecting Configure terms, a list of attribute variations comes up. For Image attribute, three variations: Charmeuse, Satin, Silk, Velvet and Wool variations are listed for me. As those variation have no image defined, they look like the following screenshot.

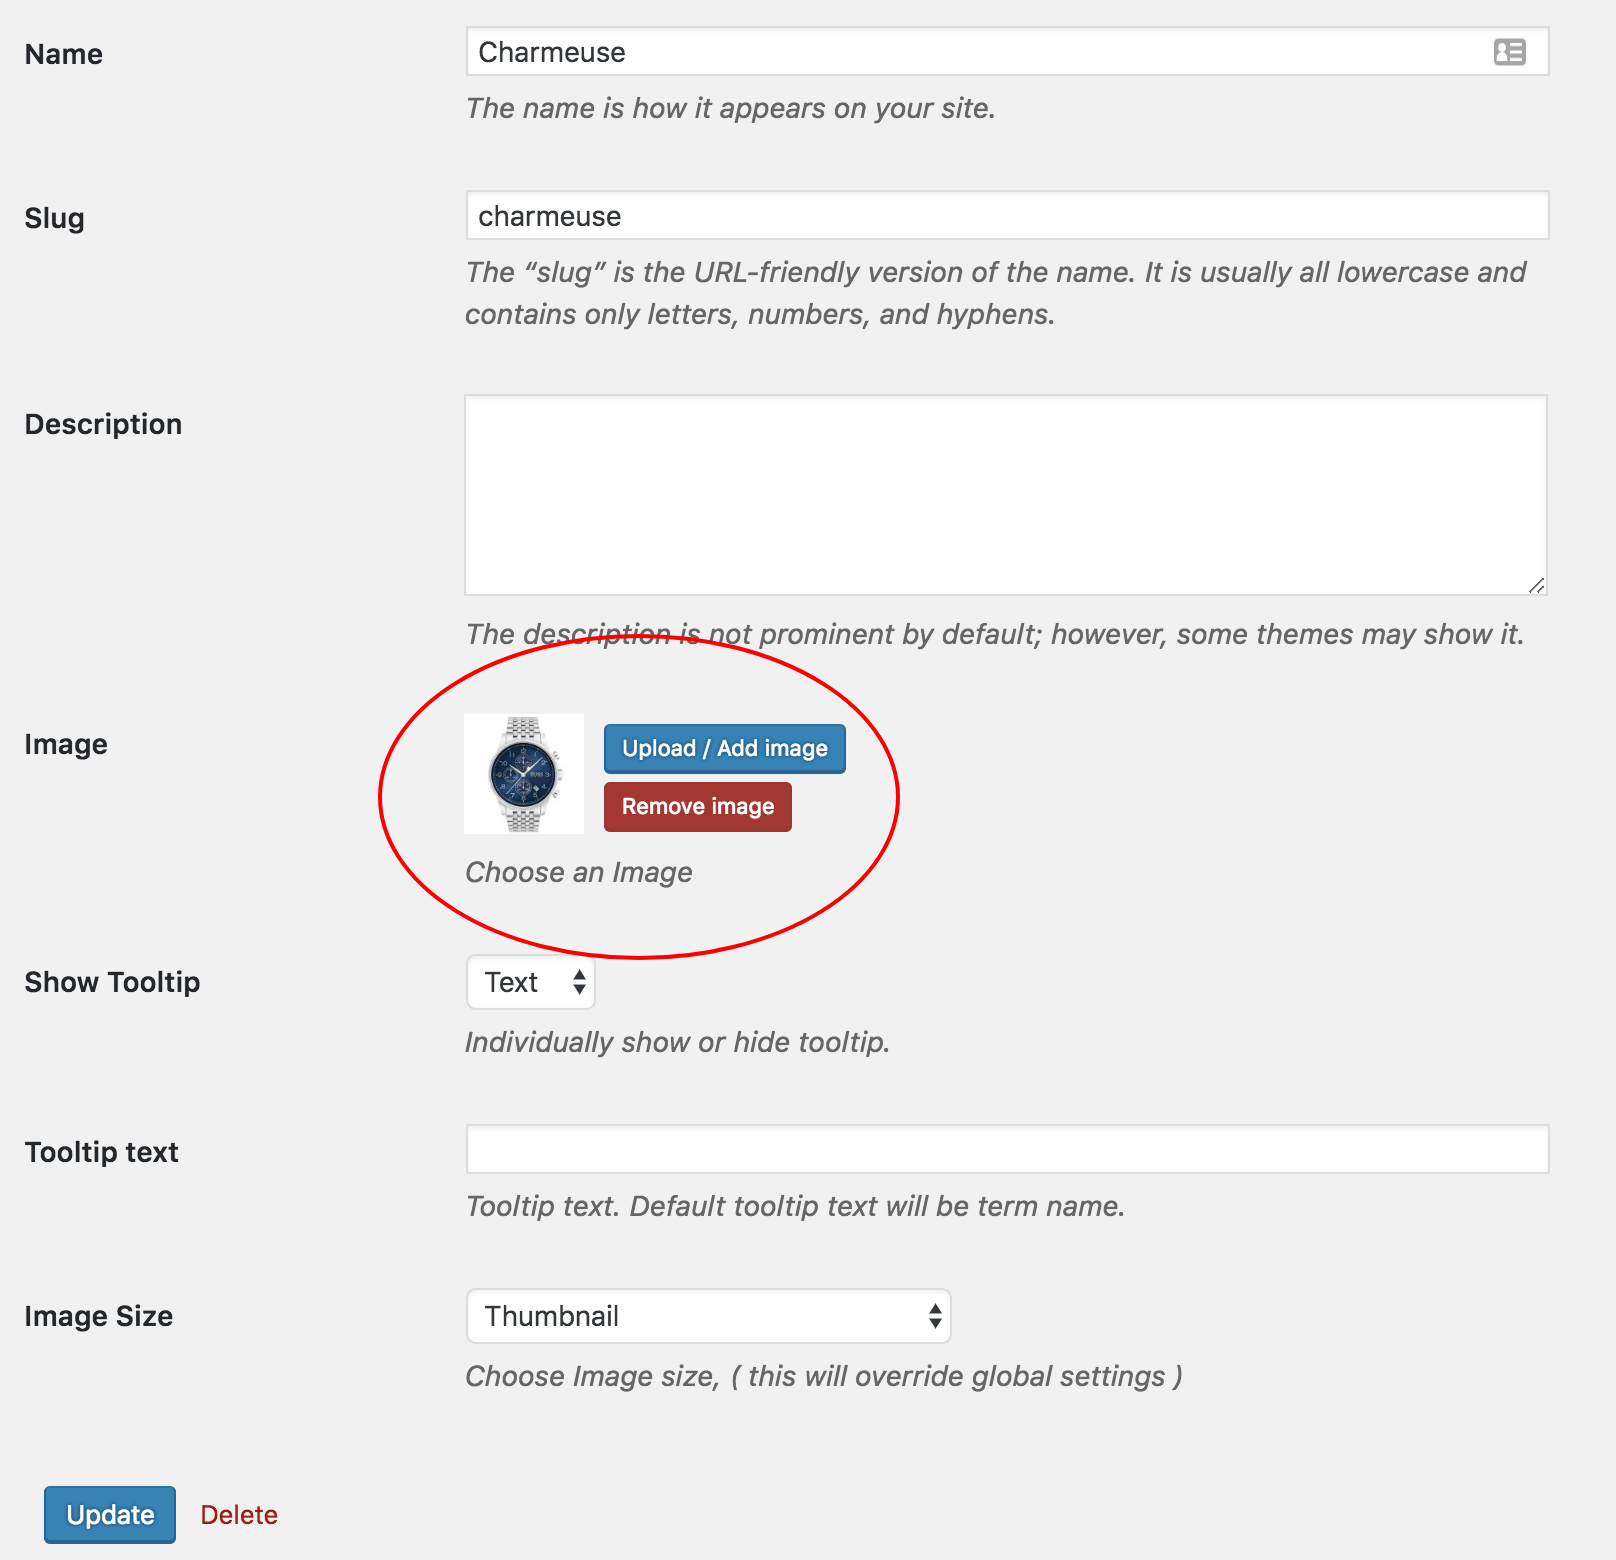
Edit each variation one by one to add variation image. For demonstration, I am going to select Edit link for Charmeuse variation.

From variation edit panel. Select desired image press Upload/Add Image button and the update the changes pressing the Update button. For my red variation.
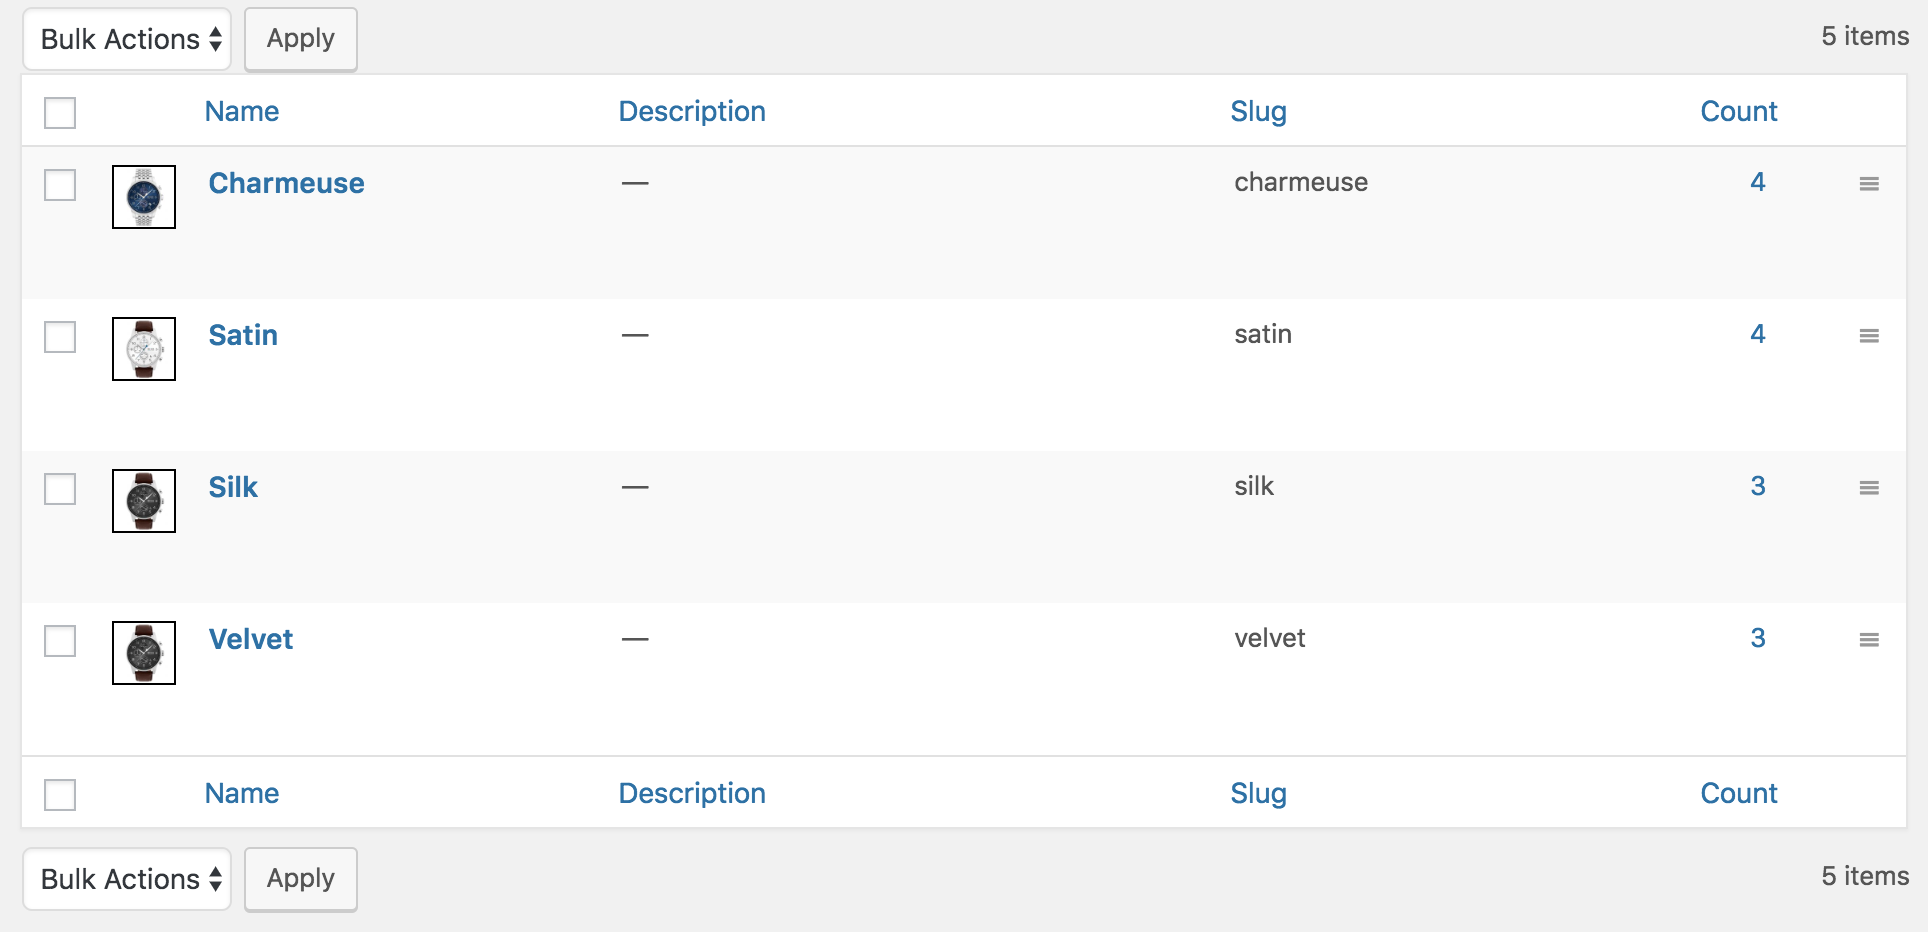
After adding image for entire variations, my variation list page looks like the following screenshot.
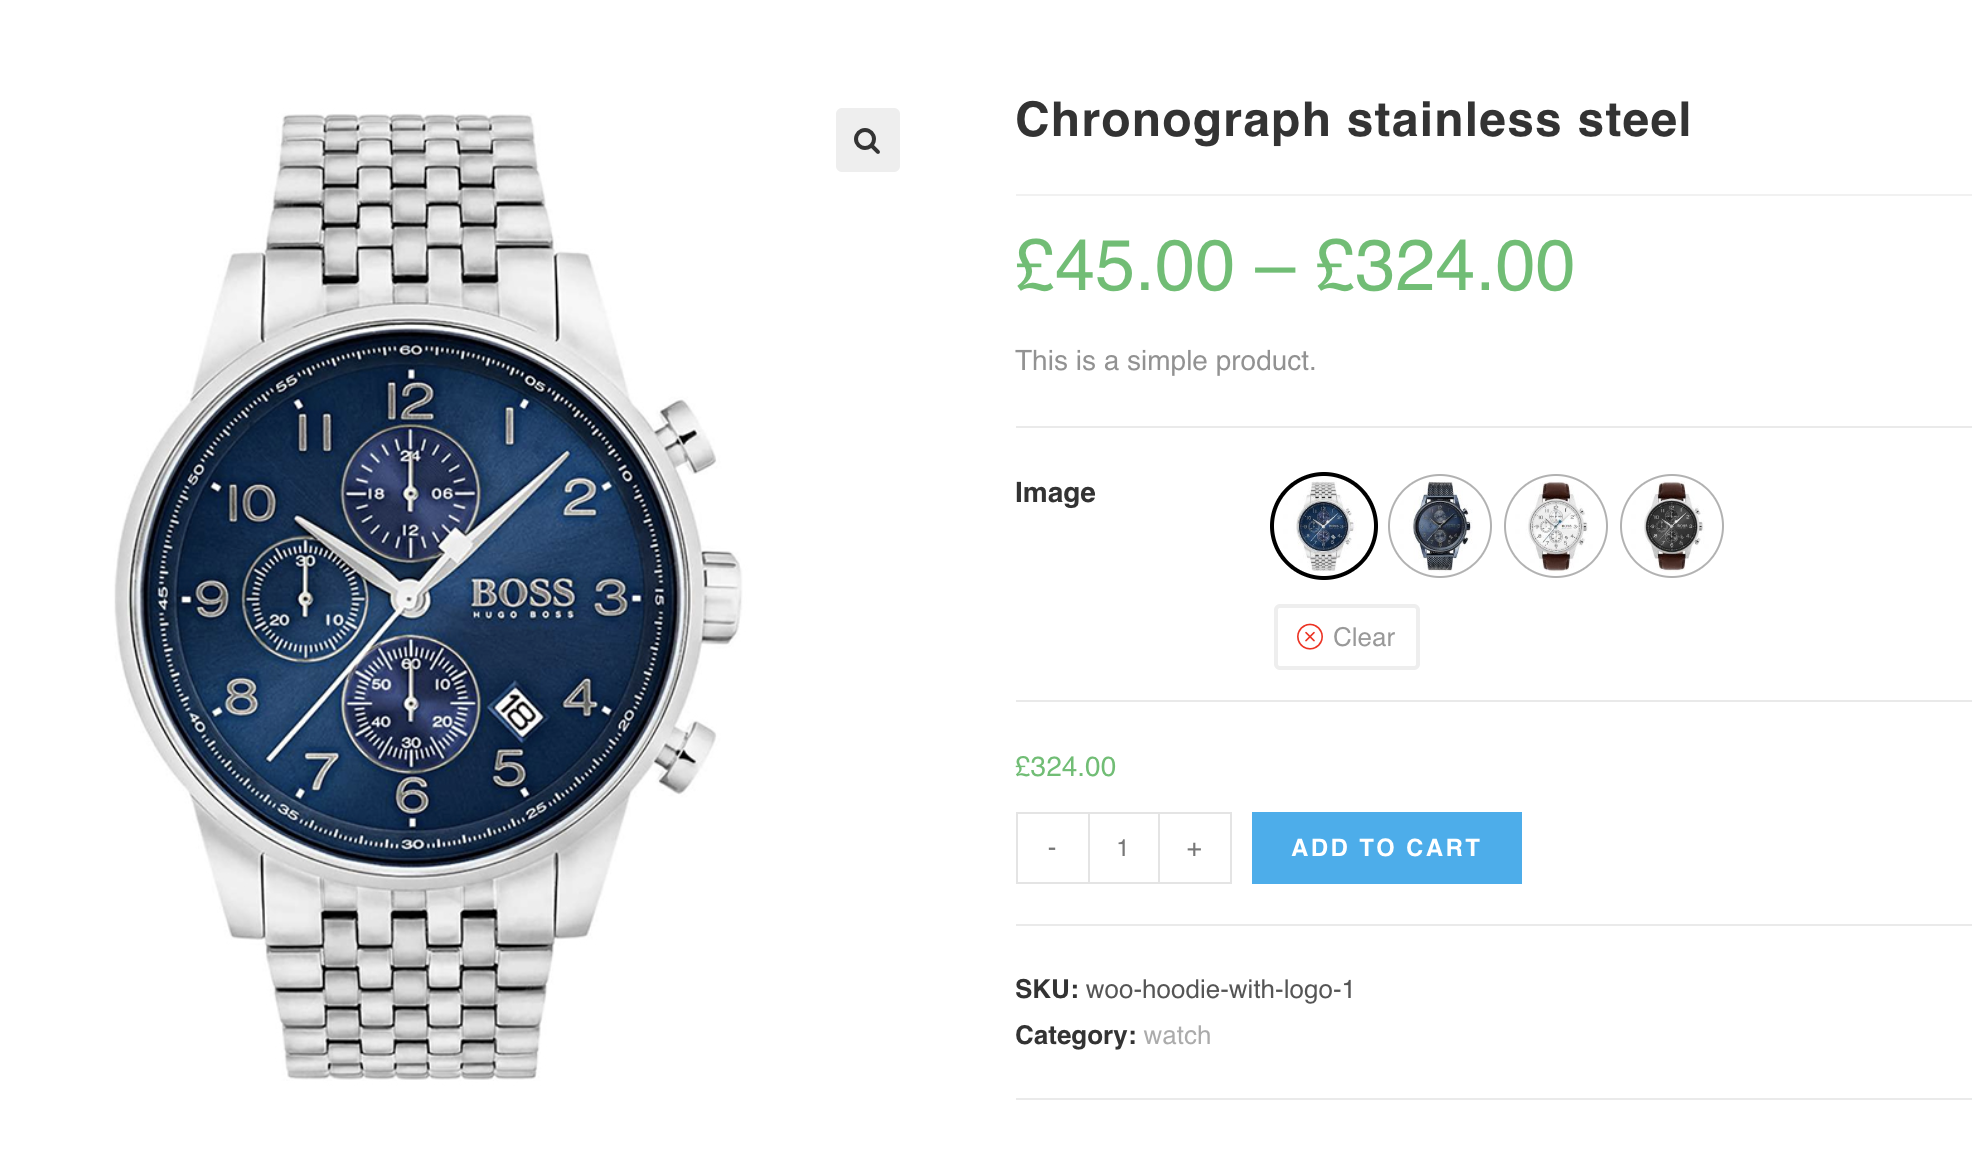
And the frontend of my variable product that is connected with global attribute would look like following image.
.
How To Create Image Variation Swatches From Manually Created Attributes
Video Tutorial
Step O1: Pro Plugin Setup
If you have variable products in your store and don't have product attributes created globally, it means you have created attribute and it's variations manually. To convert manually created attribute variations into image swatches, make sure you have premium version of WooCommerce Variation Swatches created.
Step O2: Change Manual Attribute Type
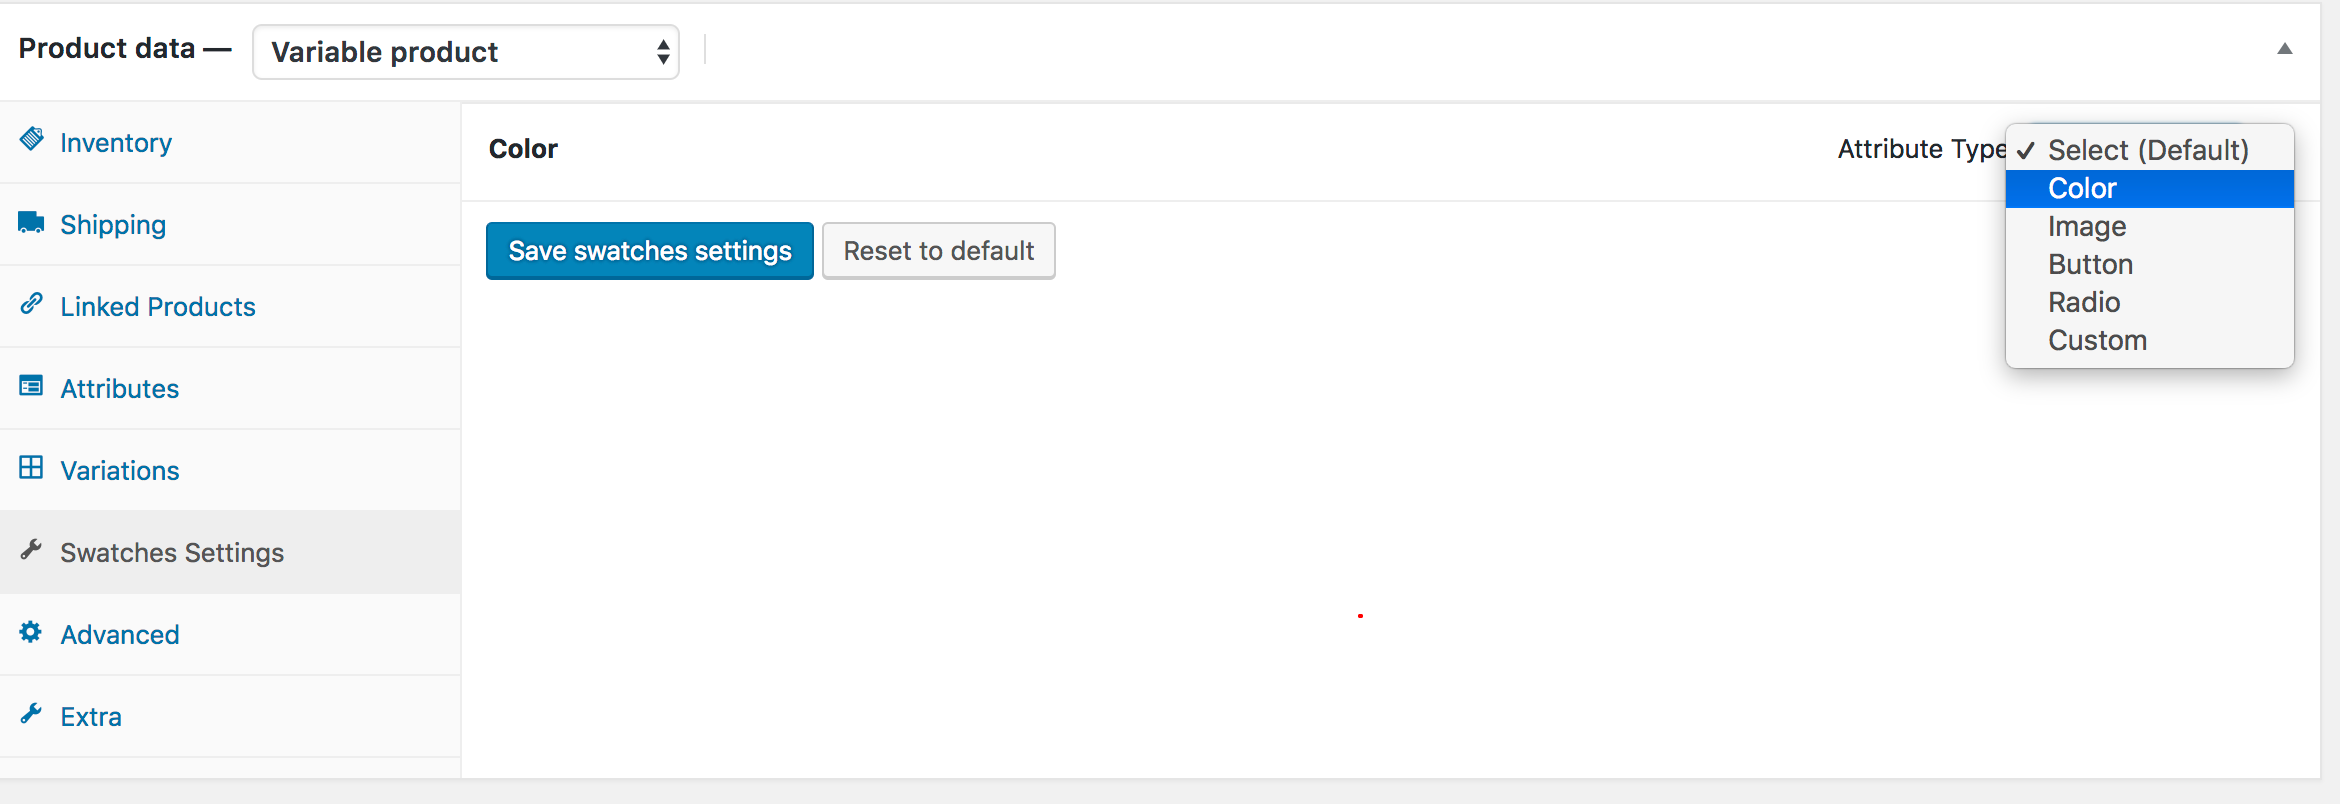
If you head to your Attributes tab from product data inside your product edit mode, and found variations are separated by pipe sign like the following screen. It means you have created variation manually.
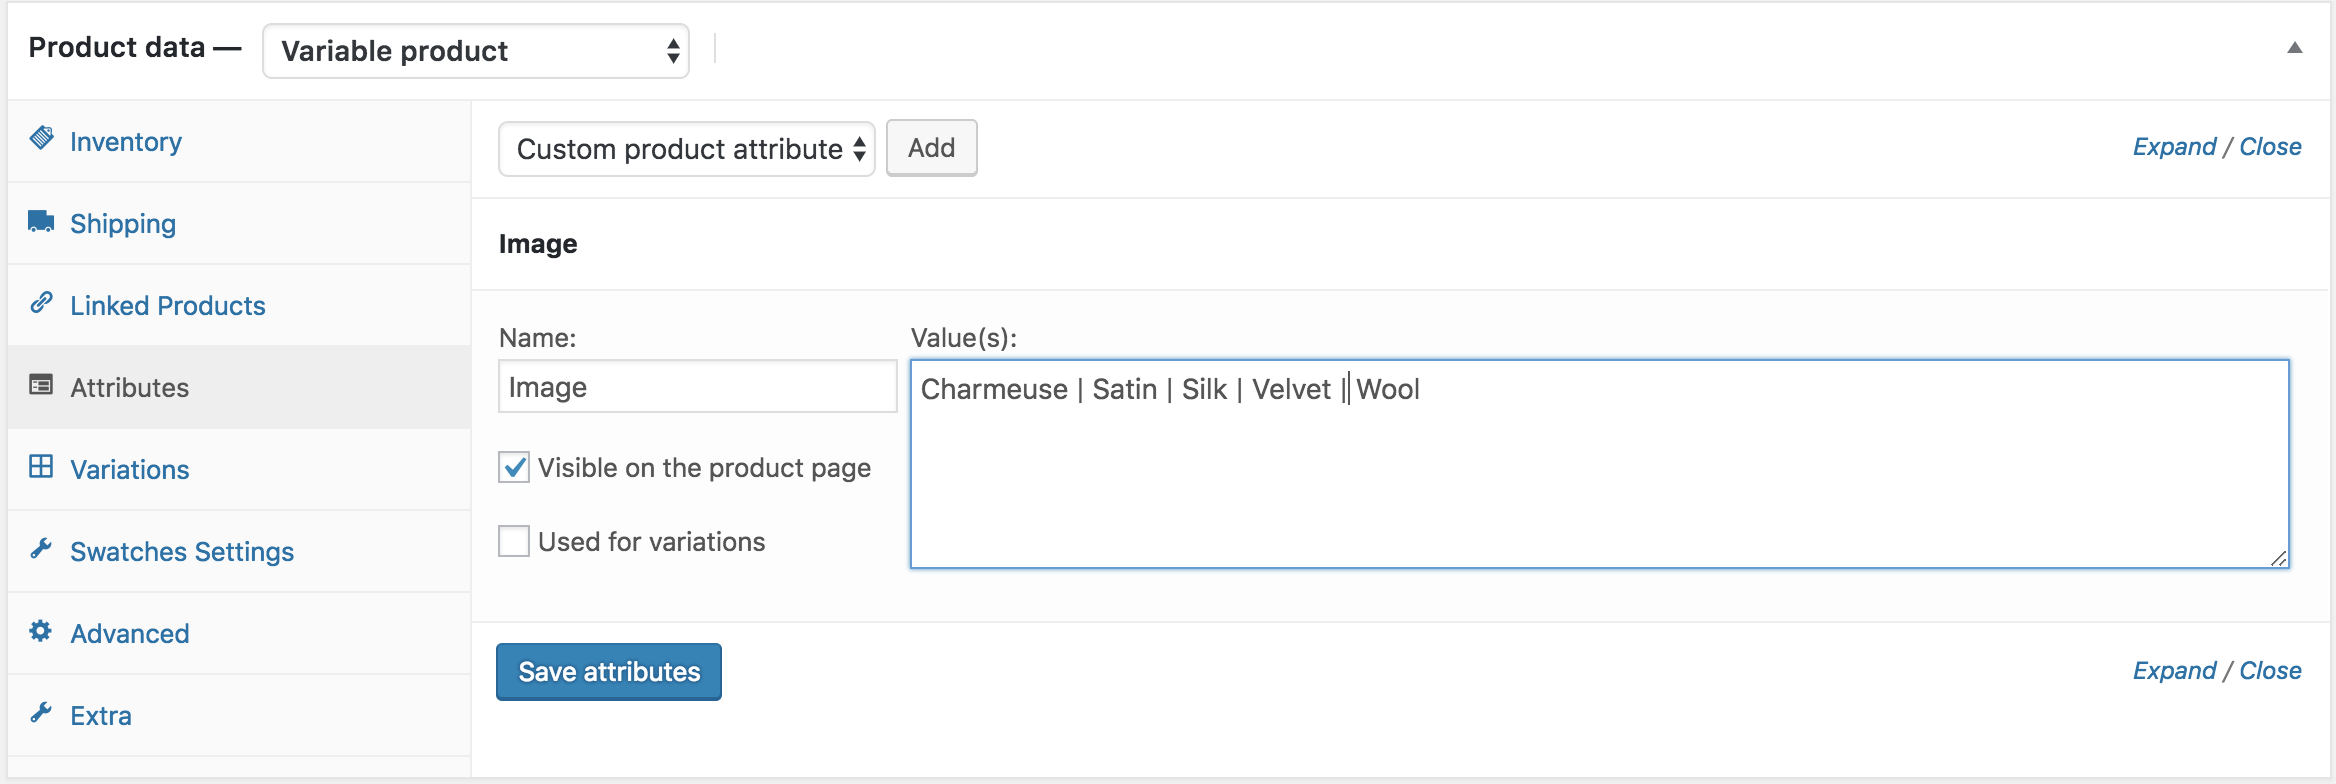
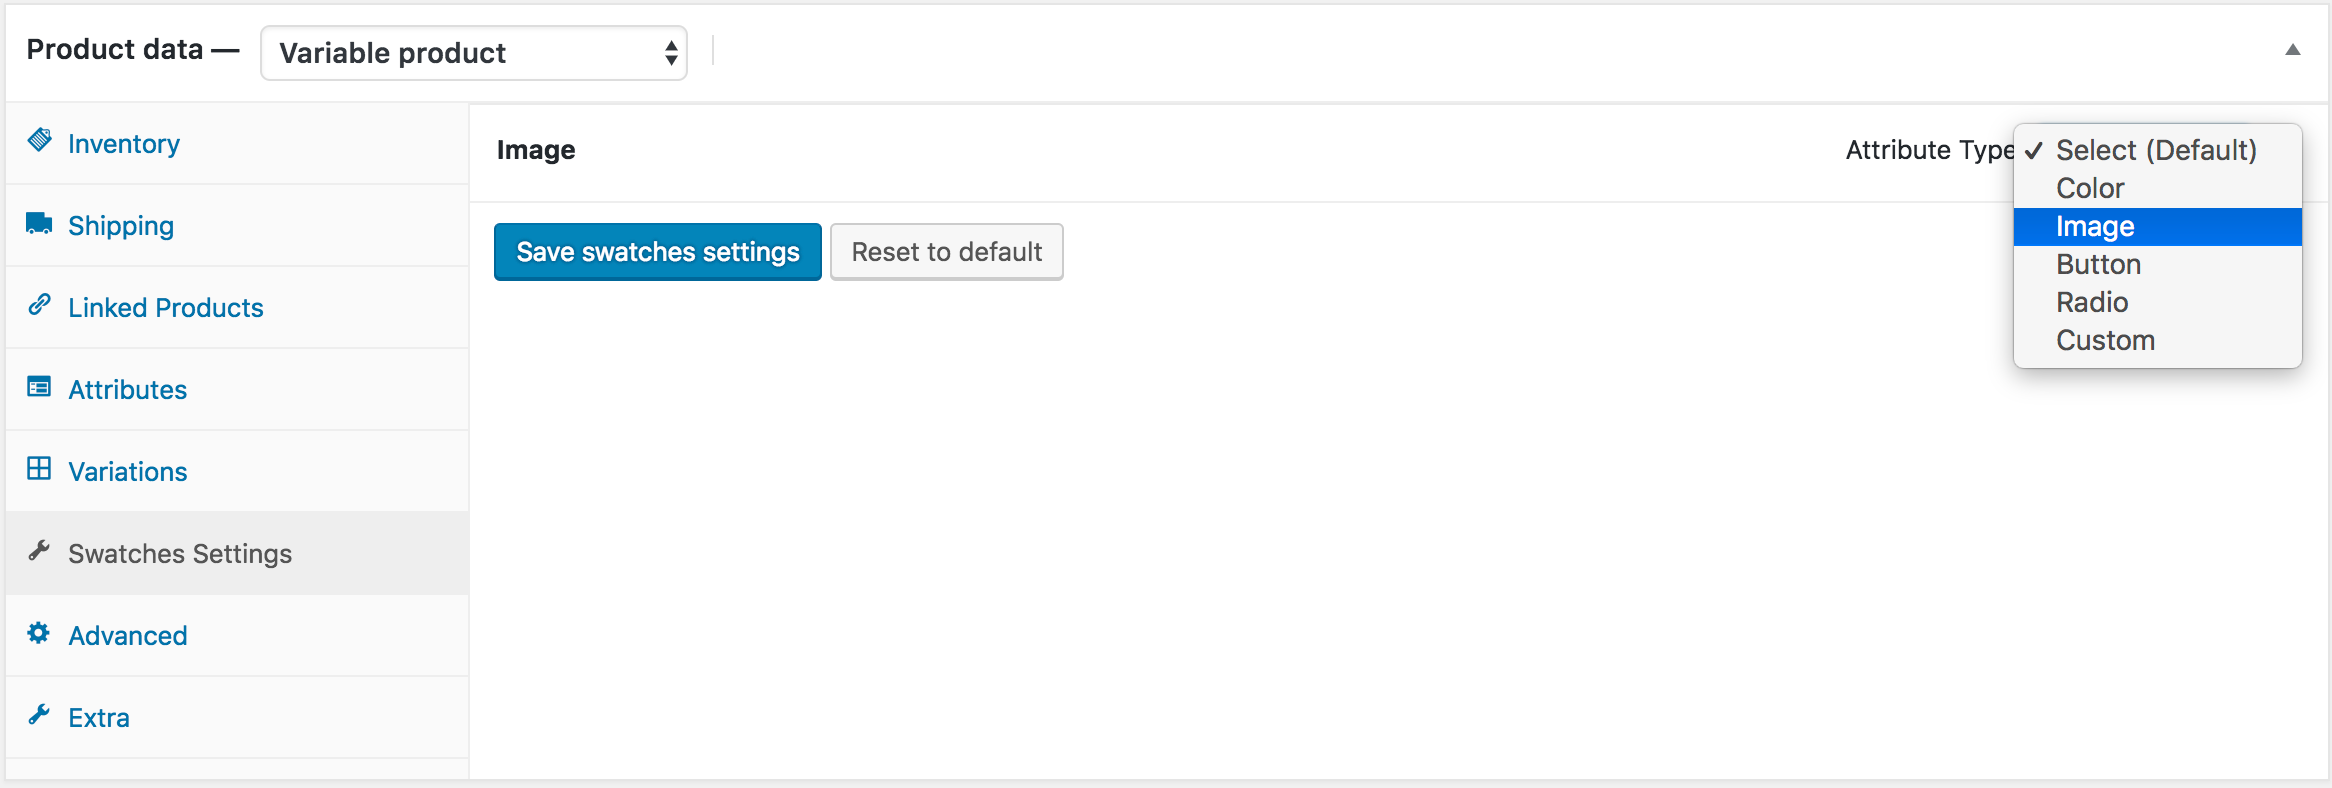
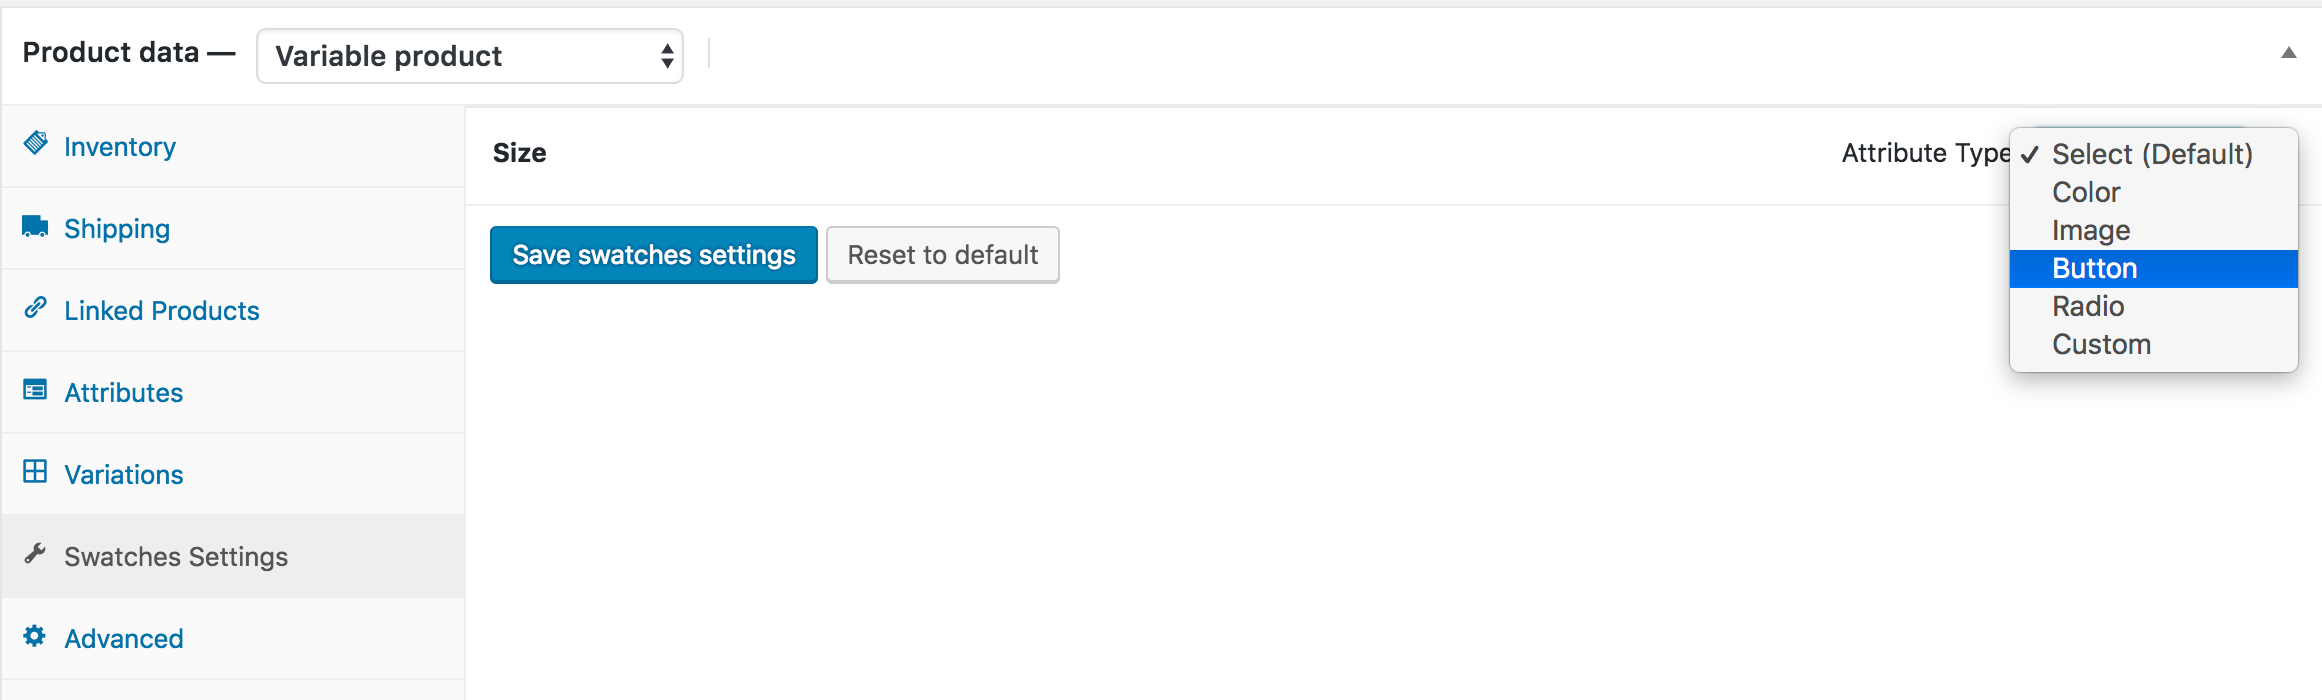
To Convert these manually created attribute variations, head to Swatches Settings tab, and select Image type from Select (Default) Dropdown.
After selecting attribute type, the frontend of the product would look like the following screenshot. Don't be panic, if you find your attribute variations weird. It happens because you haven't set any image for variations yet.
Step O3: Select Image For Variations
After selecting attribute type, press the Image attribute accordion, it will reveal setting to add images for its available variations.
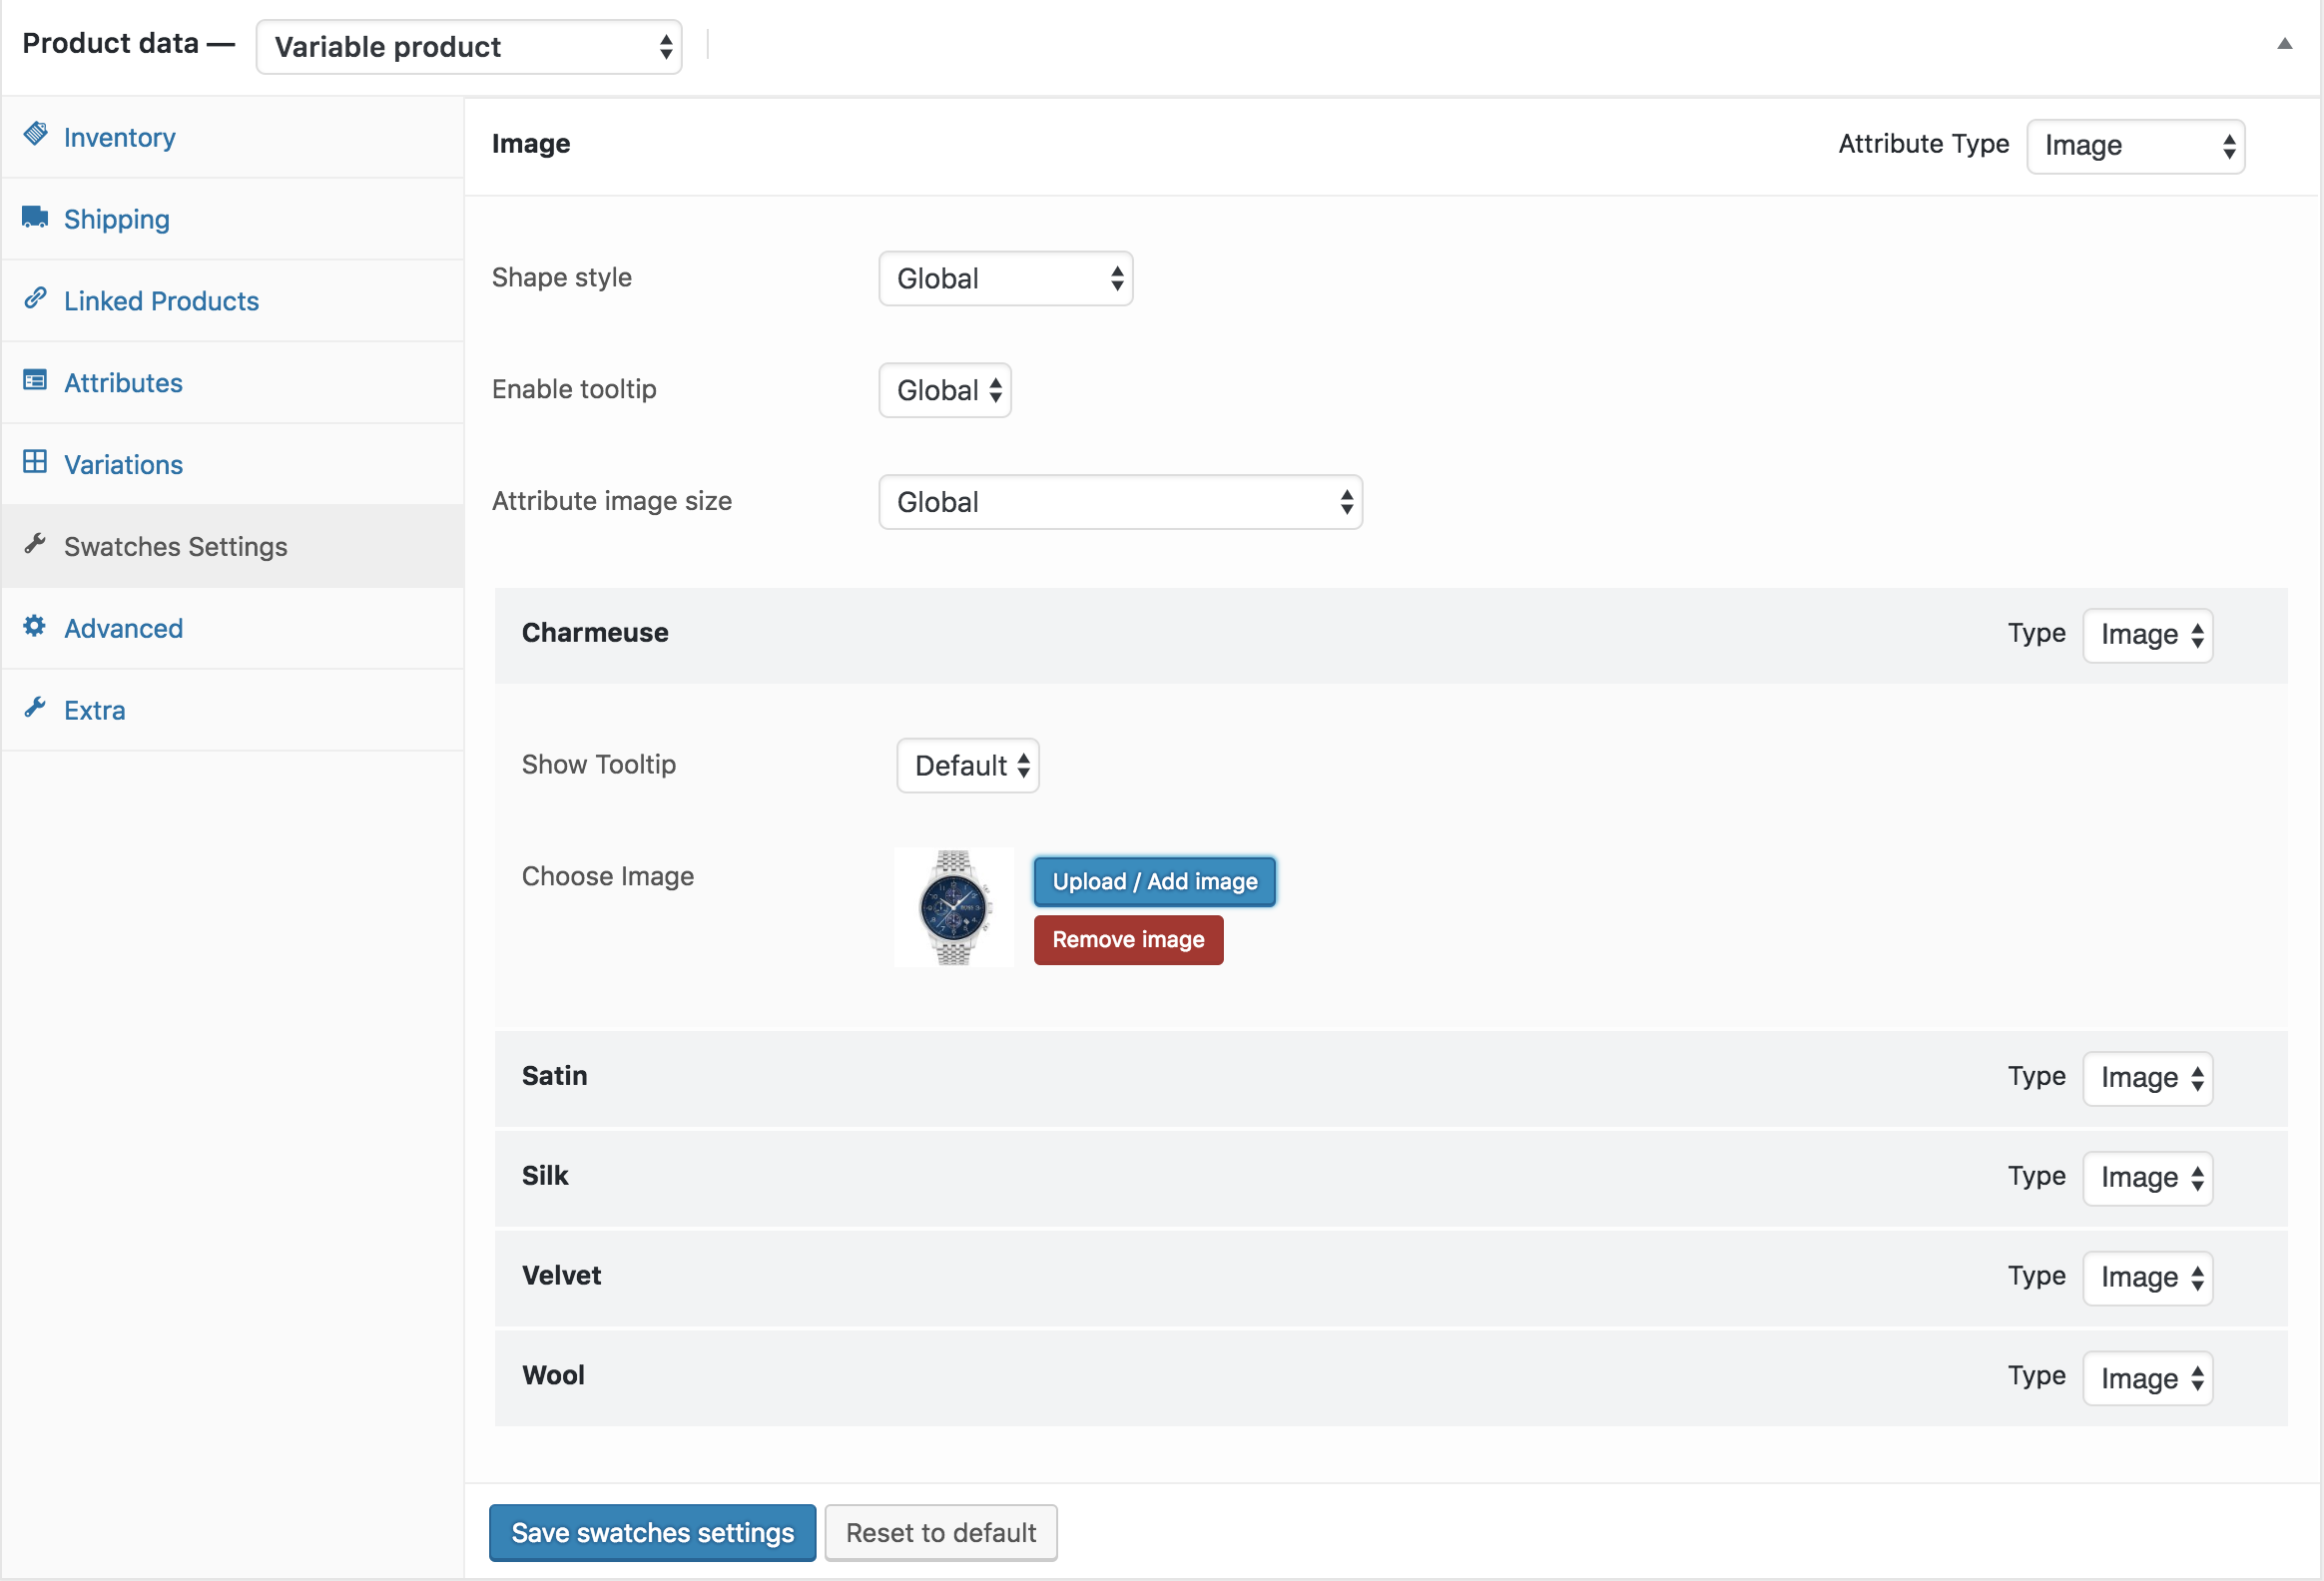
After adding the above option the frontend would look like the following screenshot.
.
How To Create Image Variation Swatches From Scratch
Video Tutorial
Step 01: Create Attribute
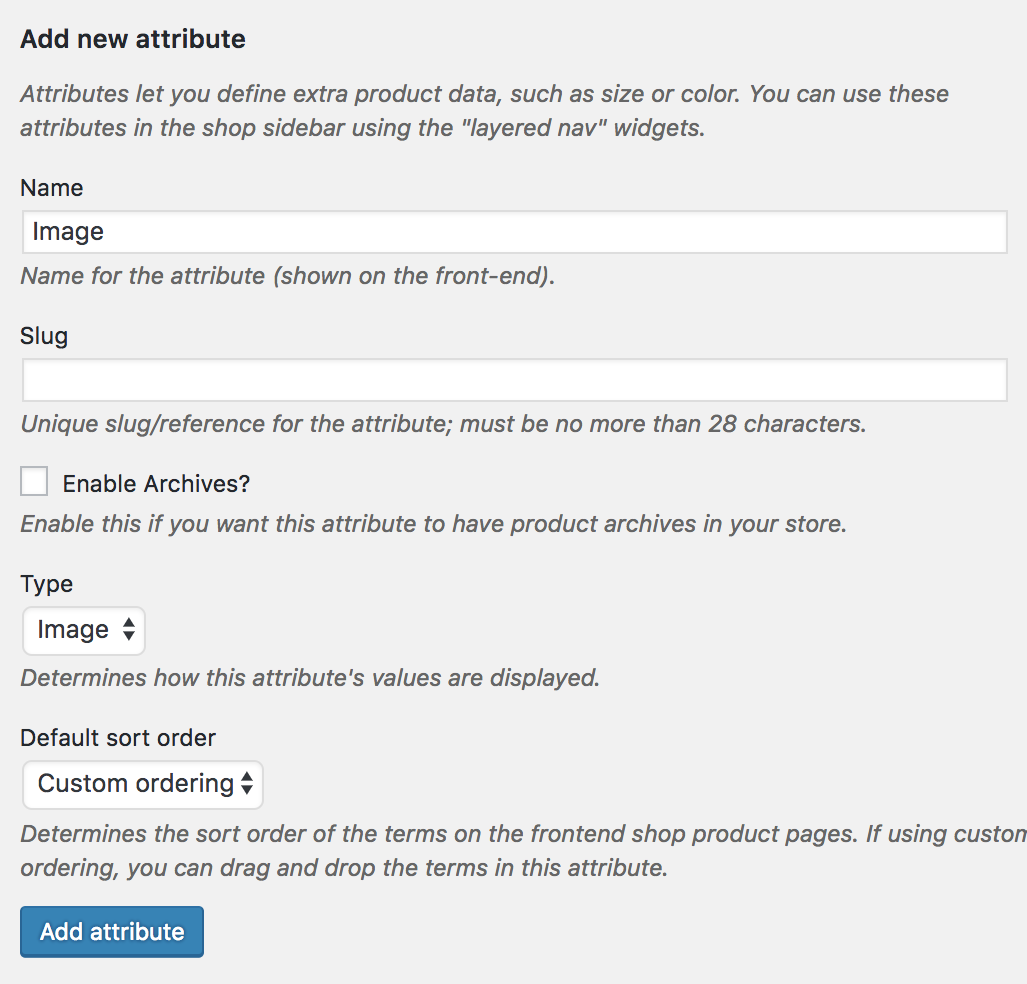
At the very beginning, we have to create image attribute and its variations globally. To create image attribute globally, navigate to Products >> Attributes. As we’ll create image attribute for our product. Fill the name field with your desired attribute name. In this tutorial, I’ve termed attribute name: Image.
You can leave Slug field empty. It automatically generates the slug for the attribute. From the Type dropdown select Image attribute type. When the mandatory fields are filled, select Add Attribute button.
After creating attribute, you will notice a list is created in the right side. Check the following screenshot.

Step 02: Create Attribute Variations
The more variation you would add, they would get added to this list. When an attribute is created, we need to create attribute variations. To create product variations, click on the Configure terms from the attribute list.

As we have created a Image attribute. We’ll add images as variations inside the Image attribute. In this tutorial, we’ll add Charmeuse, Satin, Silk, Velvet and Wool variations. To create variations inside image attribute. Fill the Name field with your desired variation name, leave the slug field empty, and select your desired image from the media library or upload from your computer.
Step 03: Enable Attribute Variation in Variable Product
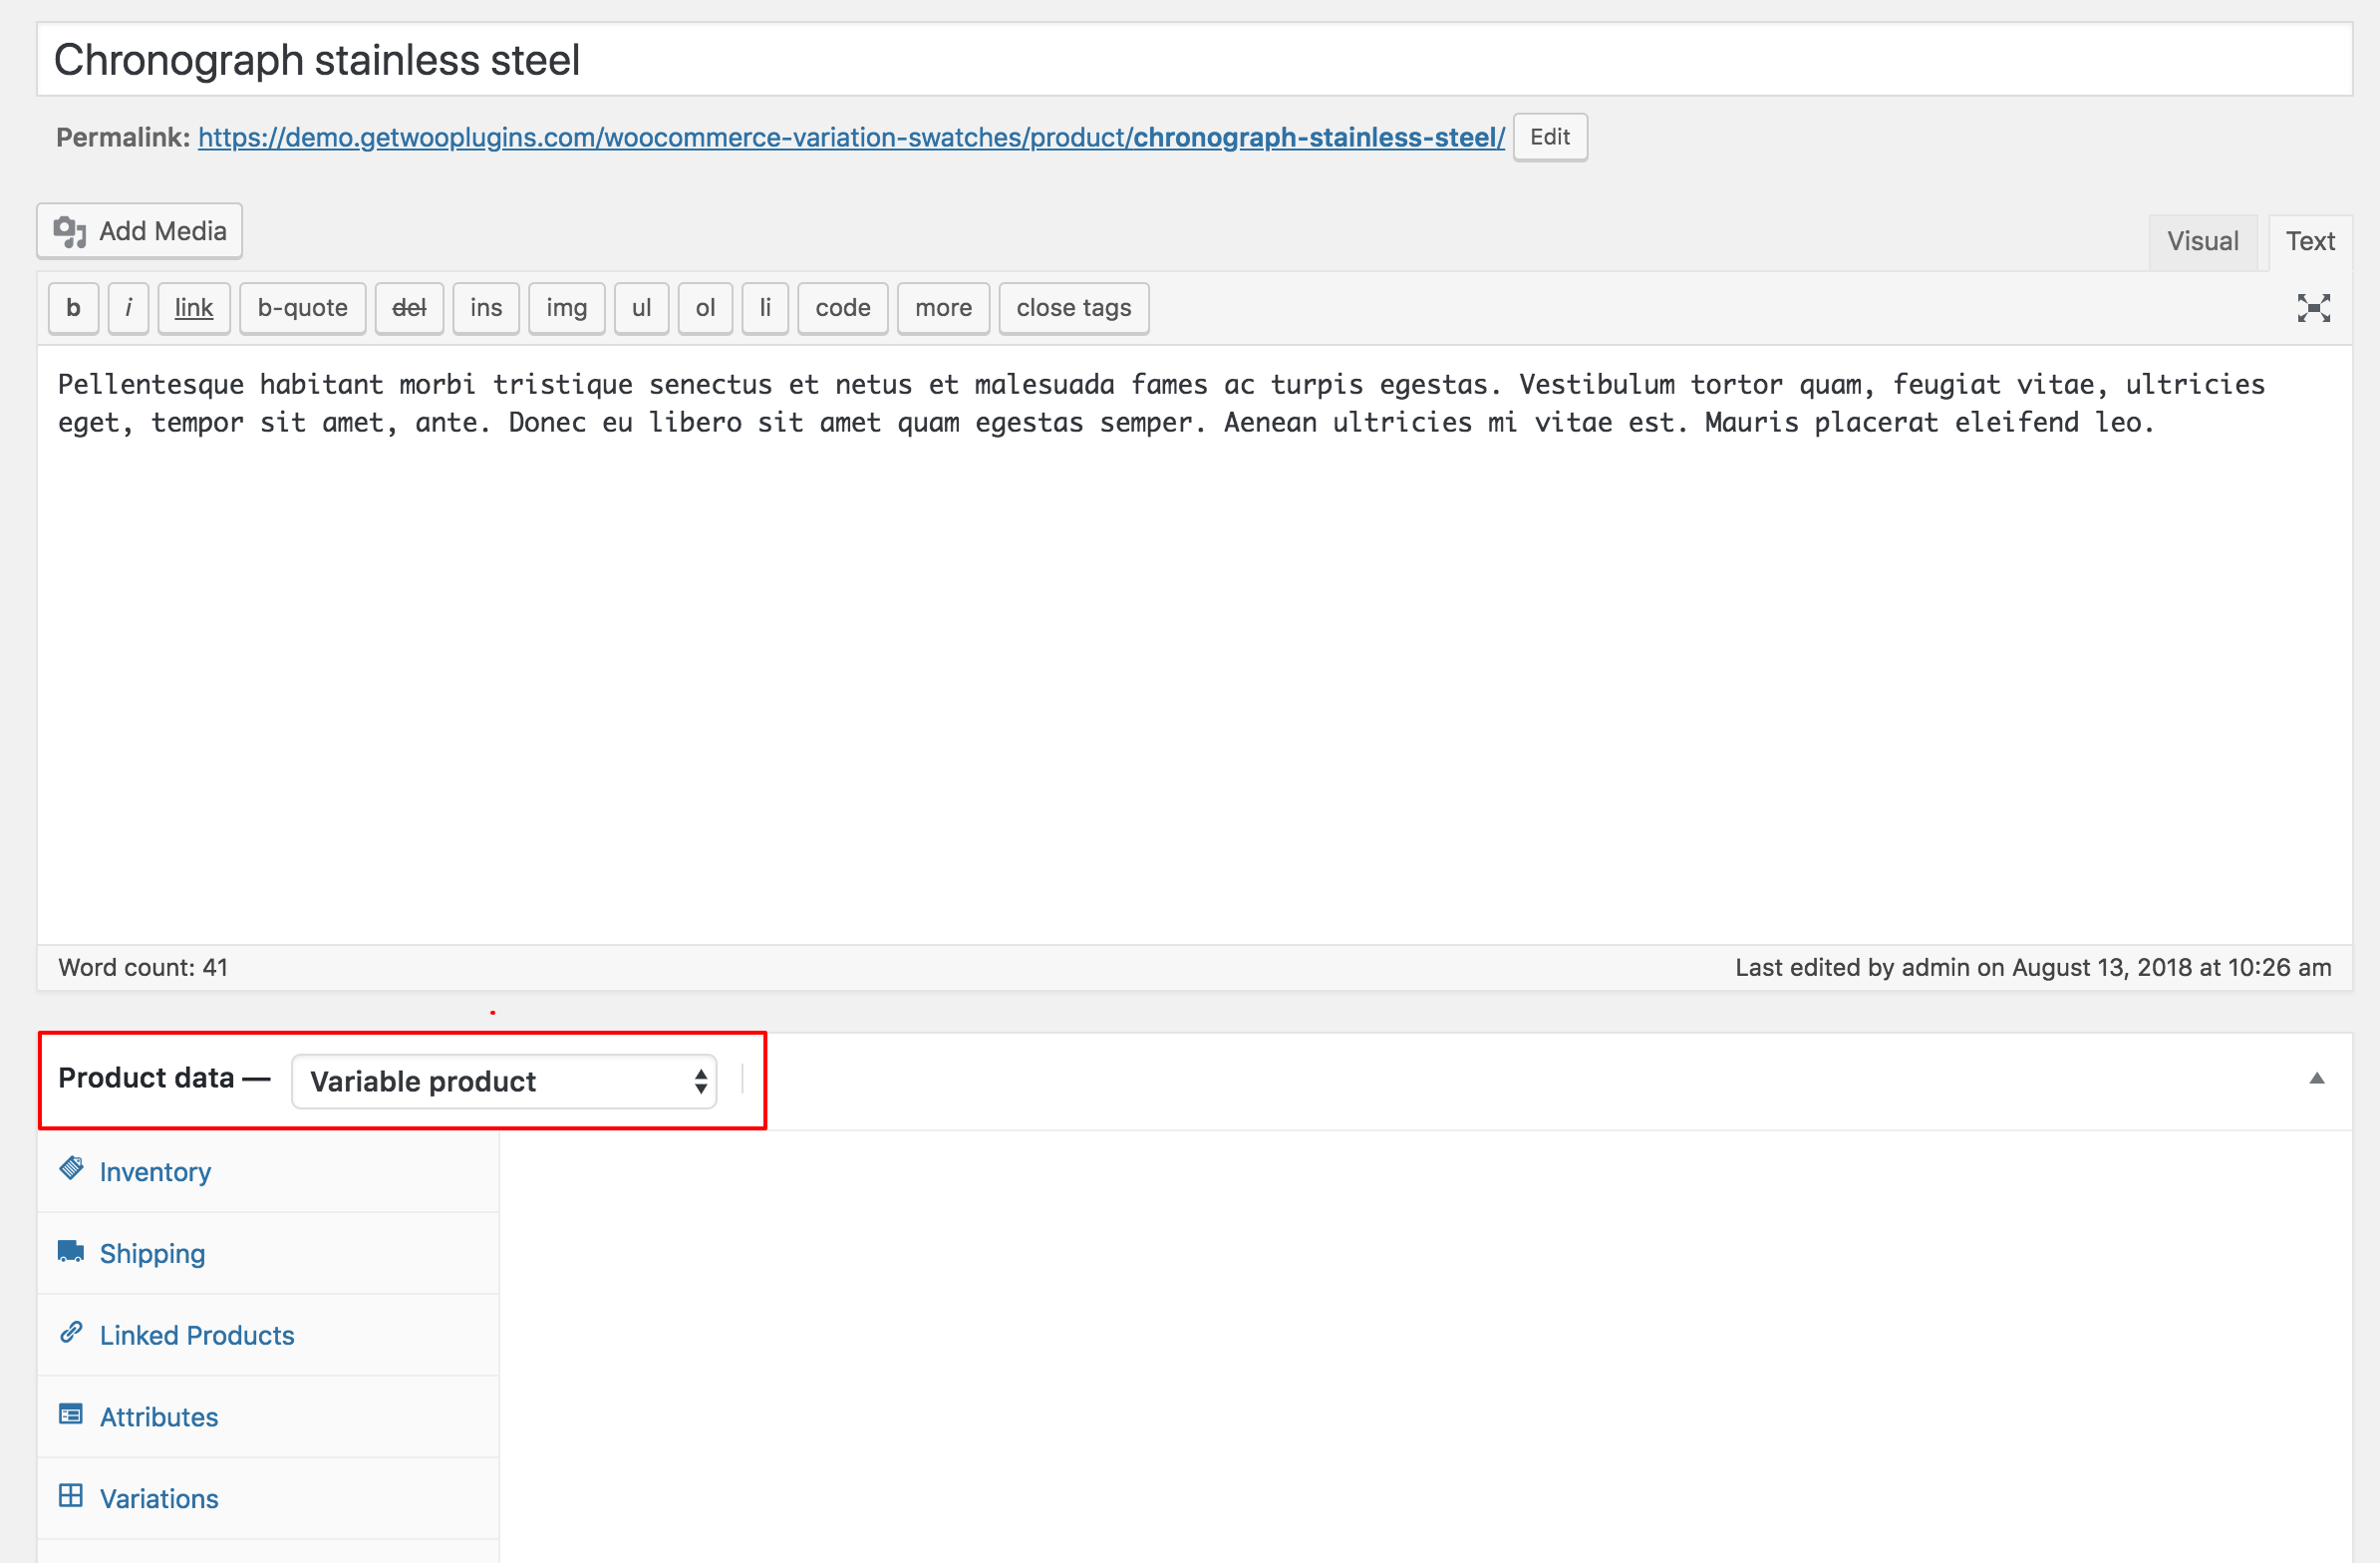
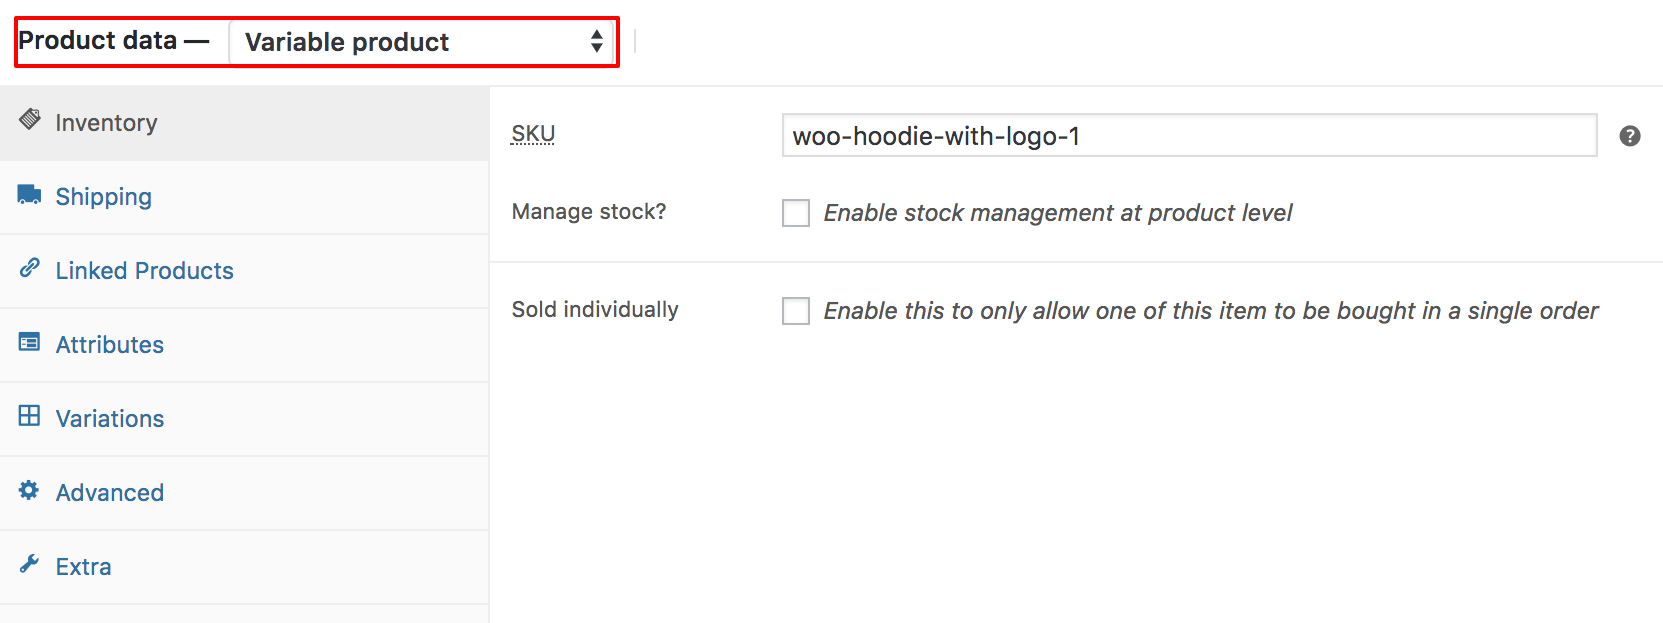
It’s time to enable image swatches inside a variable product. To enable image swatches in your desired product. Get into your desired product edit mode. Make sure you have variable product selected from Product Data.
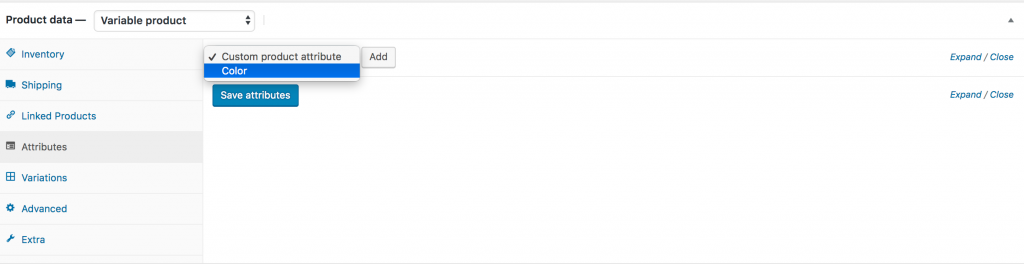
After selecting the Variable product from Product data dropdown, head to the Attributes Tab. Click on Custom product attribute dropdown. In this dropdown, you can see all your globally created attributes. As we’ve only created a Image attribute, it’s now showing Image attribute.
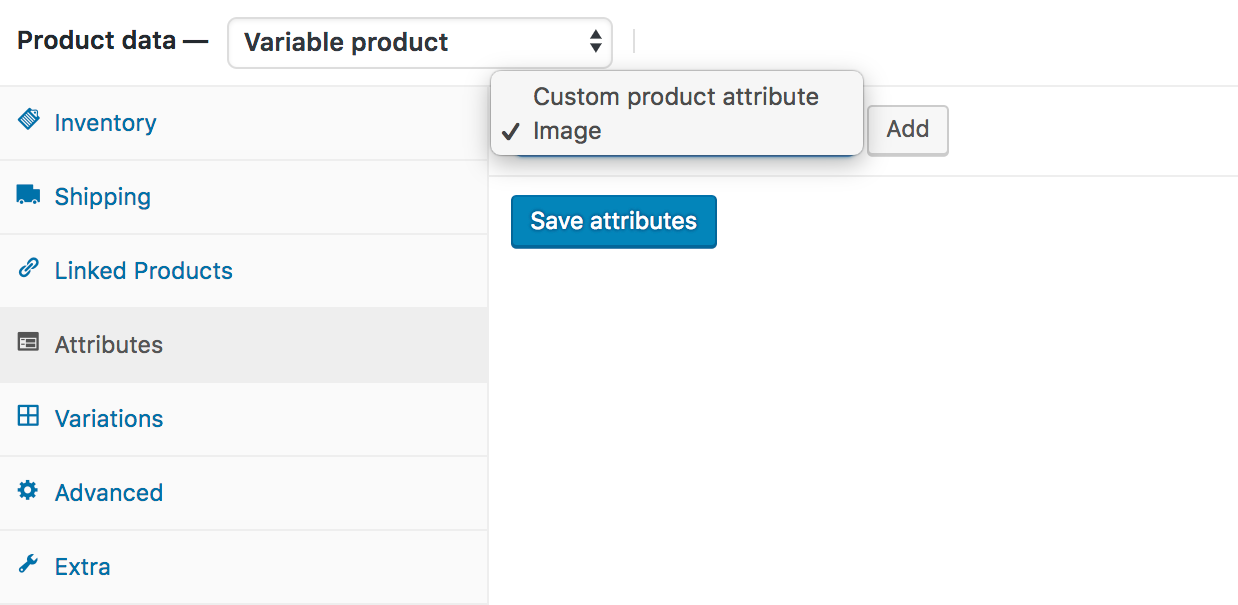
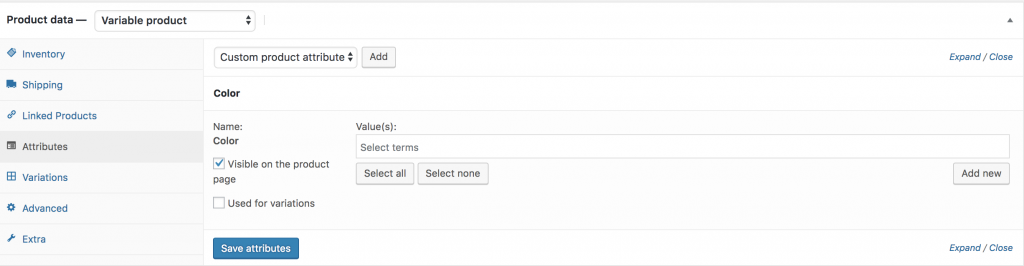
Now select the Image attribute and click on Add. You can see the following screens appears afterward.

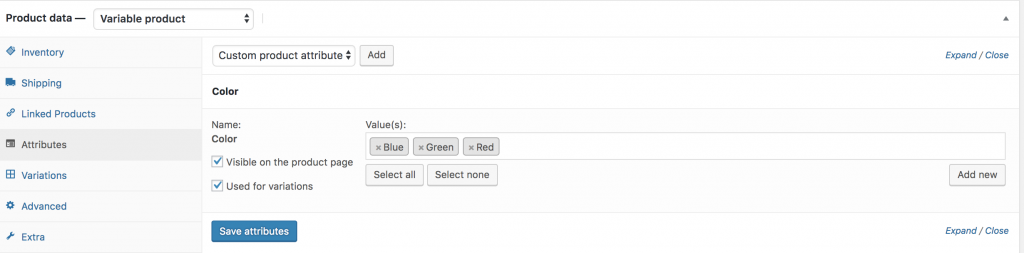
If you want to select all available variations of the color attribute, click on Select all button. If you want to deselect all selected variations at once. Click on Select none button. Add all variations selecting Select All button, checked Used for variations settings and click on Save Attributes button. Check the following screenshot for guideline.

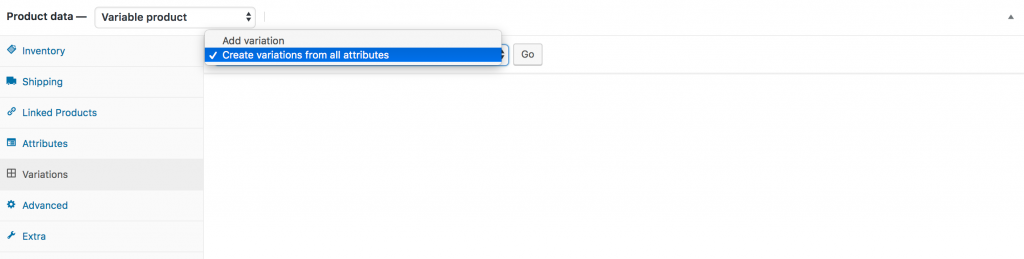
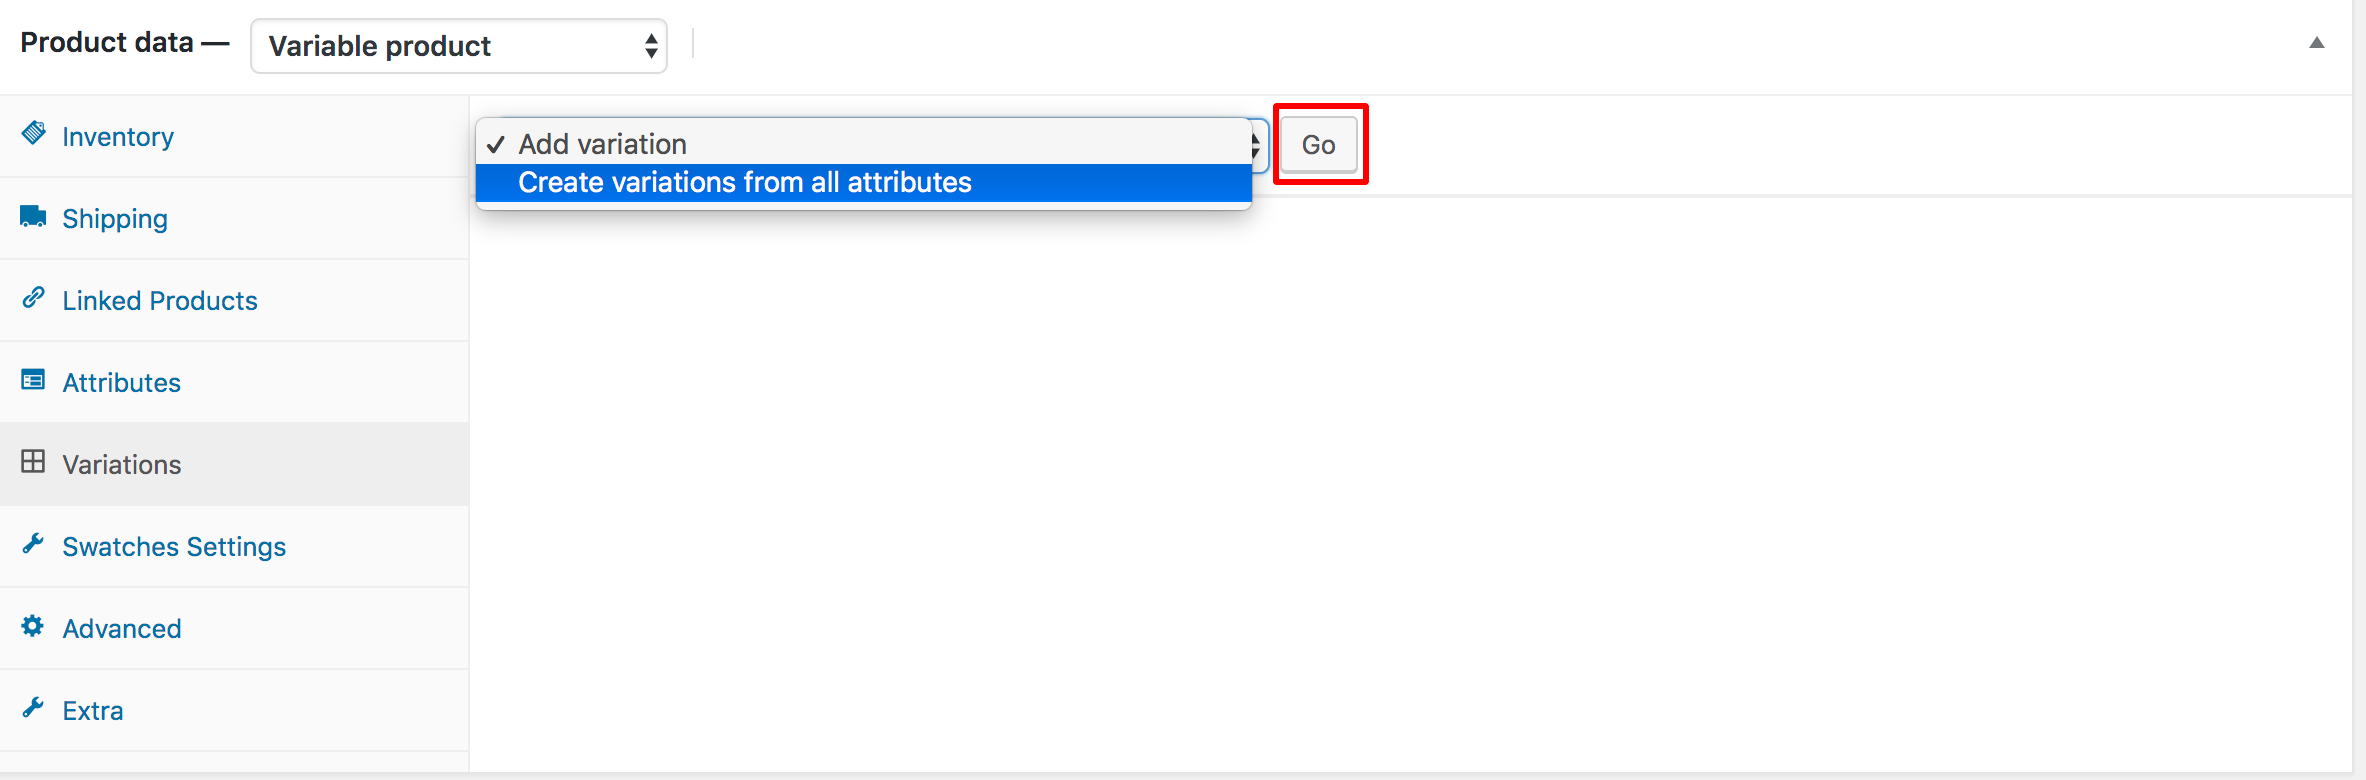
Now get into Variations tab. Click on Add Variation dropdown. Here you will notice two options. First one is Add Variation and the second one is Create variations from all attributes.

In this tutorial, I am going to select Create variation from all attributes and click Go button. It’ll add all available variations like the following.
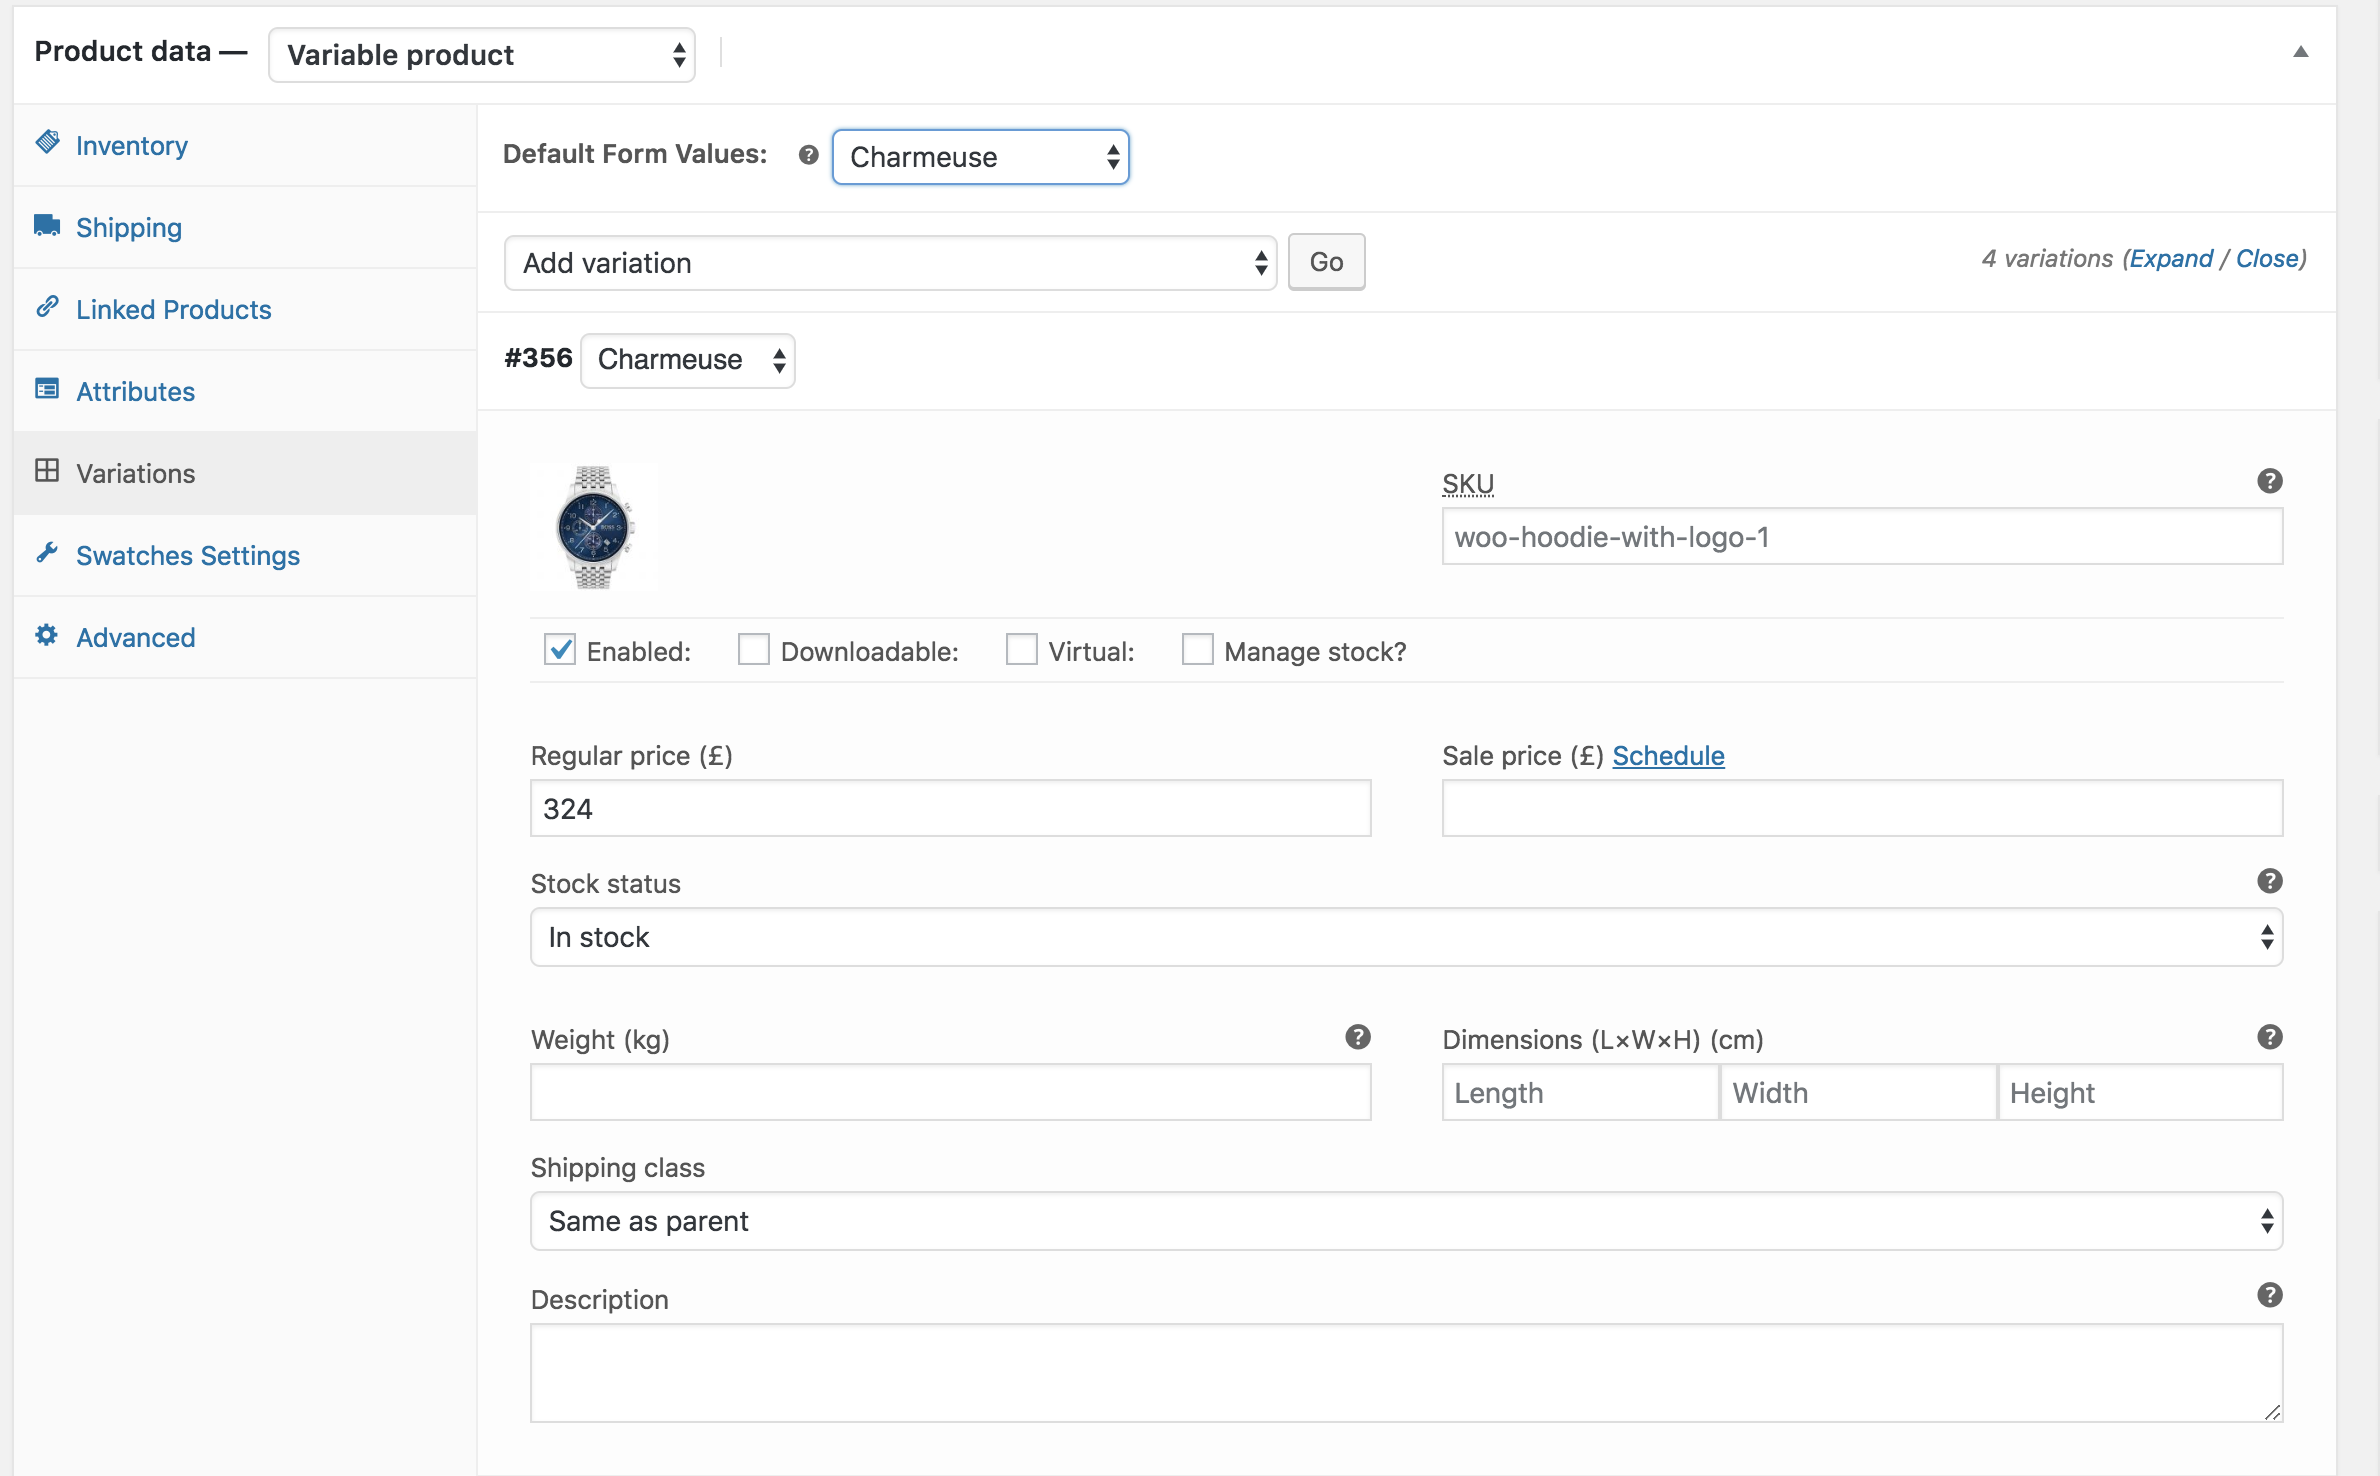
You can see the above image thatCharmeuse, Satin, Silk, Velvet and Wool image variations are there. From this screen you can add variation image, variation price, and other variation specific details. When you have done with adding all your required details in each variation, click the Save Changes button.
Remember! Don’t forget to add the price in each variation, otherwise, variations won’t be visible on the product frontend.
If you can successfully add variation. You can see the following swatches in your product frontend.
06. How To Enable Color Swatches Back To Top
Frontend Preview
- How To Create To Color Variation Swatches From Scratch
- How To Create To Color Variation Swatches For Existing Global Attributes
- How To Create To Color Variation Swatches For Custom Product Level Attributes
- How To Create To Color Variation Swatches For Existing Custom Product Level Attributes
.
How To Create Color Variation Swatches From Scratch
Video Tutorial
Step O1: Create Attribute
At the very beginning, we have to create color attributes and their variation globally. To create color attributes globally, navigate to Products >> Attributes. As we'll create a color attribute for our product. Fill the name field with your desired attribute name. In this tutorial, I've term attribute name: Color.
You can leave Slug field empty. It automatically generates the slug for the attribute. From the Type dropdown select Color attribute type. When your the mandatory fields are filled, select Add Attribute button.
After creating an attribute, you will notice a list is created on the right side. Check the following screenshot.

Step 02: Create Attribute Variations
The more variation you would add, they would get added to this list. When an attribute is created, we need to create attribute variations. To create product variations, click on the Configure terms from the attribute list.

As we have created a Color attribute. We'll add colors as variations inside the Color attribute. In this tutorial, we'll add Green, Blue, and Red Variations. To create variation inside Color attribute. Fill the Name field with your desired variation name, leave the slug field empty, and select your desired color from the color picker.
Step 03: Enable Attribute Variation in Variable Product
It's time to enable color swatch inside a variable product. To enable color swatch in your desired product. Get into your desired product edit mode. Make sure you have variable product selected from Product Data.
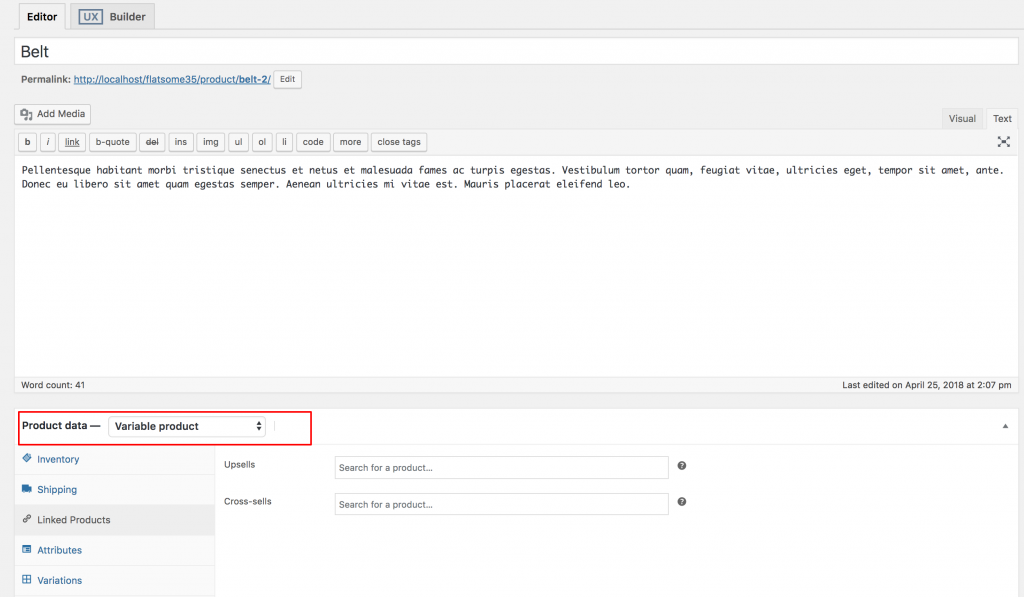
After selecting the Variable product from Product data dropdown, head to the Attributes Tab. Click on Custom product attribute dropdown. In this dropdown, you can see all your globally created attributes. As we've only created a color attribute, it's now showing color attribute.
Now select the Color attribute and click on Add. You can see the following screens appears afterward.
If you want to select all available variations of the color attribute, click on Select all button. If you want to deselect all selected variations at once. Click on Select none. Button. Add all variations selecting Select All button, checked Used for variations settings and click on Save Attributes button. Check the following screenshot for guideline.
Now get into Variations tab. Click on Add Variation dropdown. Here you will notice two options. First one is Add Variation and the second one is Create variations from all attributes.
In this tutorial, I am going to select Create variation from all attributes and click Go button. It'll add all available variation like the following.

You can see the above image that Blue, Green, and Red color variation is there. From this screen you can add variation image, variation price, and other variation specific details. When you have done with adding all your required details in each variation, click the Save Changes button.
Remember! Don't forget to add the price in each variation; otherwise, variation won't be visible on the product frontend.
If you can successfully add a variation color. You can see the following swatches in your product frontend.
.
How To Create Color Variation Swatches For Existing Globally Created Attributes
Video Tutorial
If you have variable product in your store and have attribute variation created globally in attributes >> products page. This tutorial is for you.
Step 01: Editing Attribute
Head to the Products >> Attributes. All existing global attributes are listed in the attribute list page section. After installing WooCommerce Variation Swatches plugin, it adds Type field. By default it would show Select under Type title.

As WooCommerce Variation Swatches, the Plugin comes with 4 attribute types: Color, Image, Button, and Radio. You can set any attribute type for your desired attribute.
For demonstration purpose, Pattern attribute has been created. We'll add Color attribute type for Pattern attribute.
To set color attribute type to Pattern attribute, click on Edit.

After selecting button, it will open attribute editing panel. Select Color Type from the type dropdown.
When attribute type selection is completed, get back to the attribute list page. The Attribute list would look like the following image. Now Pattern Attribute is showing Color type instead of default Select type.

After selecting attribute type, the frontend of the product would look like the following screenshot. Don't be panic if you find your attribute variations are white. It happens because you haven't defined any color for variations yet.
Step 02: Editing Variations
To define colors as variations inside the Pattern attribute. Head over to Products >> Attributes. Select Configure terms from Patterns attribute.

After selecting Configure terms, a list of attribute variations comes up. For Pattern attribute, three variations: Blue, Green, and Red variations are listed for me. As those variations have no color defined, they look like the following screenshot.
Edit each variation one by one to add variation color. For demonstration, I am going to select Edit link for Red variation.
From variation edit panel. Select desired color from Color-picker and the update the changes pressing the Update button. For my red variation, I've selected red color.
After adding color for entire variations, my variation list page looks like the following screenshot.
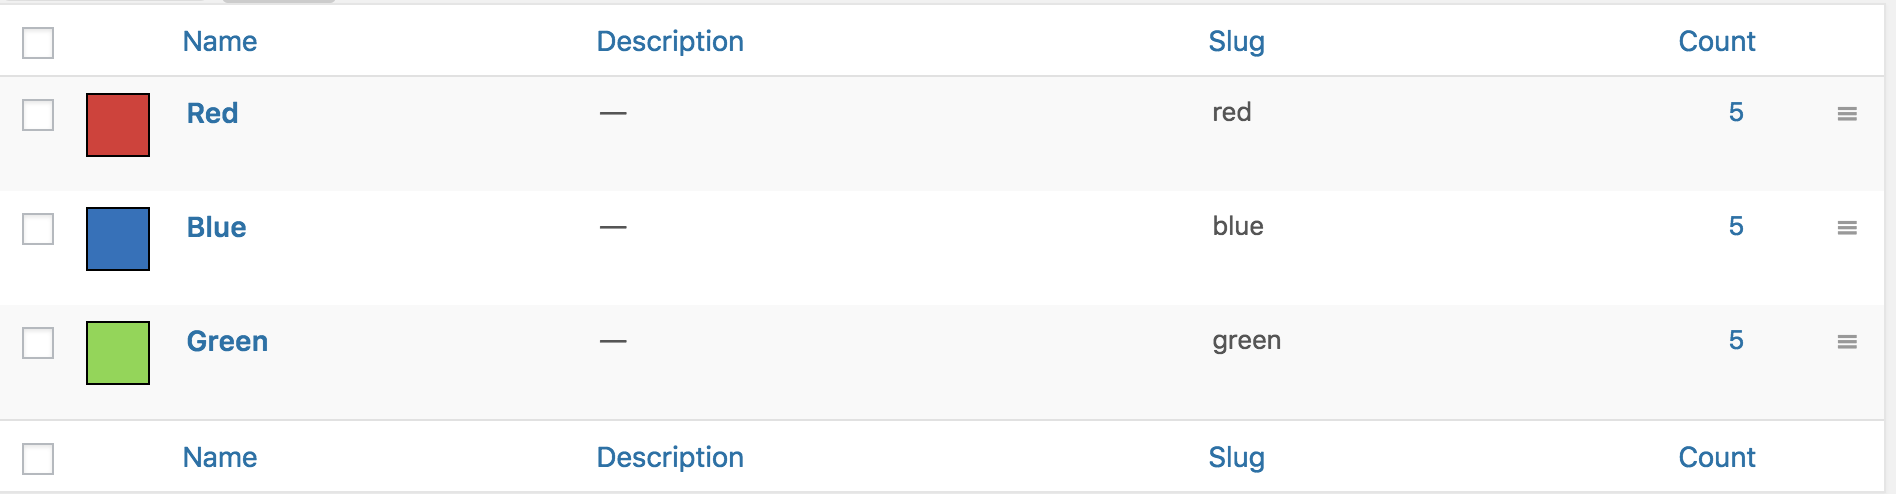
And the frontend of my variable product that is connected with the global attribute would look like the following image.
.
How To Create Color Variation Swatches For Custom Product Level Attributes
Video Tutorial
Step O1: Pro Plugin Setup
If you have variable products in your store and don't have product attributes created globally, it means you have created attributes and it's variations manually. To convert manually created attribute variations into color swatches, make sure you have premium version of WooCommerce Variation Swatches created.
Step O2: Change Manual Attribute Type
If you head to your Attributes tab from product data inside your product edit mode, and found variations are separated by pipe sign like the following screen. It means you have created variation manually.

To Convert these manually created attribute variations, head to Swatches Settings tab, and select Color type from Select (Default) Dropdown.
After selecting attribute type, the frontend of the product would look like the following screenshot. Don't be panic if you find your attribute variations are white. It happens because you haven't defined any color for variations yet.
Step O3: Select Color For Variations
After selecting the attribute type, press the Color attribute accordion. It will reveal the setting to add colors for its available variations.
If you can successfully add a variation color, you can see the following swatches in your product frontend.
.
How To Create Color Variation Swatches For Custom Existing Product Level Attributes
Video Tutorial
Auto Convert All Dropdown Into Image Swatches If Variation Has a Feature Image Set (Advanced) Back To Top
Auto Convert All Dropdown Into Image Swatches If Variation Has a Feature Image Set (Custom Attribute Per Product Variation)
Auto Convert All Dropdown Into Image Swatches If Variation Has a Feature Image Set (Global Attribute)
Setup Swatches In Elementor Page Builder Back To Top
Setup Swatches With Printful Plugin Back To Top
Setup Swatches With Dokan Multivendor Plugin Back To Top
Setup Swatches In AliDropship Plugin Back To Top
How To Enable Label / Button Swatches Back To Top
Frontend Preview
- How To Create To Label/Button Variation Swatches For Global Attributes
- How To Create To Label/Button Variation Swatches For Manual Attributes
- How To Create To Label/Button Variation Swatches From Scratch
.
How To Create Label/Button Variation Swatches For Globally Created Attributes
Video Tutorial
Head to the Products >> Attributes. All existing global attributes are listed in the attribute list page section. After installing WooCommerce Variation Swatches plugin, it adds Type field. By default it would show Select under Type title.

As WooCommerce Variation Swatches Plugin comes with 4 attribute types: Color, Image, Button and Radio. You can set any of attribute type for your desired attribute.
For demonstration purpose, Size attribute has been created. We'll add button attribute type for Size attribute.
To set button attribute type to Image attribute, click on Edit.

After selecting edit link, it will open attribute editing panel. Select Button Type from the type dropdown.
When attribute type selection is completed, get back to the attribute list page. The Attribute list would look like the following image. Now Size Attribute is showing Button type instead of default Select type.

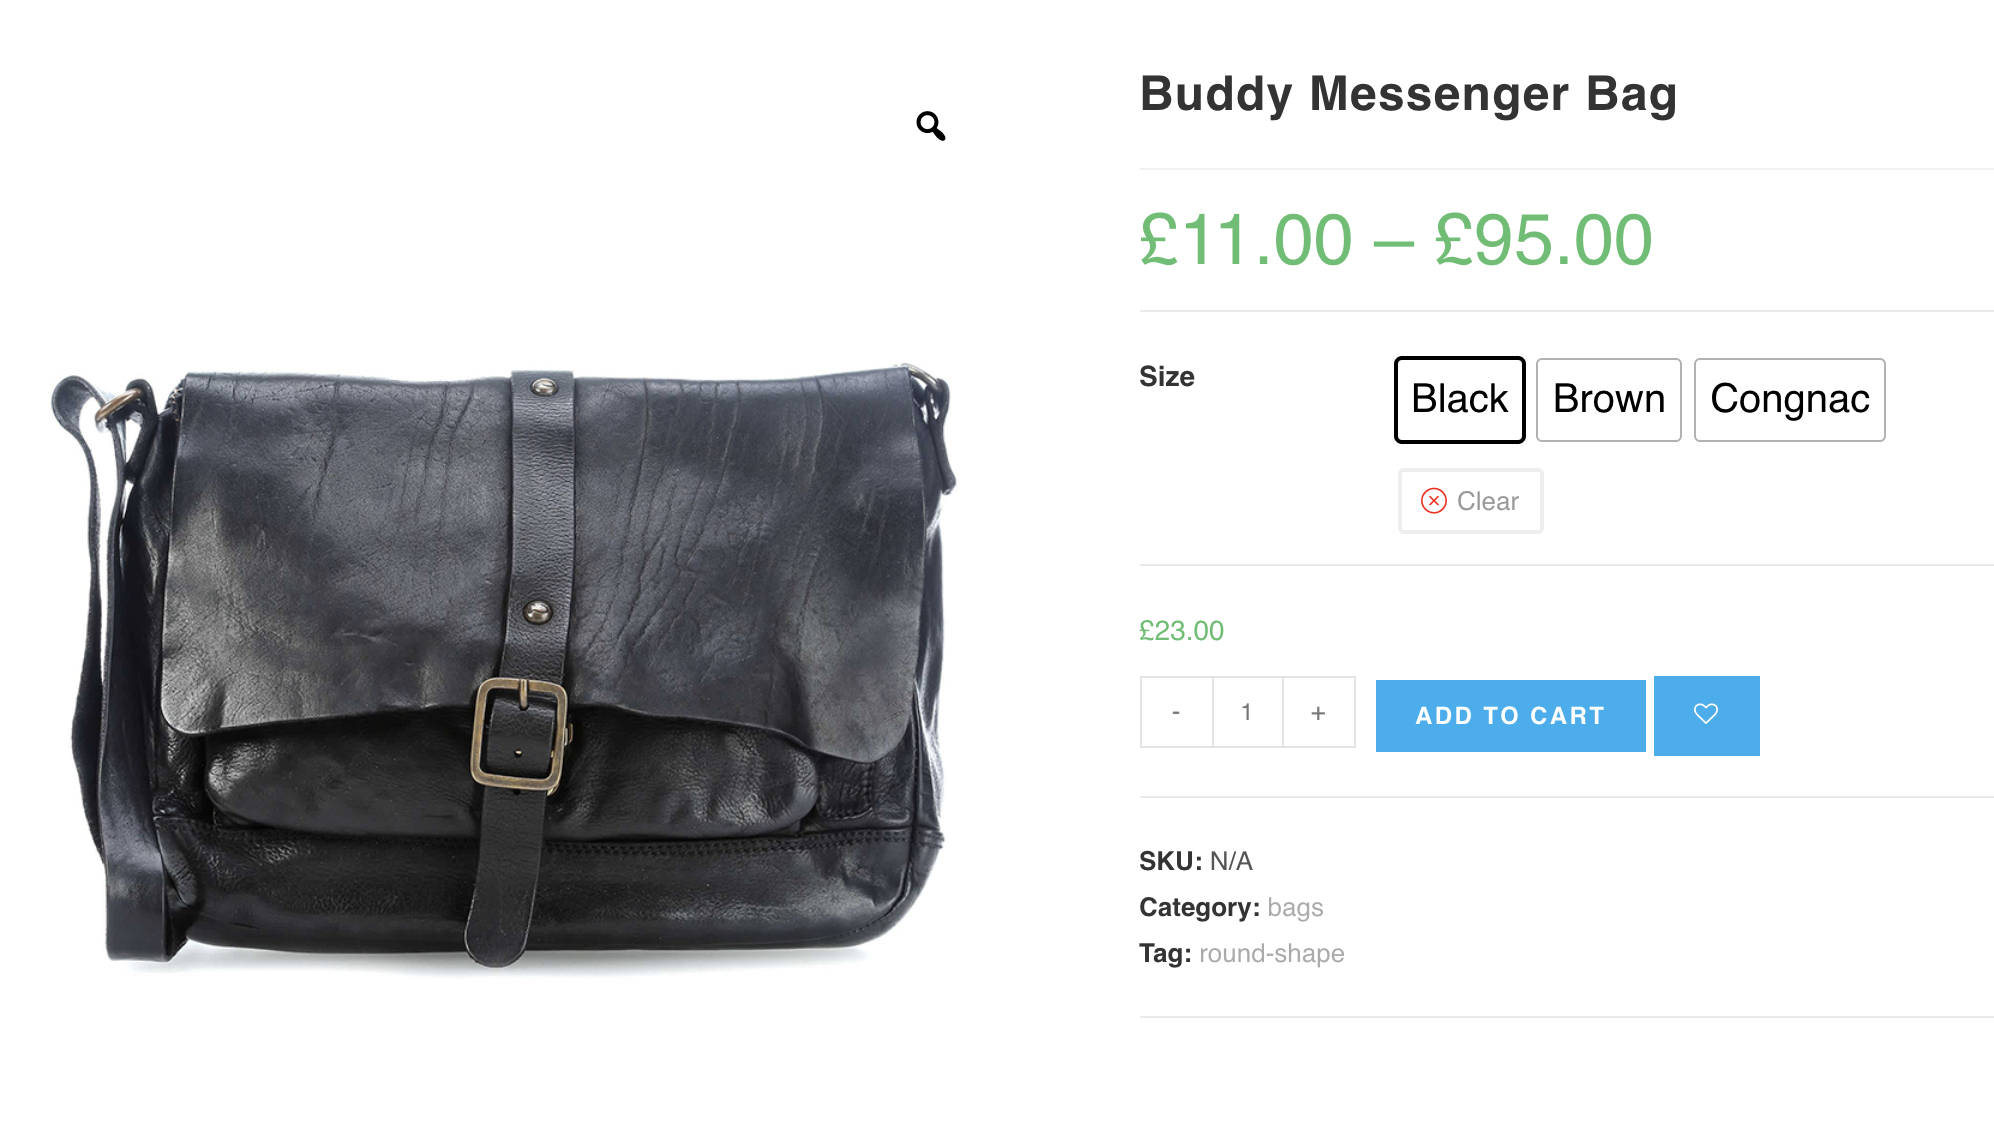
After selecting attribute type, the frontend of the product would look like the following screenshot. Don't be panic, if you find your attribute variations weird. It happens because you haven't set any image for variations yet.
.
How To Create Label/Button Variation Swatches From Manually Created Attributes
Video Tutorial
Step O1: Pro Plugin Setup
If you have variable products in your store and don't have product attributes created globally, it means you have created attribute and it's variations manually. To convert manually created attribute variations into image swatches, make sure you have premium version of WooCommerce Variation Swatches created.
Step O2: Change Manual Attribute Type
If you head to your Attributes tab from product data inside your product edit mode, and found variations are separated by pipe sign like the following screen. It means you have created variation manually.
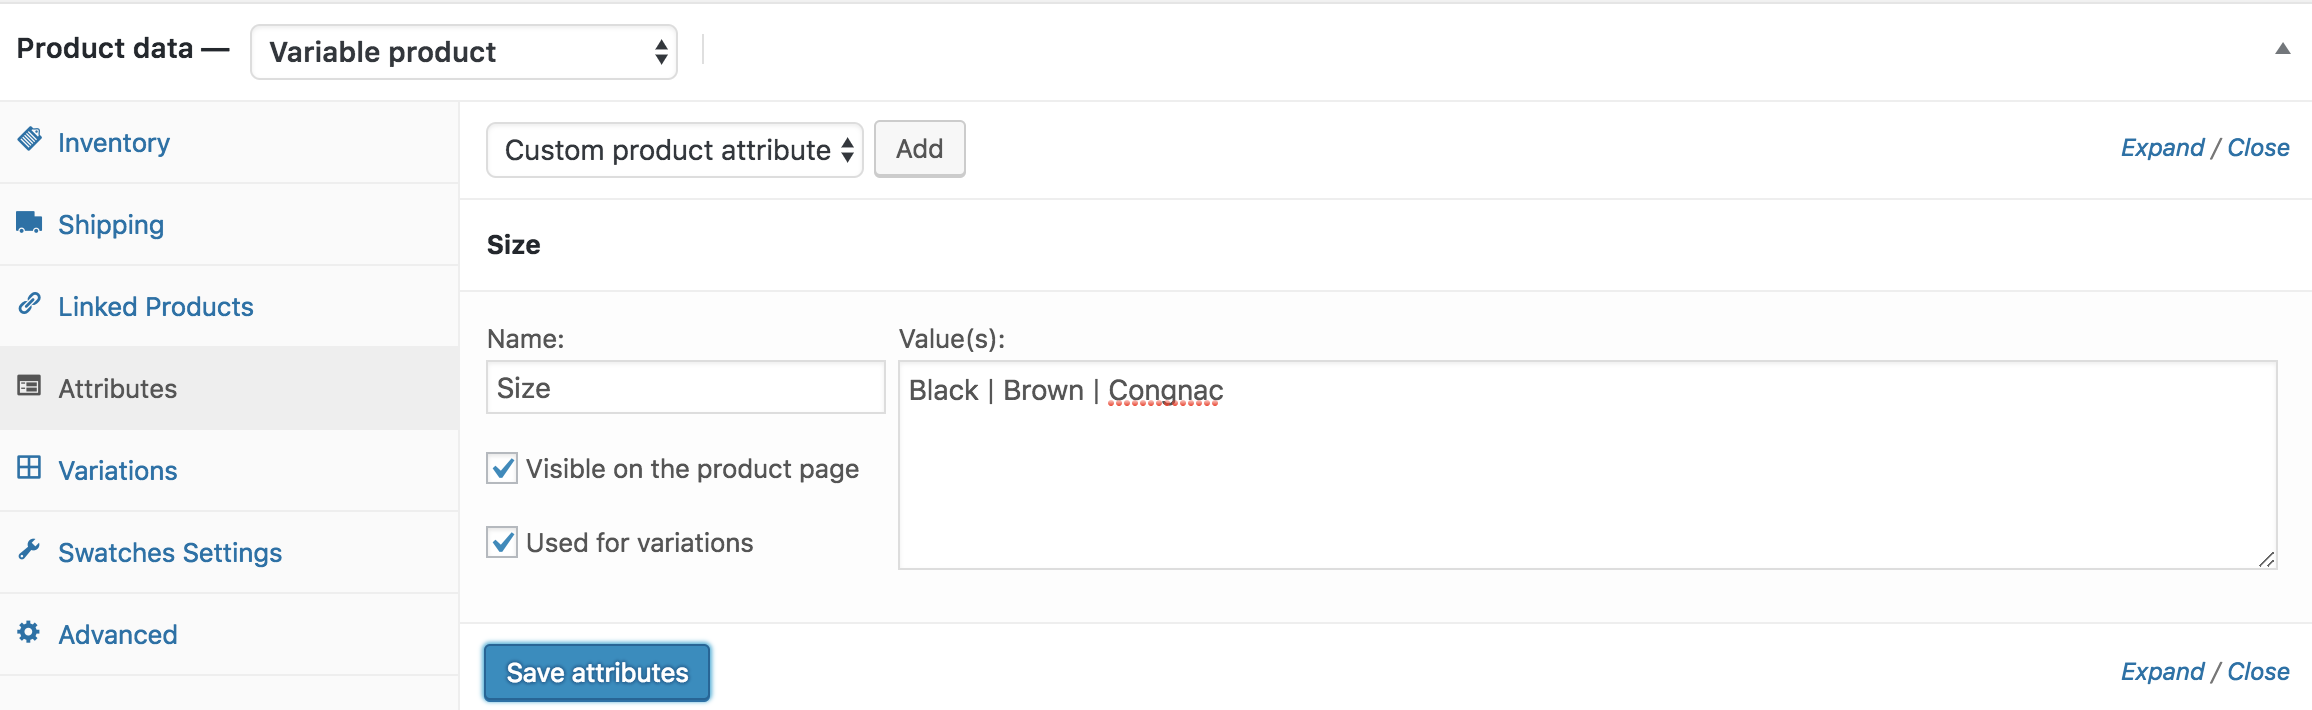
To Convert these manually created attribute variations, head to Swatches Settings tab, and select Button type from Select (Default) Dropdown.
After selecting attribute type, the frontend of the product would look like the following screenshot.
.
How To Create Label Variation Swatches From Scratch
Video Tutorial
Step 01: Create Attribute
At first, we have to create label / button attribute and its variations globally. To create label attribute globally, navigate to Products >> Attributes. As we’ll create label attribute for our product. Fill the name field with your desired attribute name. In this tutorial, I’ve termed attribute name: Size.
You can leave Slug field empty. It automatically generates the slug for the attribute. From the Type dropdown select button attribute type. When the mandatory fields are filled, select Add Attribute button.

After creating attribute, you will notice a list is created in the right side. Check the following screenshot.

Step 02: Create Attribute Variations
The more variation you would add, they would get added to this list. When an attribute is created, we need to create attribute variations. To create product variations, click on the Configure terms from the attribute list.

As we have created a label attribute. We’ll add label title as variations inside the button attribute. In this tutorial, we’ll add Small, Medium, and Large Variations. To create variations inside label attribute. Fill the Name field with your desired variation name, leave the slug field empty and save the setting each time.

Step 03: Enable Attribute Variation in Variable Product
It’s time to enable button / label swatches inside a variable product. To enable label swatches in your desired product. Get into your desired product edit mode. Make sure you have variable product selected from Product Data.
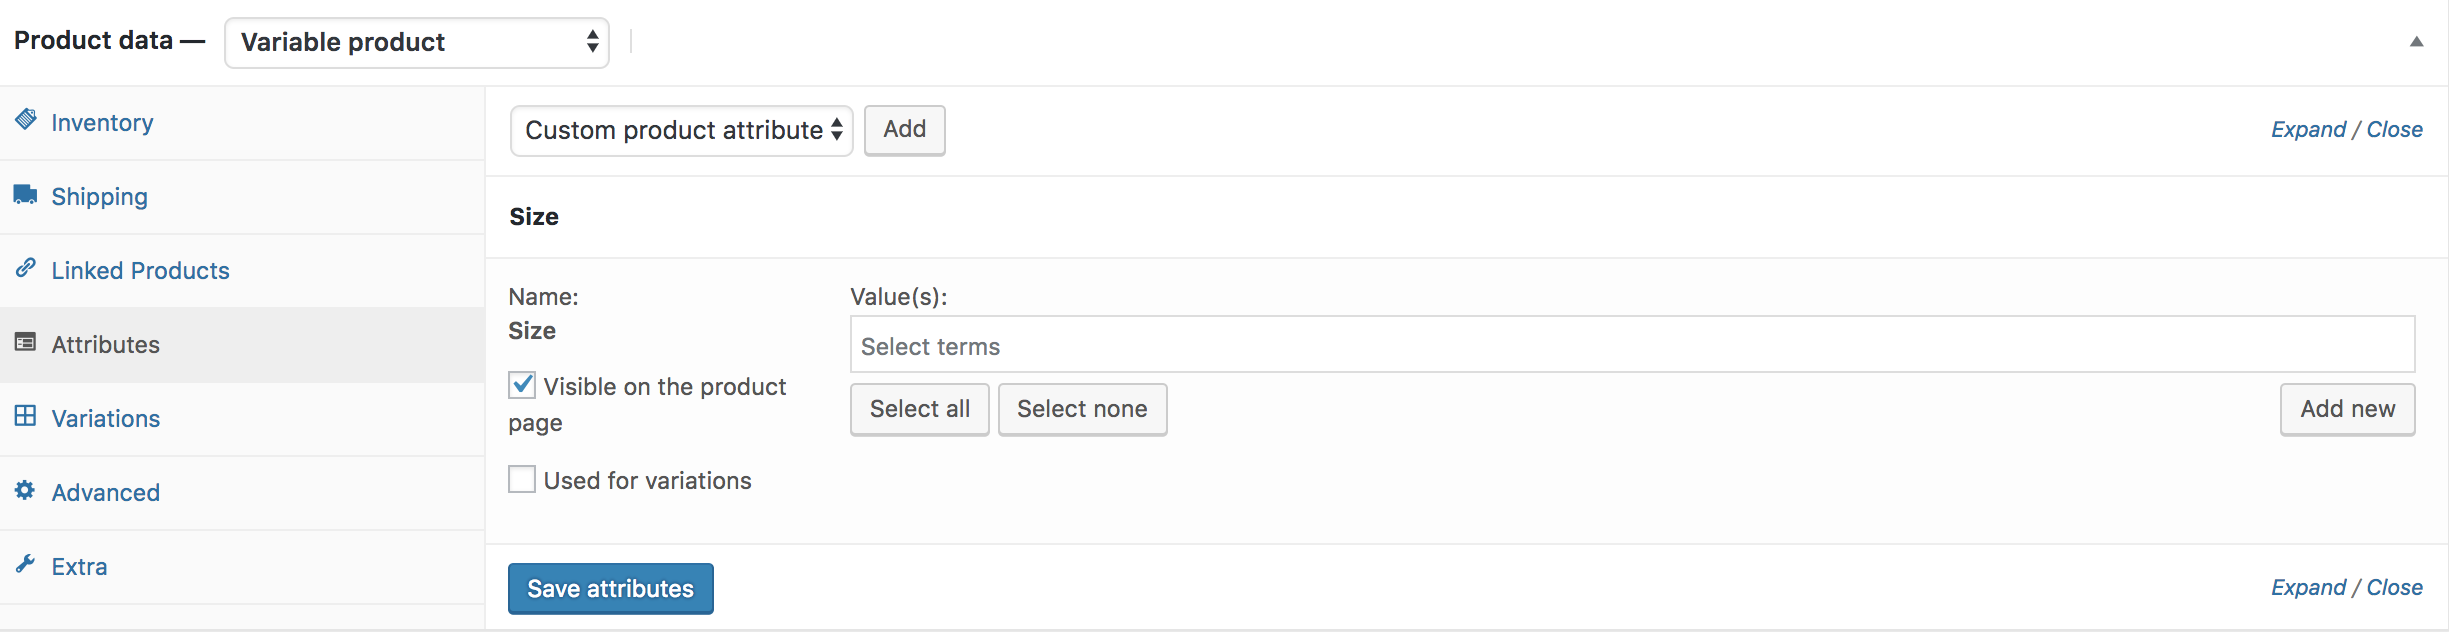
After selecting the Variable product from Product data dropdown, head to the Attributes Tab. Click on Custom product attribute dropdown. In this dropdown, you can see all your globally created attributes. As we’ve only created a Size attribute, it’s now showing Size attribute.
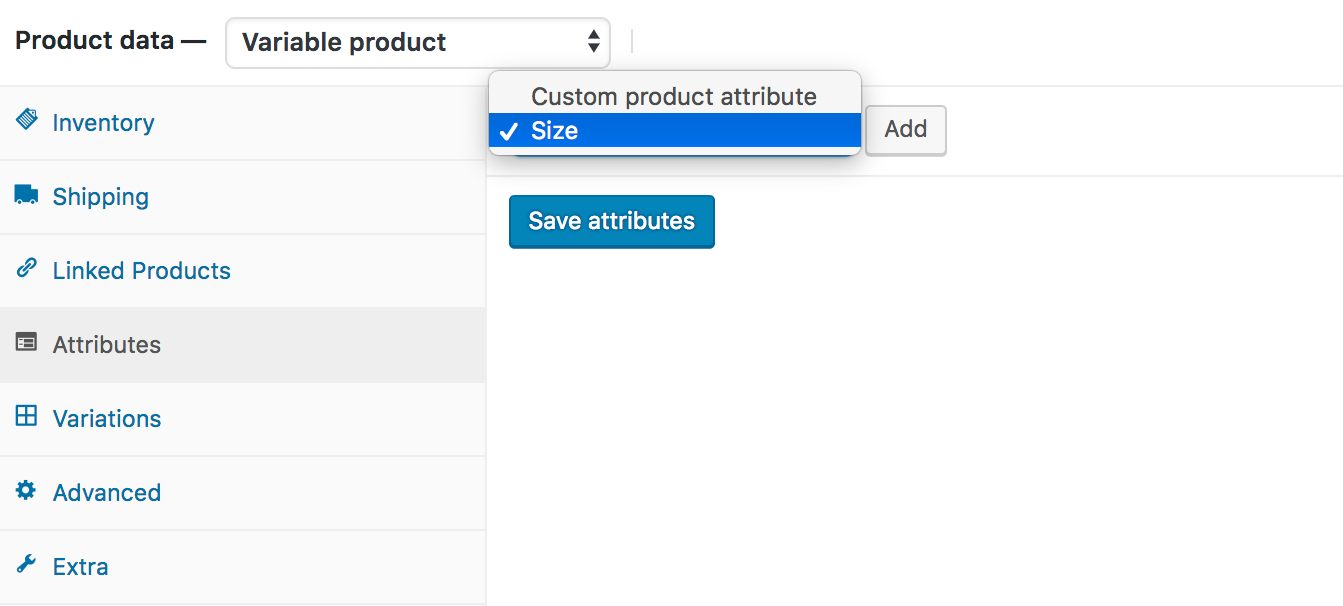
Now select the Size attribute and click on Add. You can see the following screens appears afterward.
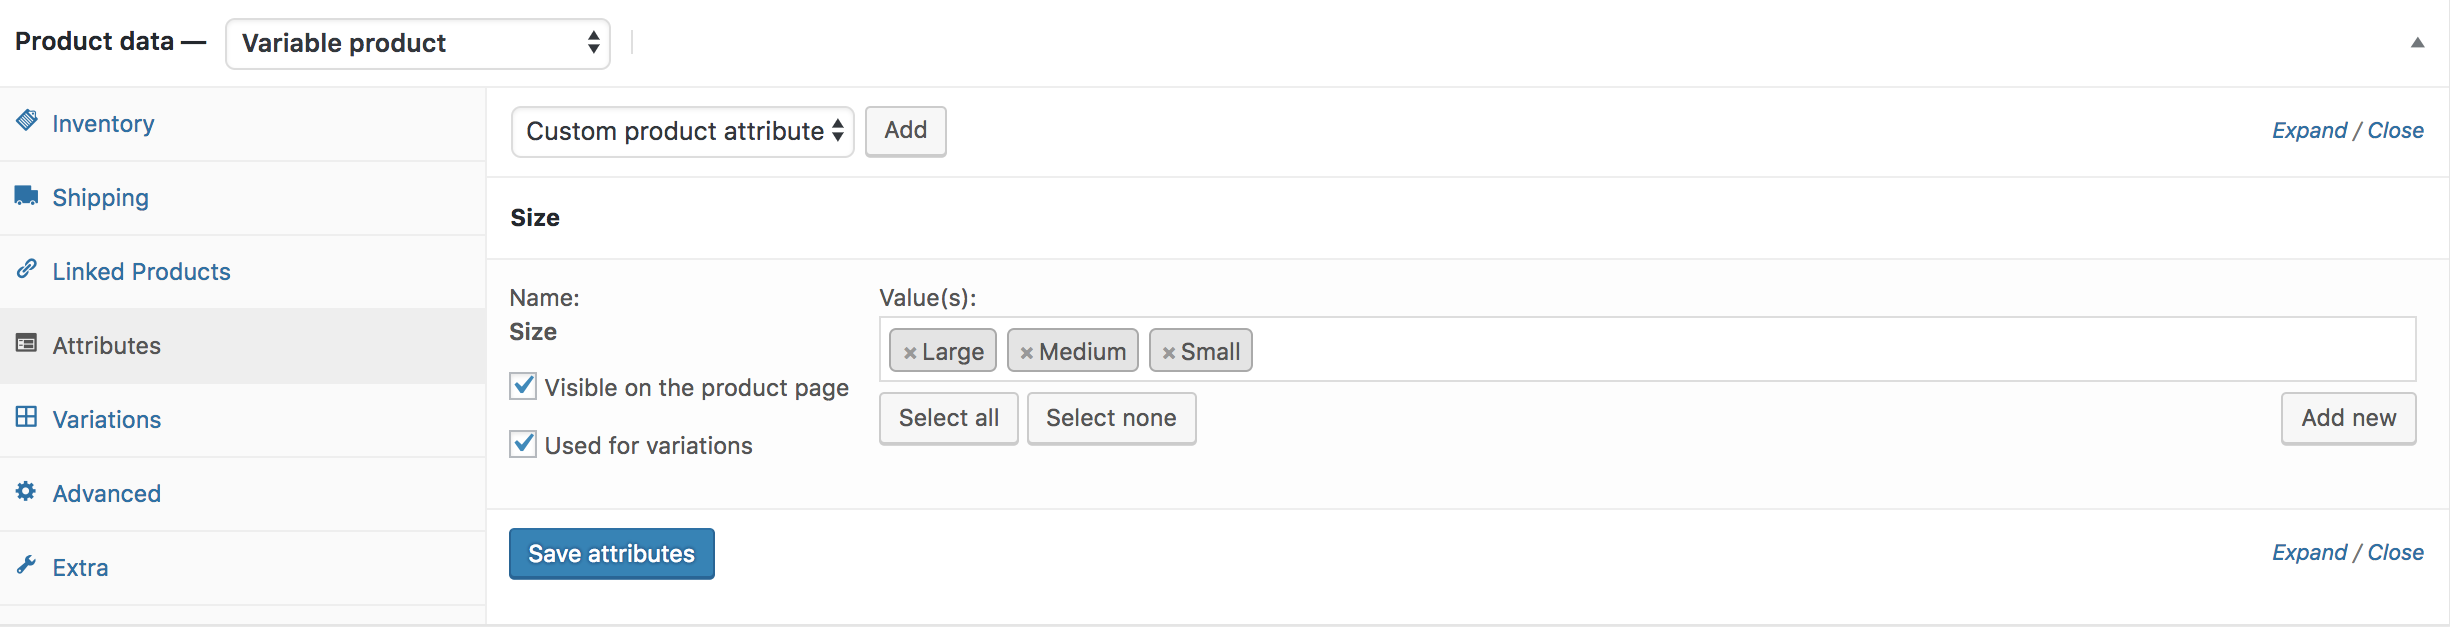
If you want to select all available variations of the size attribute, click on Select all button. If you want to deselect all selected variations at once. Click on Select none button. Add all variations selecting Select All button, checked Used for variations settings and click on Save Attributes button. Check the following screenshot for guideline.
Now get into Variations tab. Click on Add Variation dropdown. Here you will notice two options. First one is Add Variation and the second one is Create variations from all attributes.
In this tutorial, I am going to select Create variation from all attributes and click Go button. It’ll add all available variations like the following.
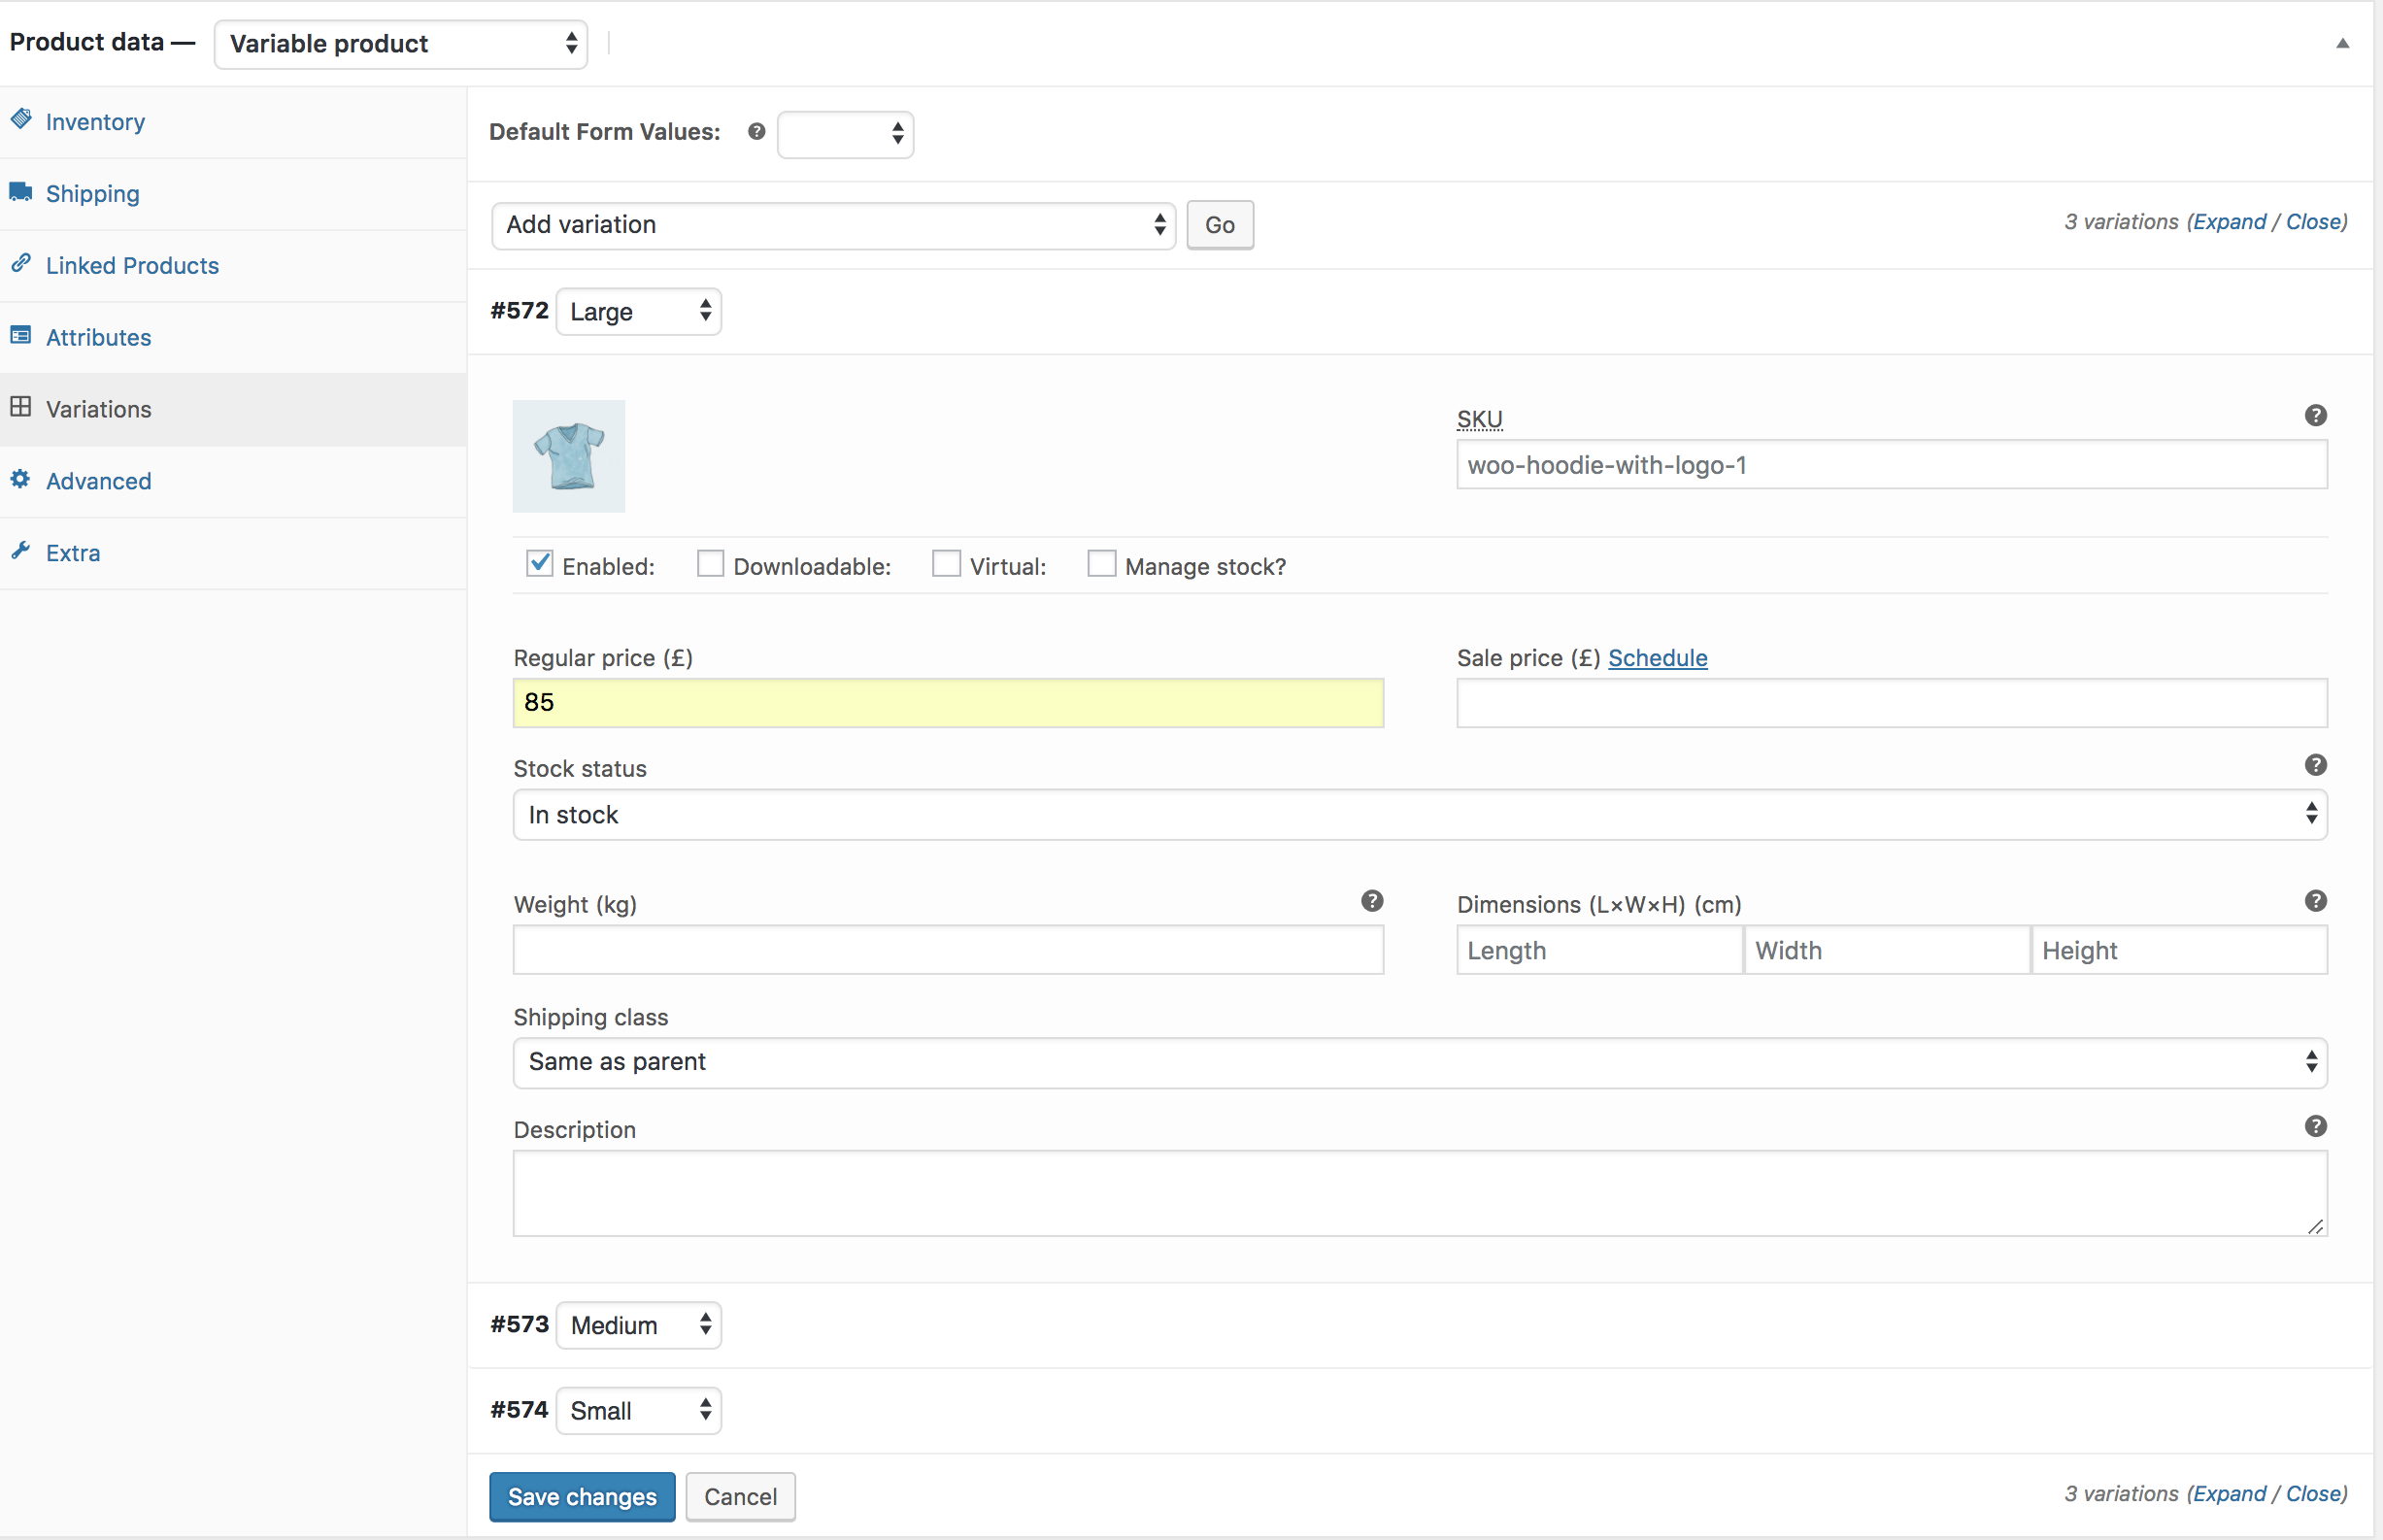
You can see the above image that Small, Medium, and Large image variations are there. From this screen you can add variation image, variation price, and other variation specific details. When you have done with adding all your required details in each variation, click the Save Changes button.
Remember! Don’t forget to add the price in each variation, otherwise, variations won’t be visible on the product frontend.
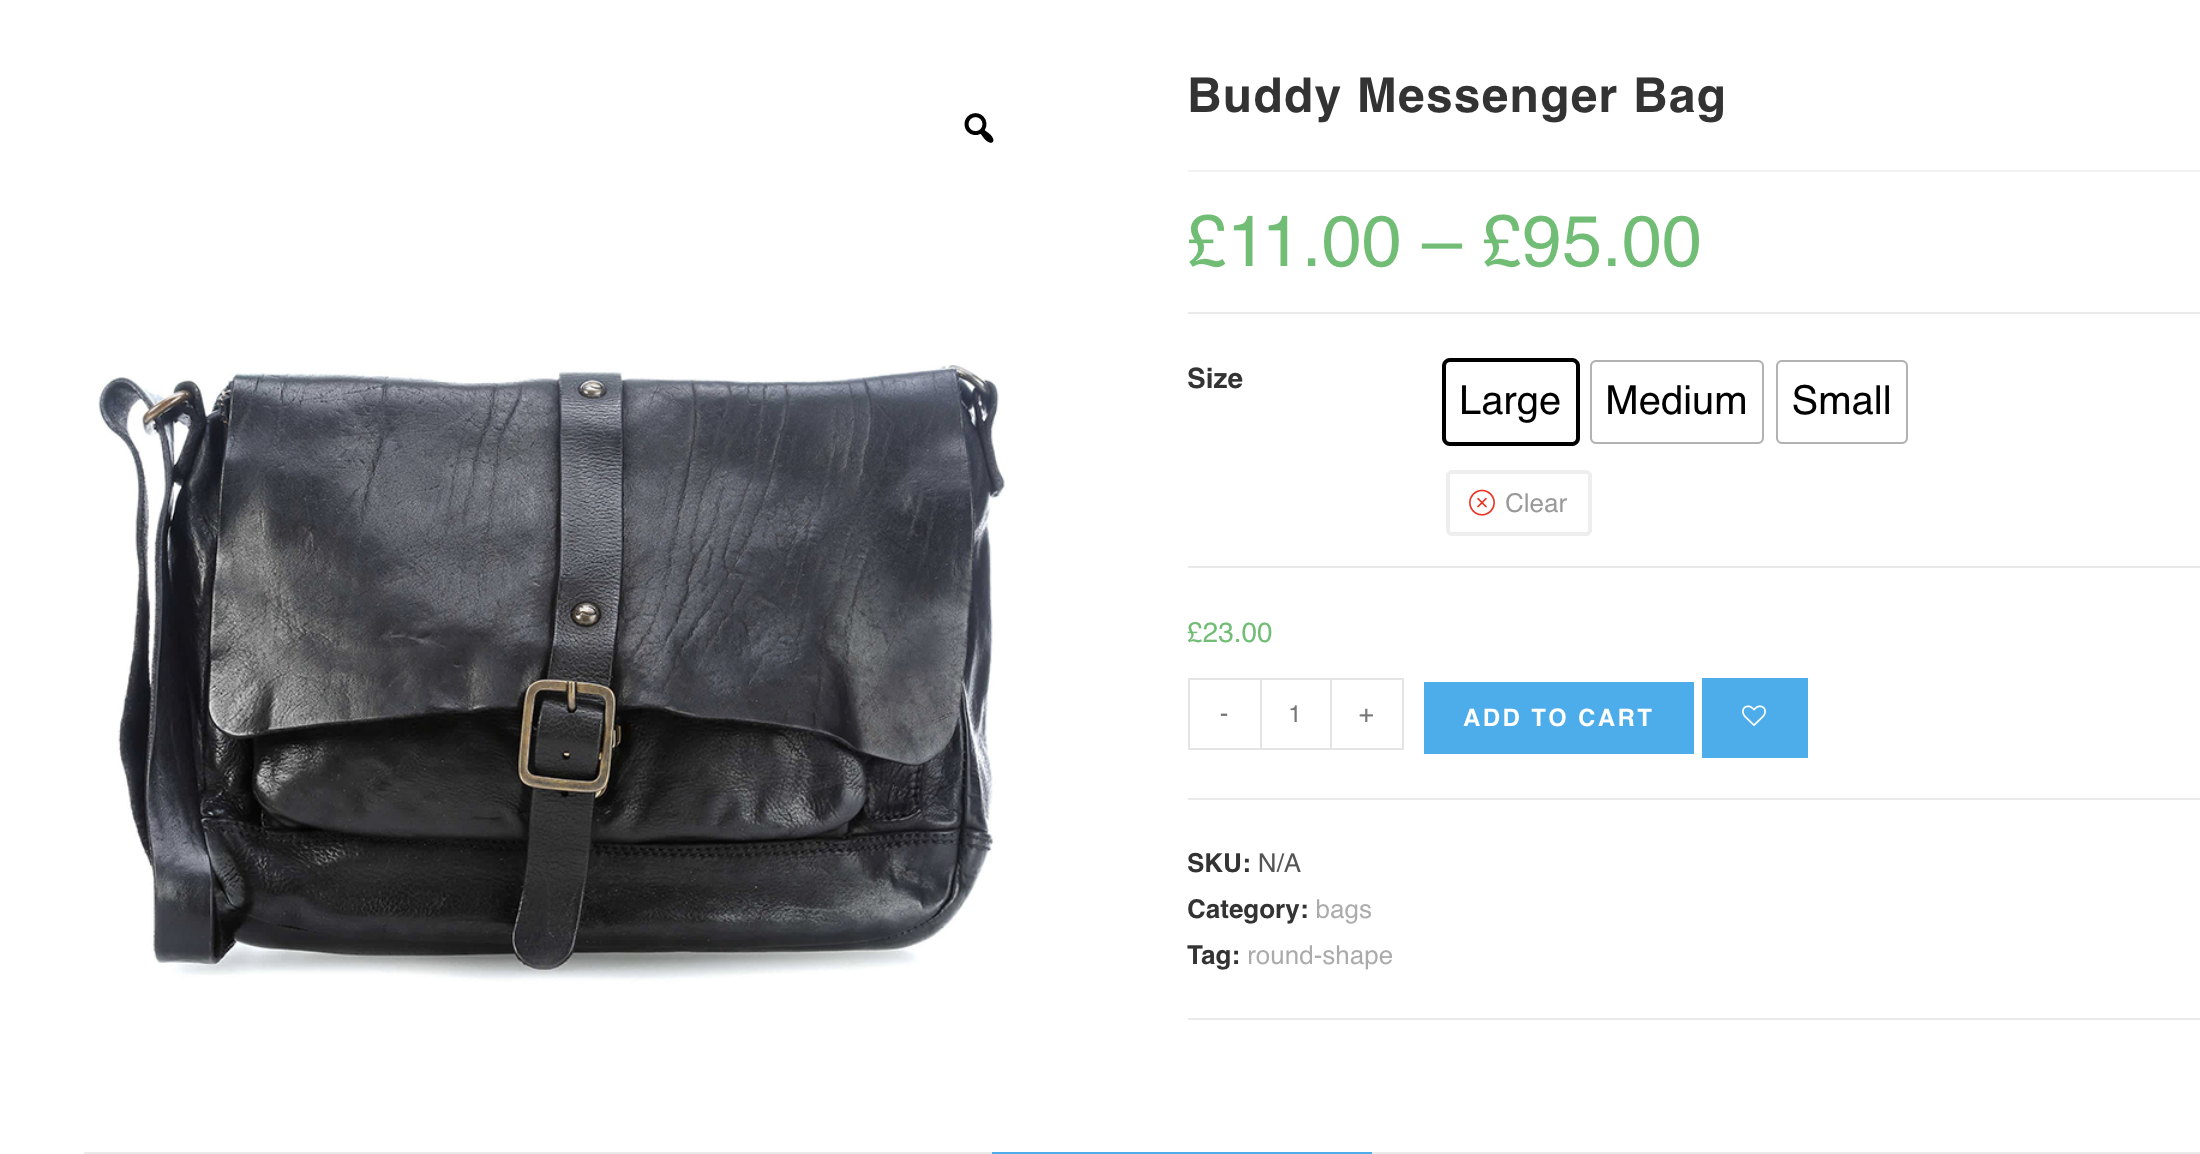
If you can successfully add variation. You can see the following swatches in your product frontend.
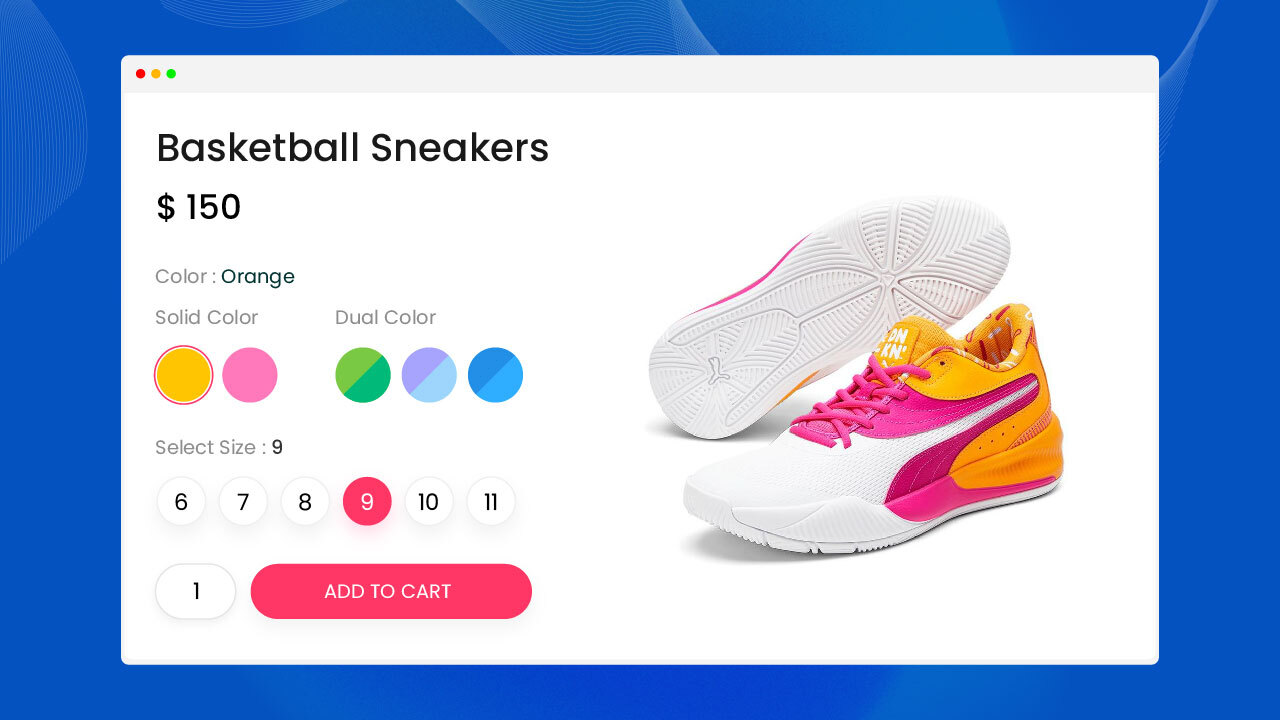
07. How To Create Multi / Dual Color Swatches (Globally) Back To Top
Step 01: Define Attribute Type
To kickstart creating multi/dual color variation swatches globally, navigate to Products >> Attributes. Fill Name field with your desired product attribute name. I am going to name this attribute DualColor.
Leave the Slug field empty. The system will create attribute slug on its own. Select Color attribute type from the type dropdown. Press Add Attribute button to continue the process.

After pressing Add Attribute button, you will notice a list on the right side. In the list, you can find DualColor attribute there.

Step 02: Create Variation for DualColor Attribute
From the attribute list table, you have to press Configure terms link to create variations from DualColor attribute row.
In this list table, you will find all your product attributes. All attributes come with Configure terms link. So, whenever you need to add new or edit existing variations you, you have to go in this way.

Now, we'll create Red&Blue and Green&Black variations for DualColor attribute.
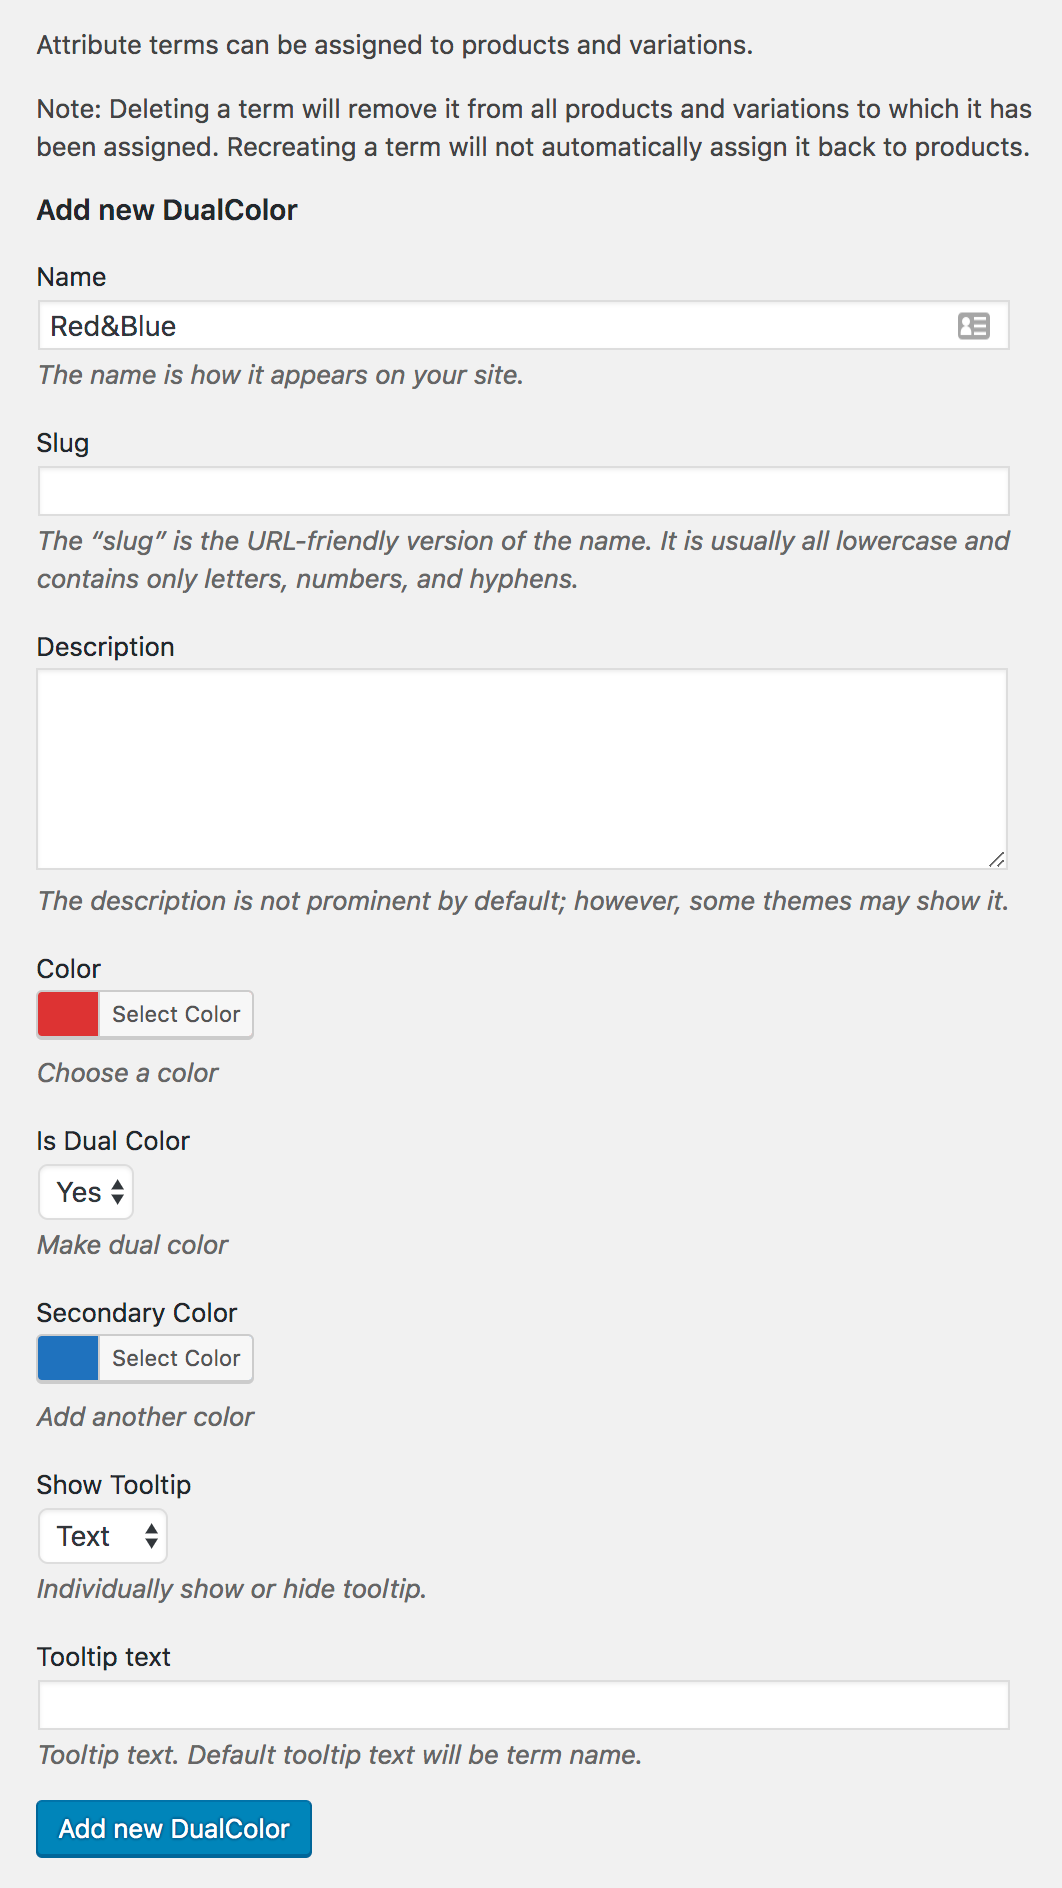
Creating Attribute Variation is the same as creating Attribute itself. Fill the Name field with desired variation name, keep empty Slug field empty. Pick your desired Primary color and select Yes from is Dual Color option. Afterward, Secondary Color option comes up. pick the secondary color from color-picker. Press Add new button to save the changes.
For demonstration purposes, I've filled Name field with Red&Blue title. Added Red color for primary and Blue color for secondary color options.
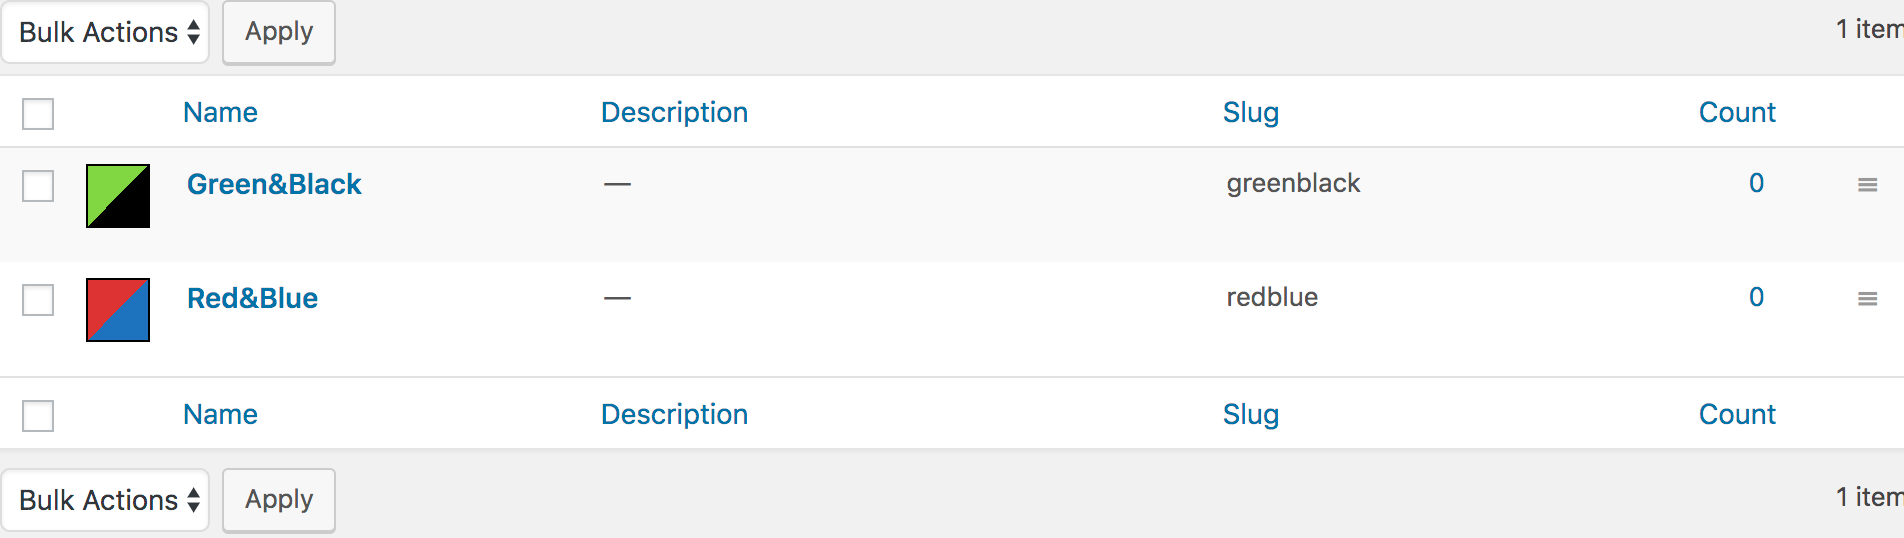
I'll do the same for the Green&Black variation. After creating all your attribute variations, you can a variation list on the right side of the product variation creating form. So, you can see my created variable product variations.
Step 03: Enable WooCommerce Dual Color Swatches On Variable Products
We have successfully created WooCommerce multicolor swatches for product attribute variations globally. Now, It’s time to link them with variable products.
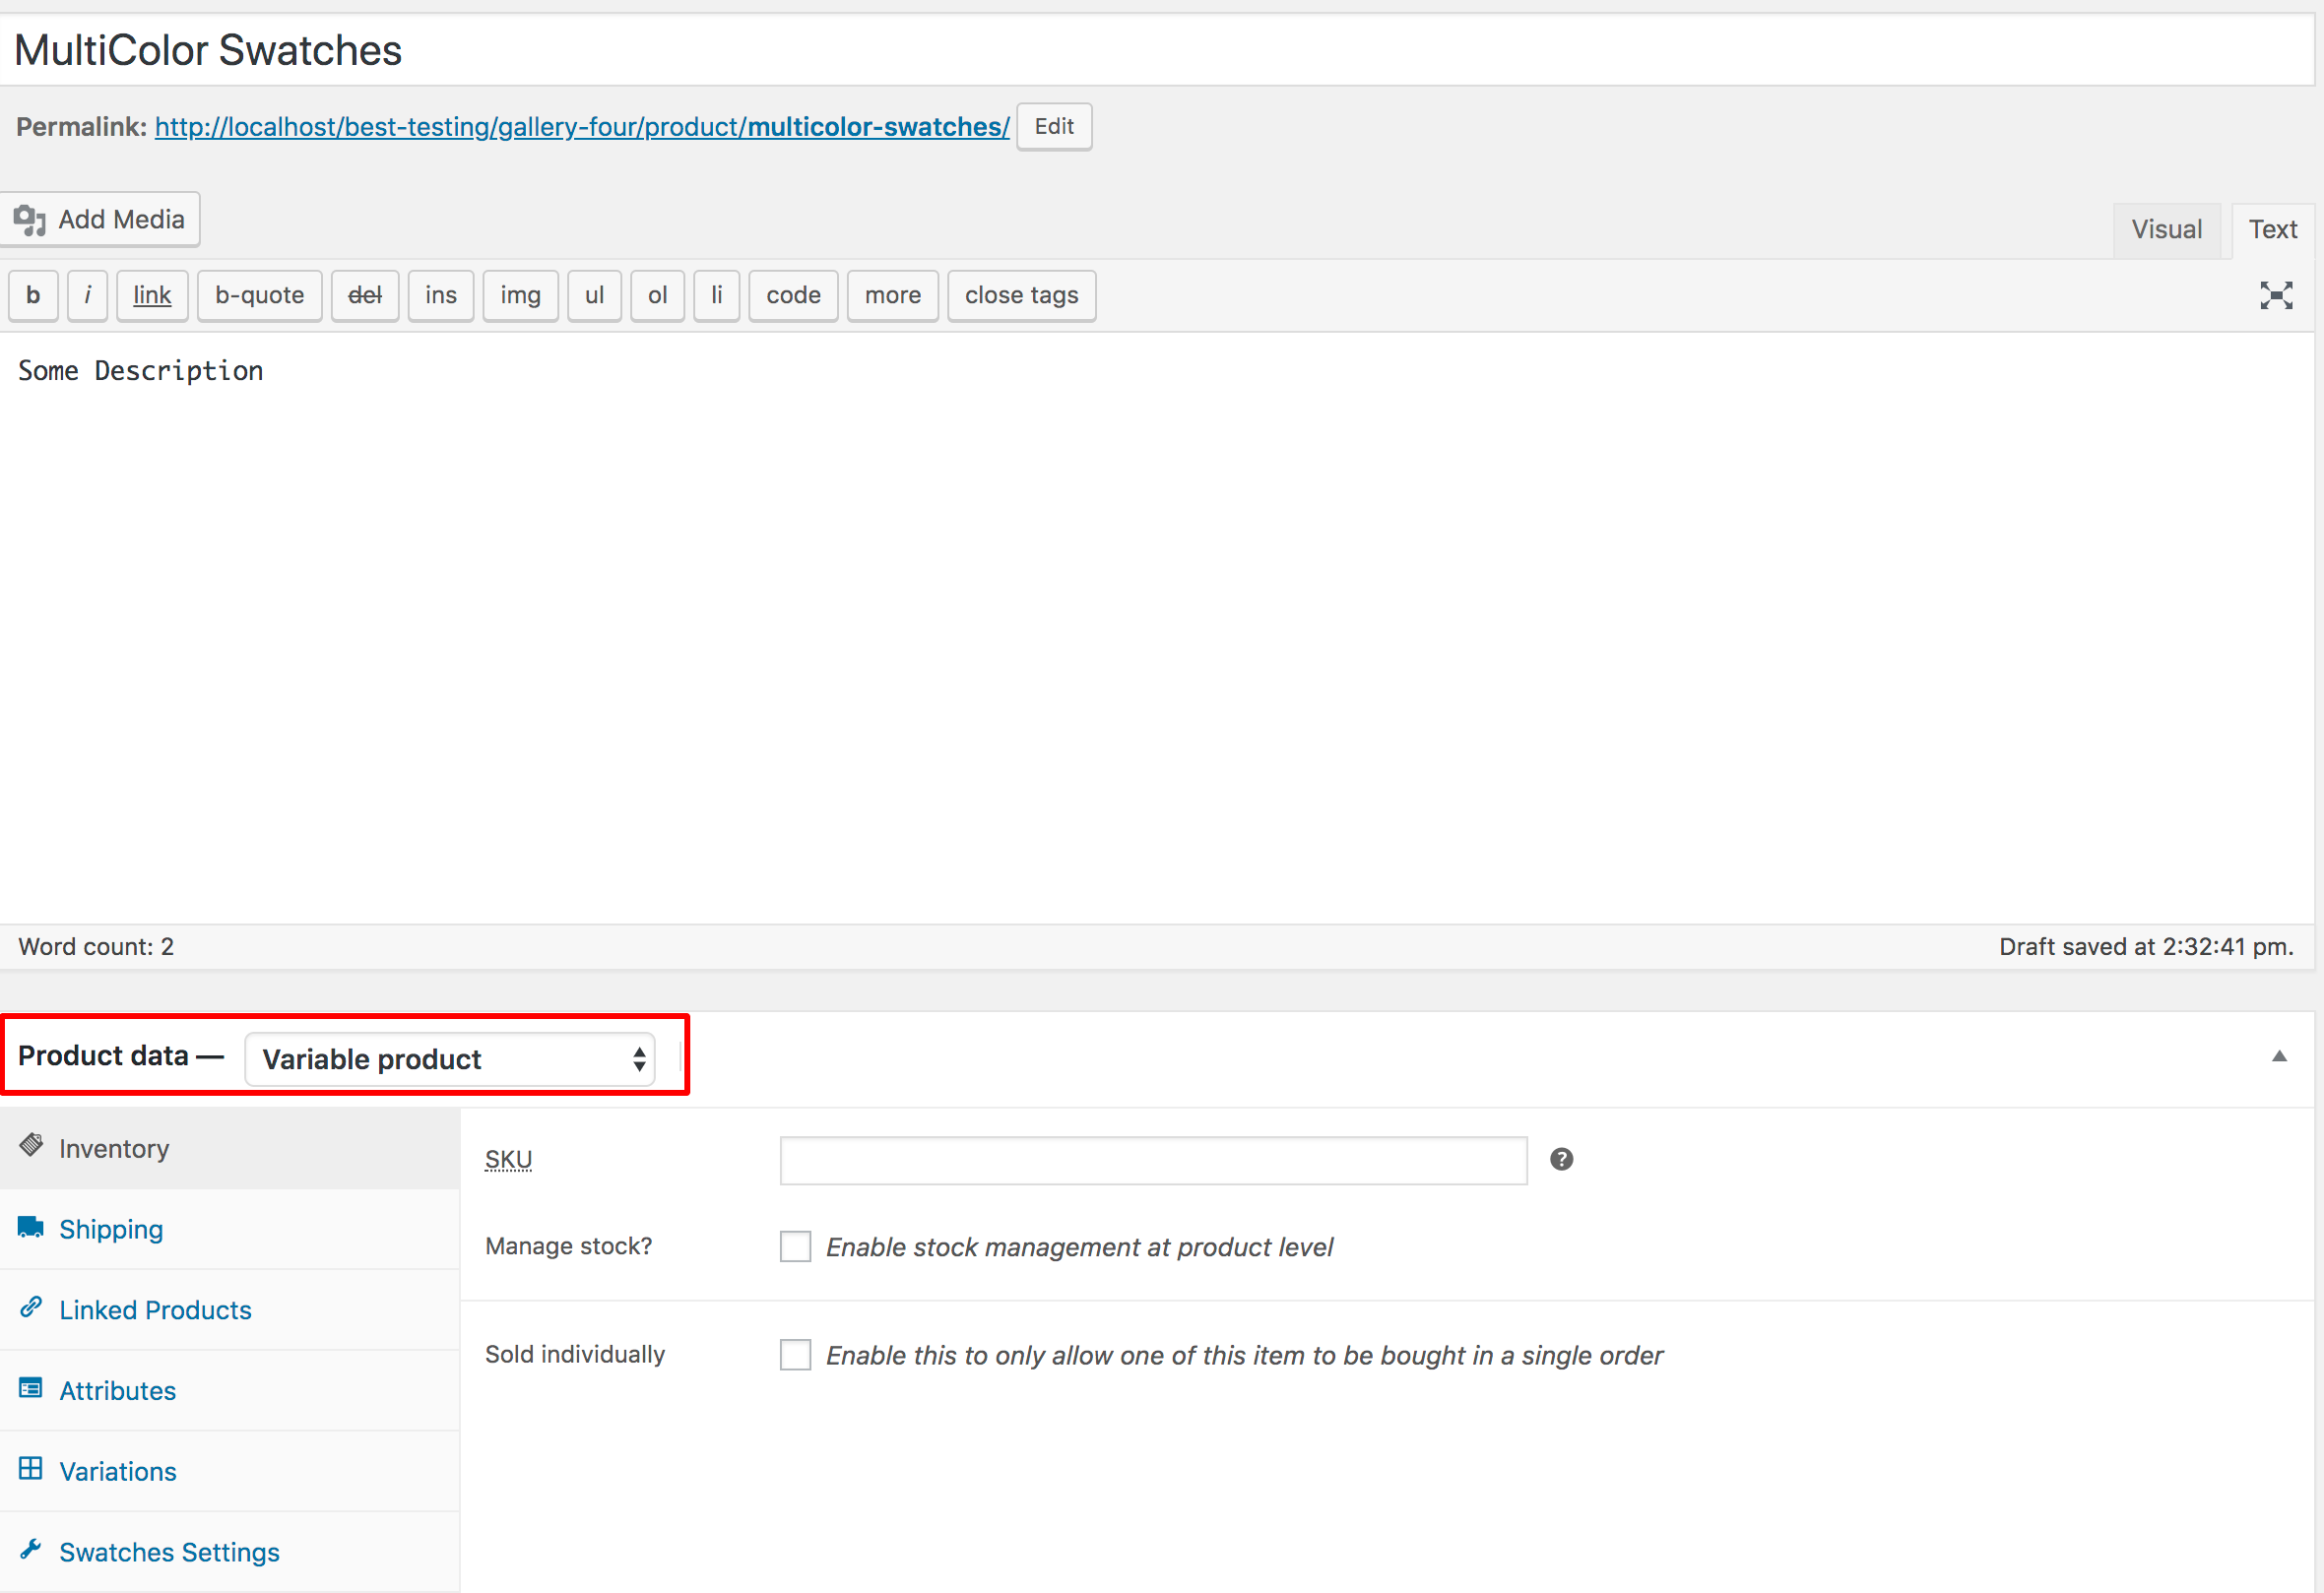
To create a variable product, head to the Products >> Add new. Give a name to your variable product and add some product description. Make sure you have variable product select from Product Data option.
Next, from the Attribute tab, press on Custom product attribute dropdown. This dropdown list will reveal with all available product attributes created globally.
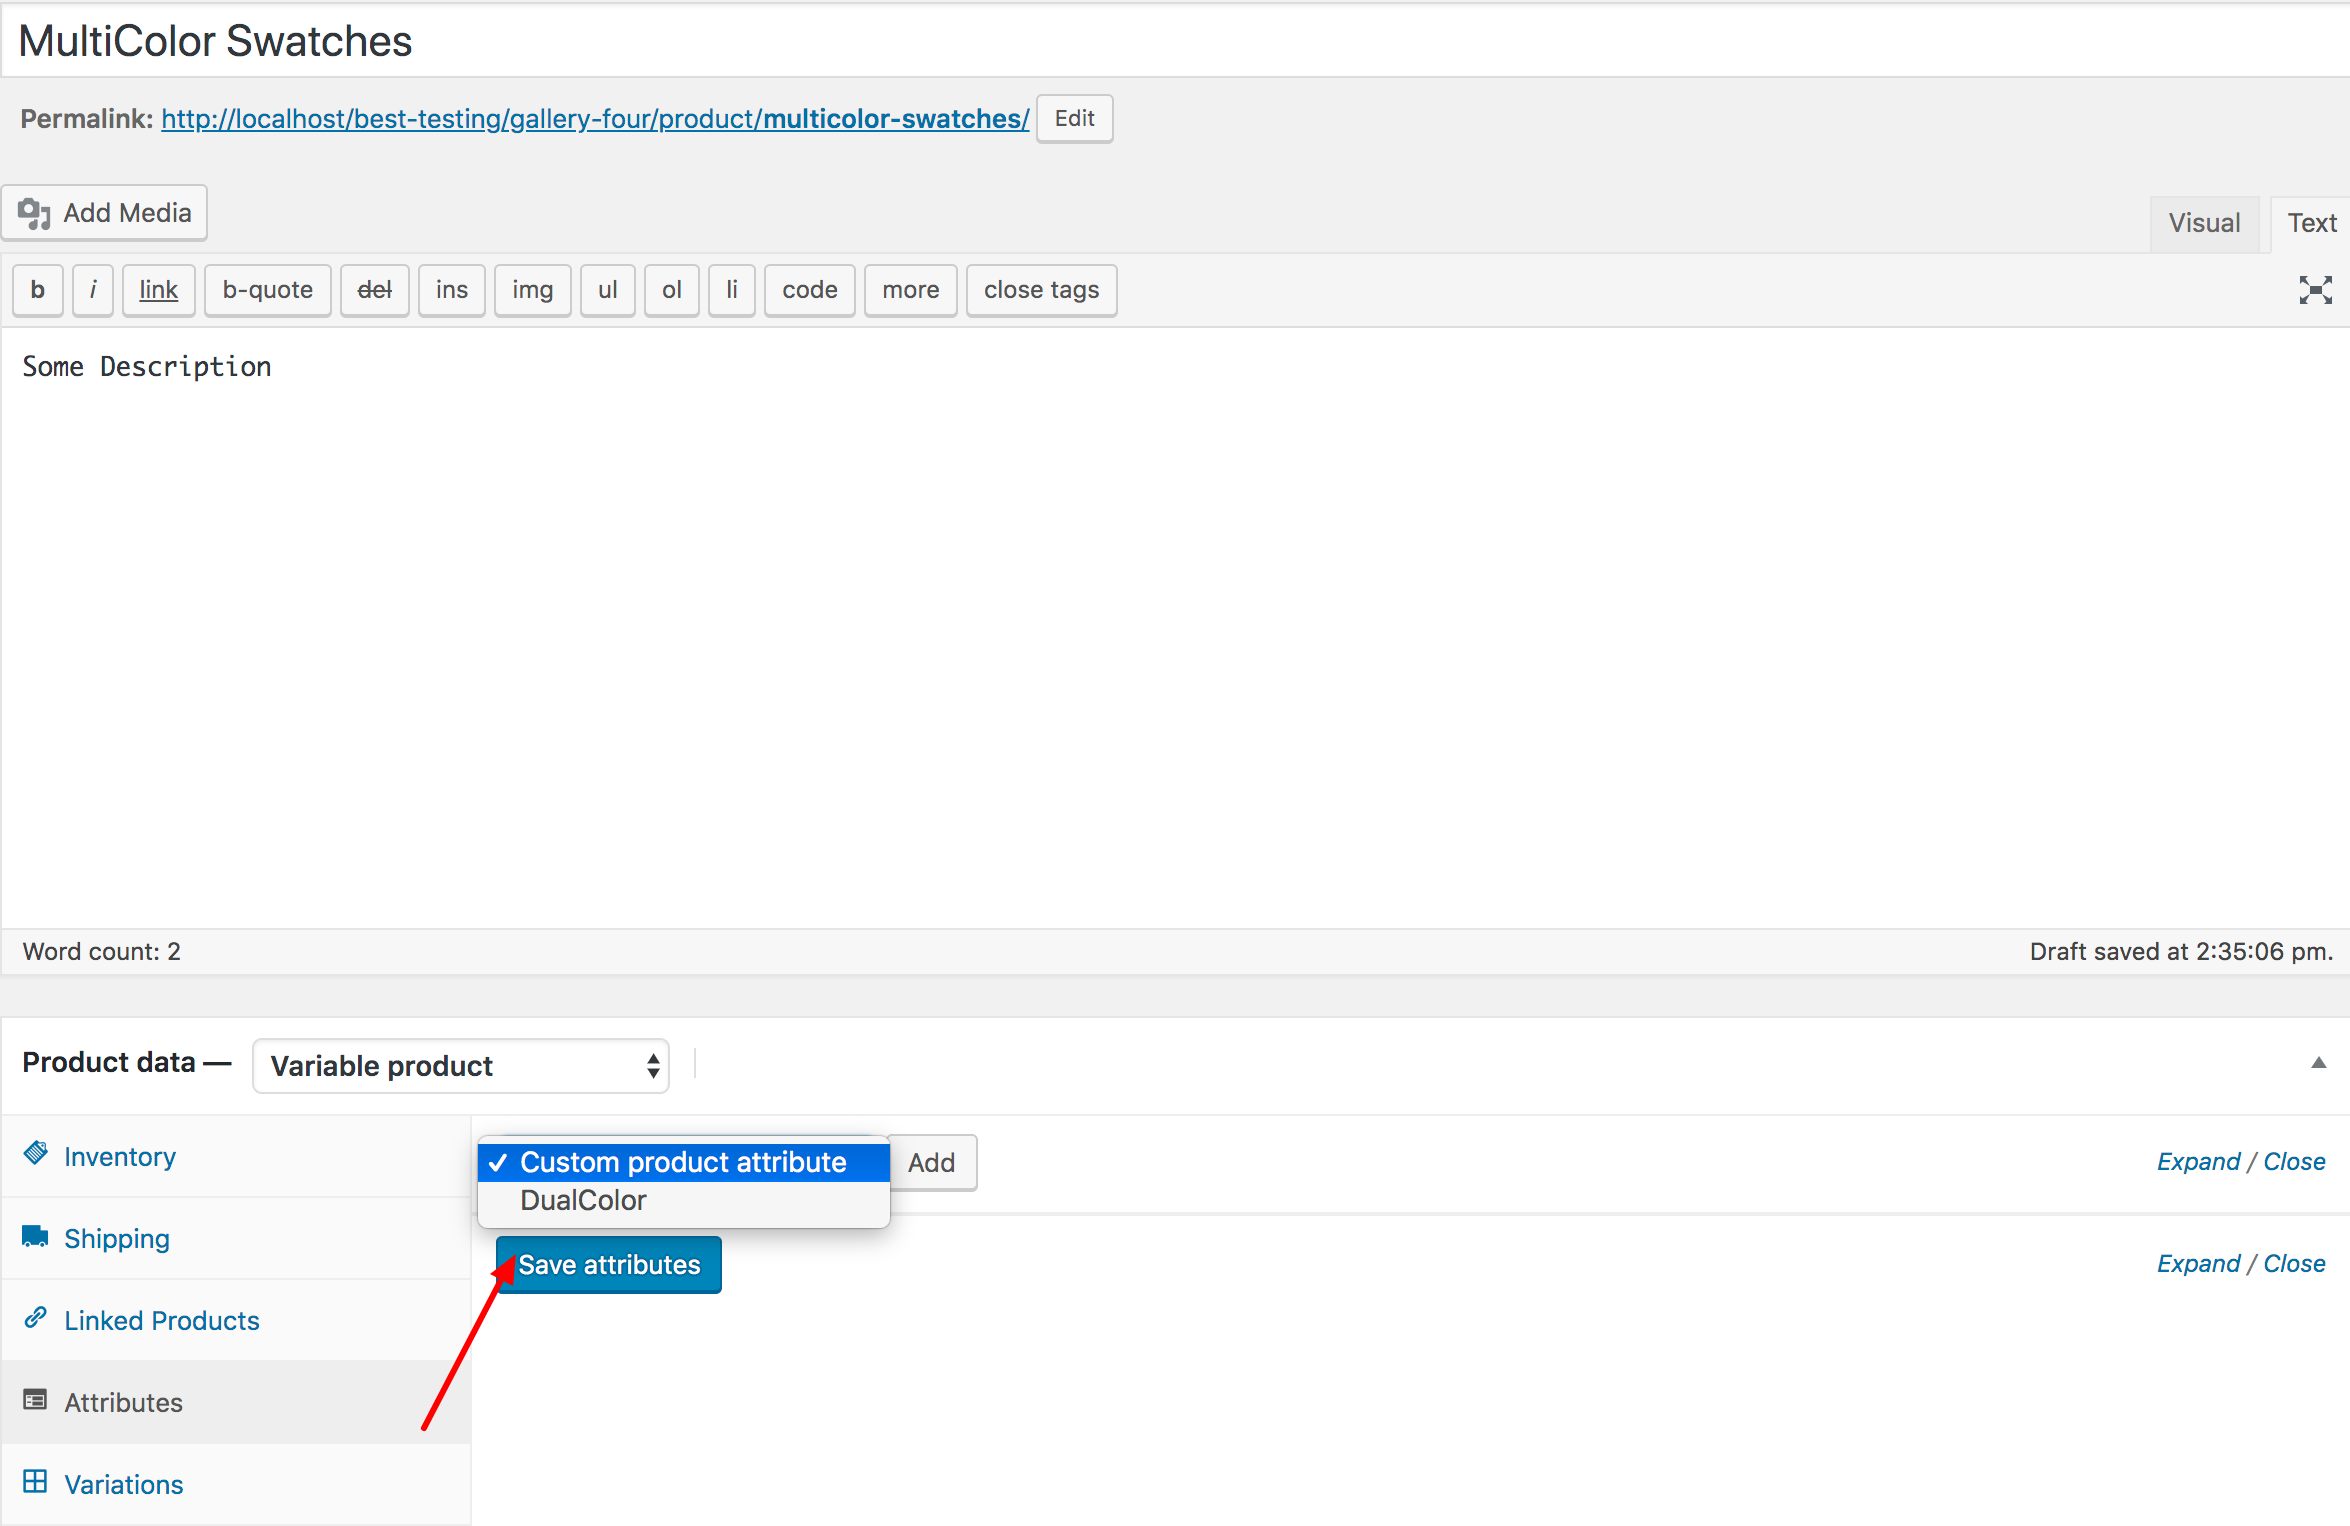
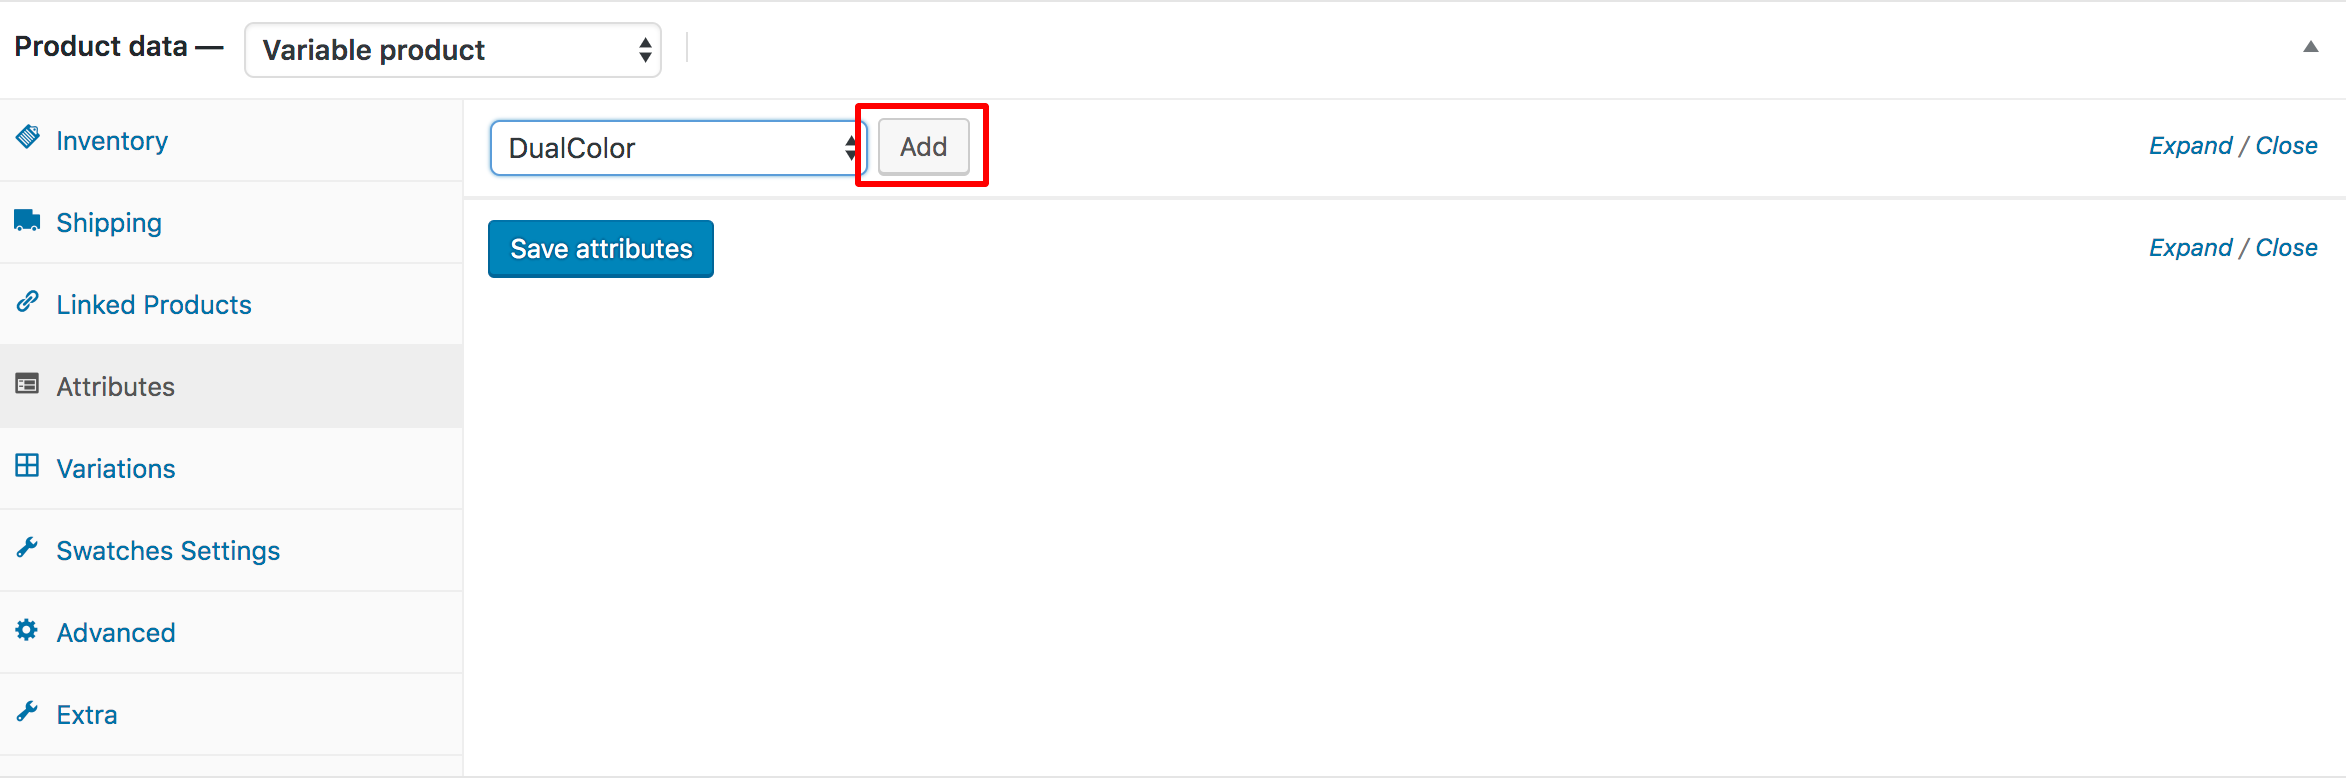
Select your desired Attribute from this list. In my turn, it’s DualColor attribute. Select DualColor attribute, press Add button.
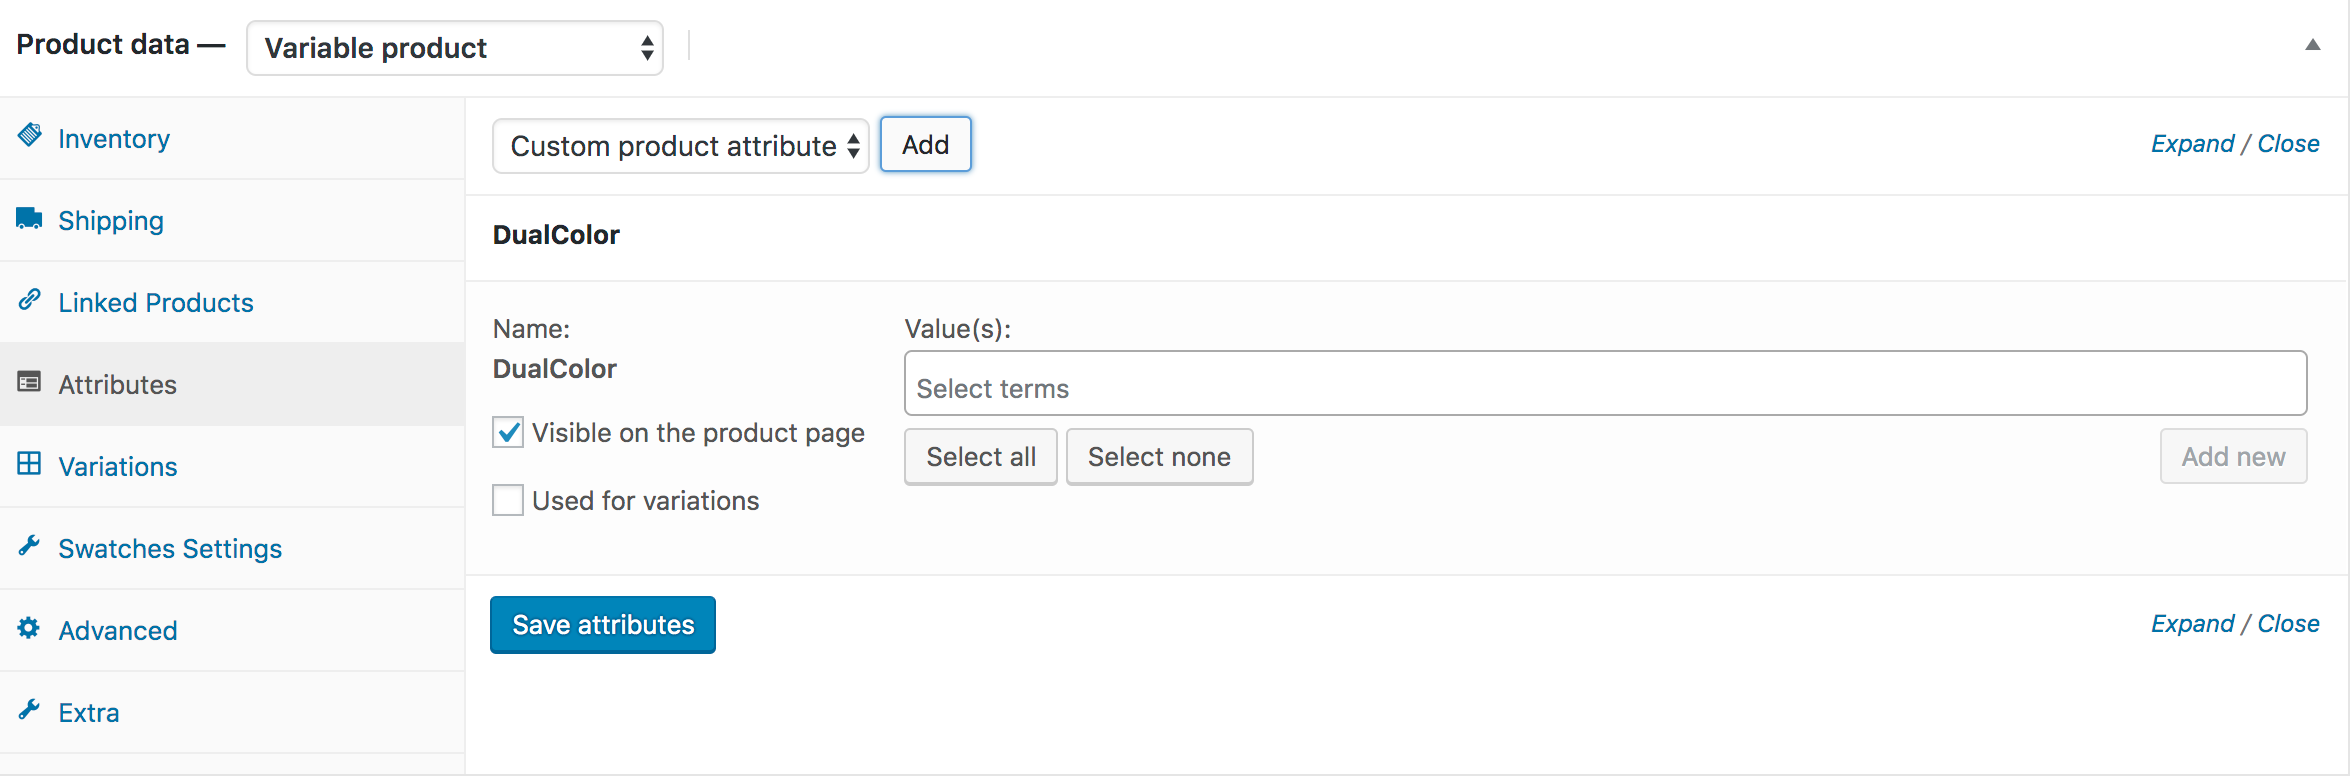
After Adding Dual Swatches, you can see the following screen. From here, you add all your attribute variations at once, pressing Select All button.
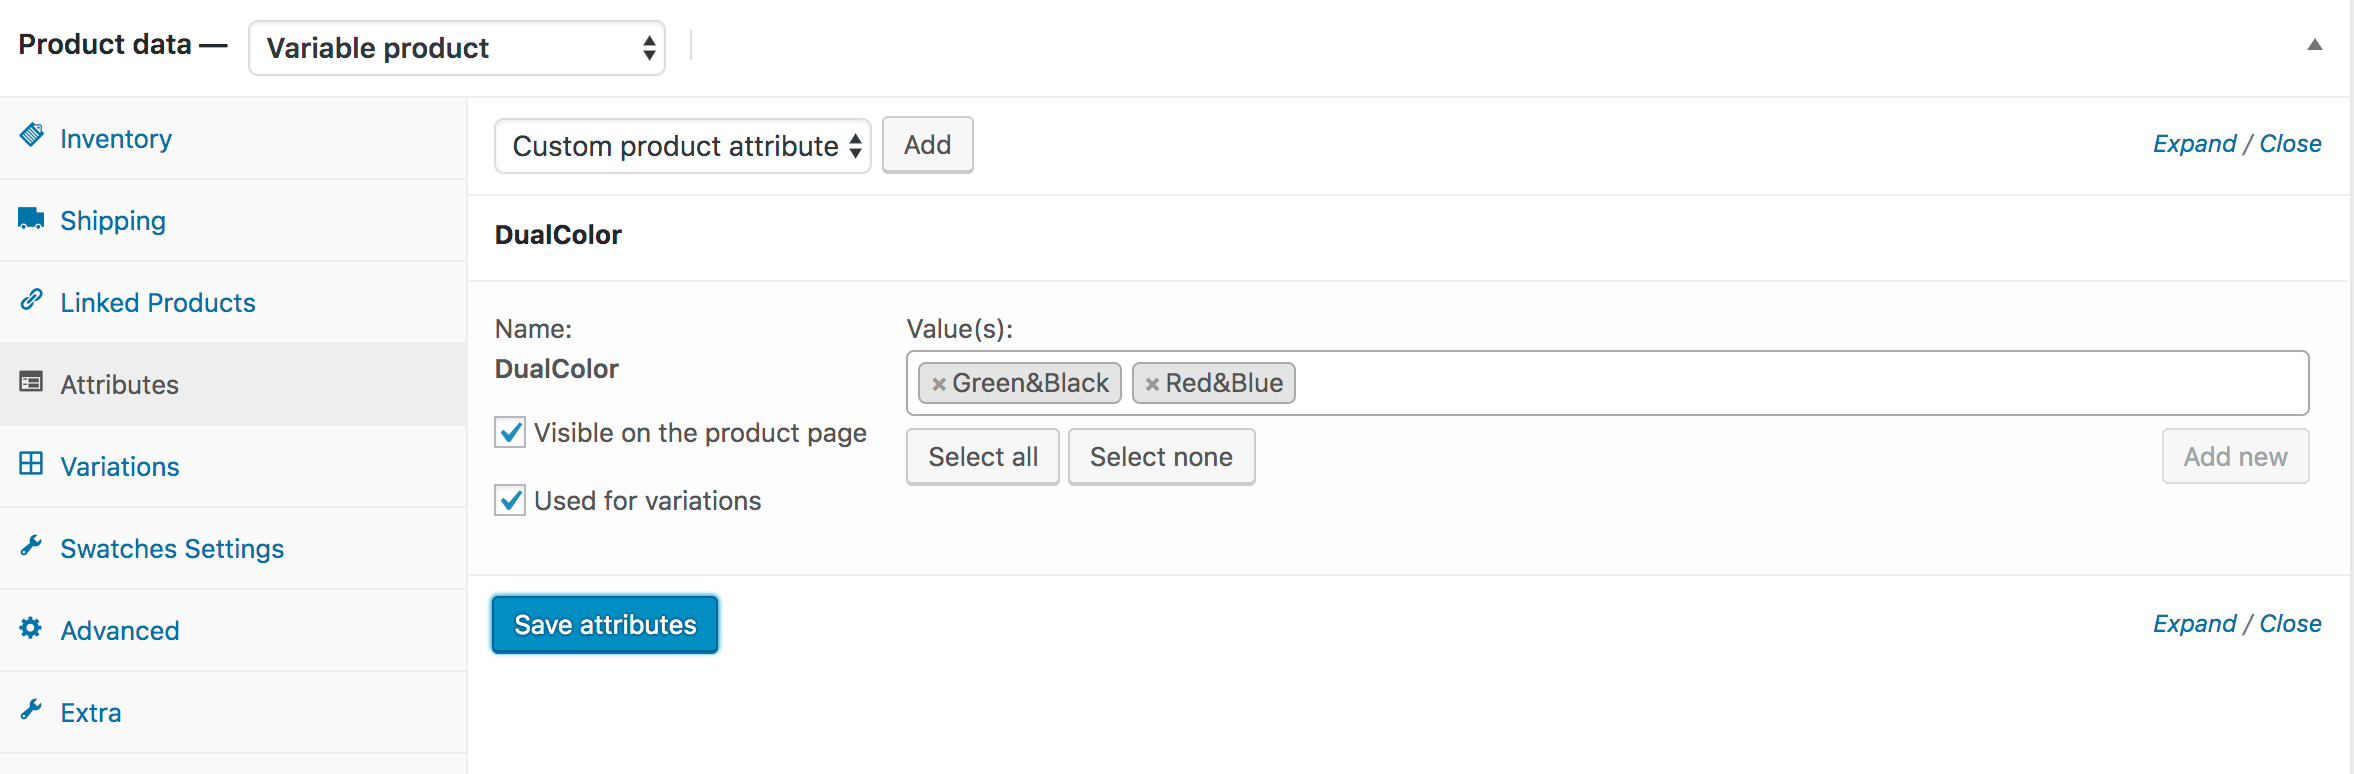
You can see in the following screenshot, I've my two variations: Green&Black and Red&Blue for DualColor attribute are there. Check Used for variations and press the Save attributes button
Get inside the next section called Variations. Click Add Variation dropdown. You can see Create variations from all attributes option comes up. Select the option and press the Go button.
After pressing the Go button, you can attribute variations are list one after another in accordion style. You can notice, my two attributes Green&Black and Read&Blue variation are there in the screenshot.
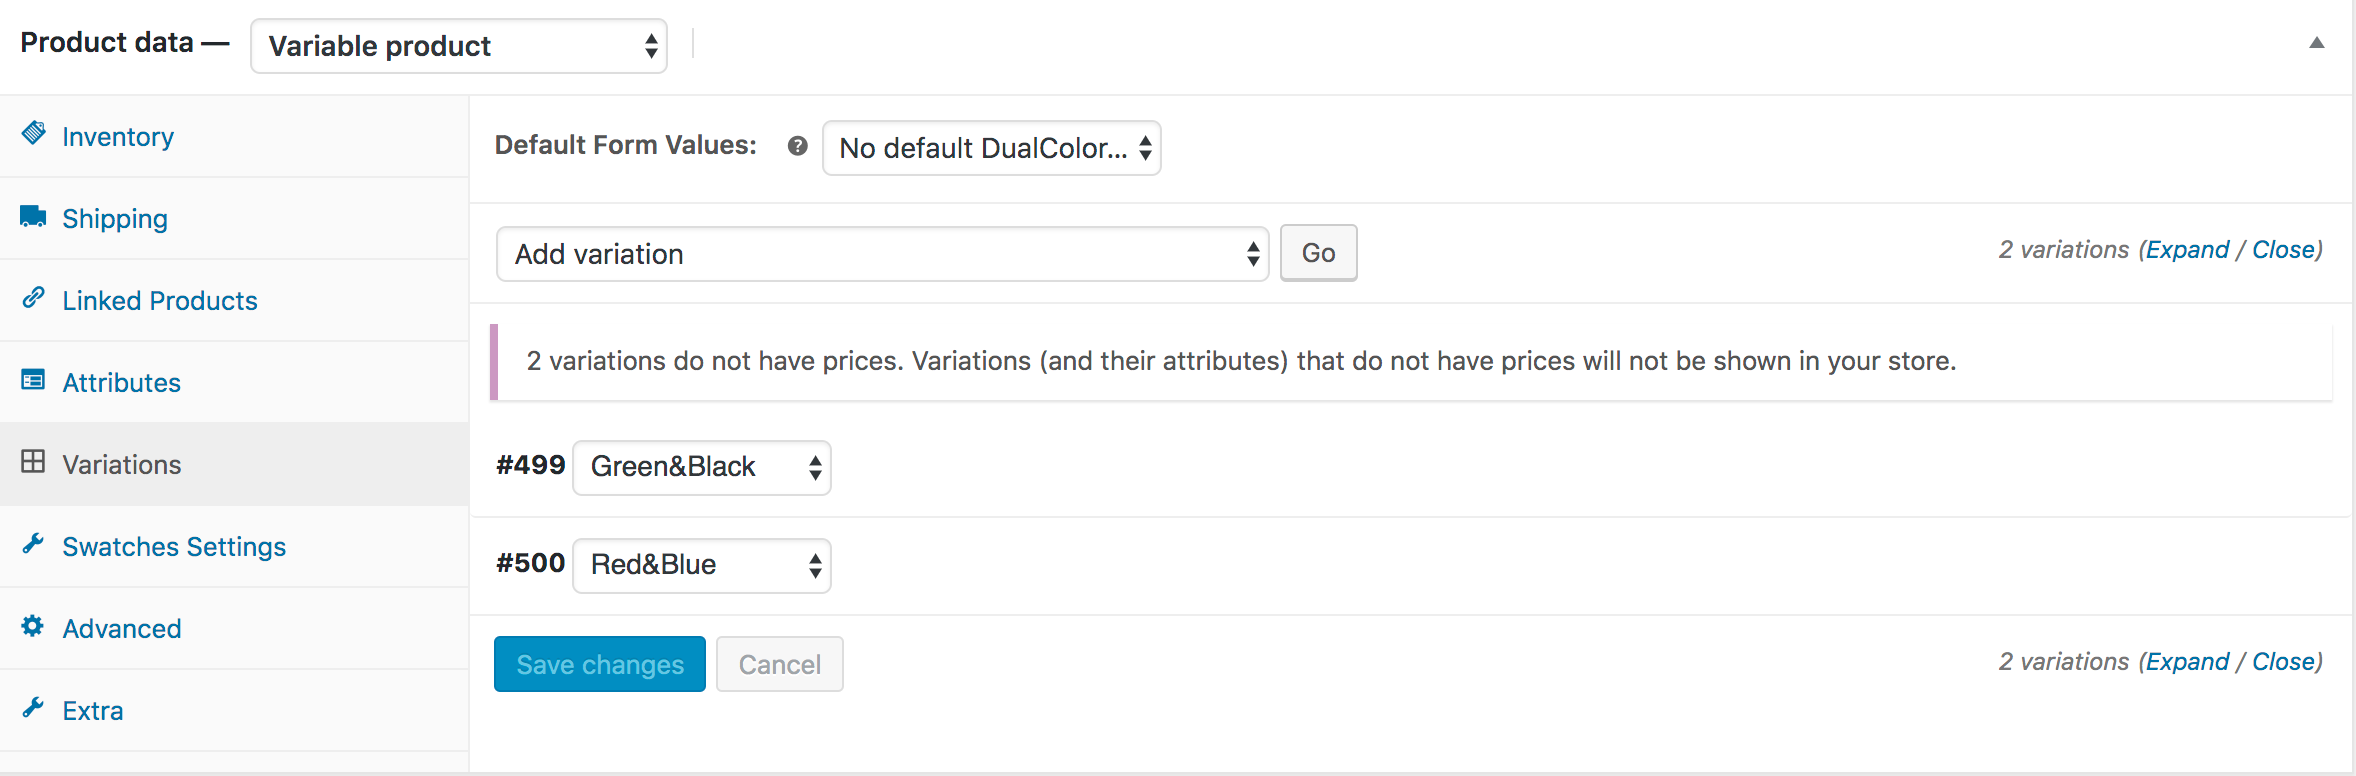
Now, these variable product variations will not appear in the product frontend without defining prices. For demonstration purpose, I'll add price and feature image for Green&Black variation.
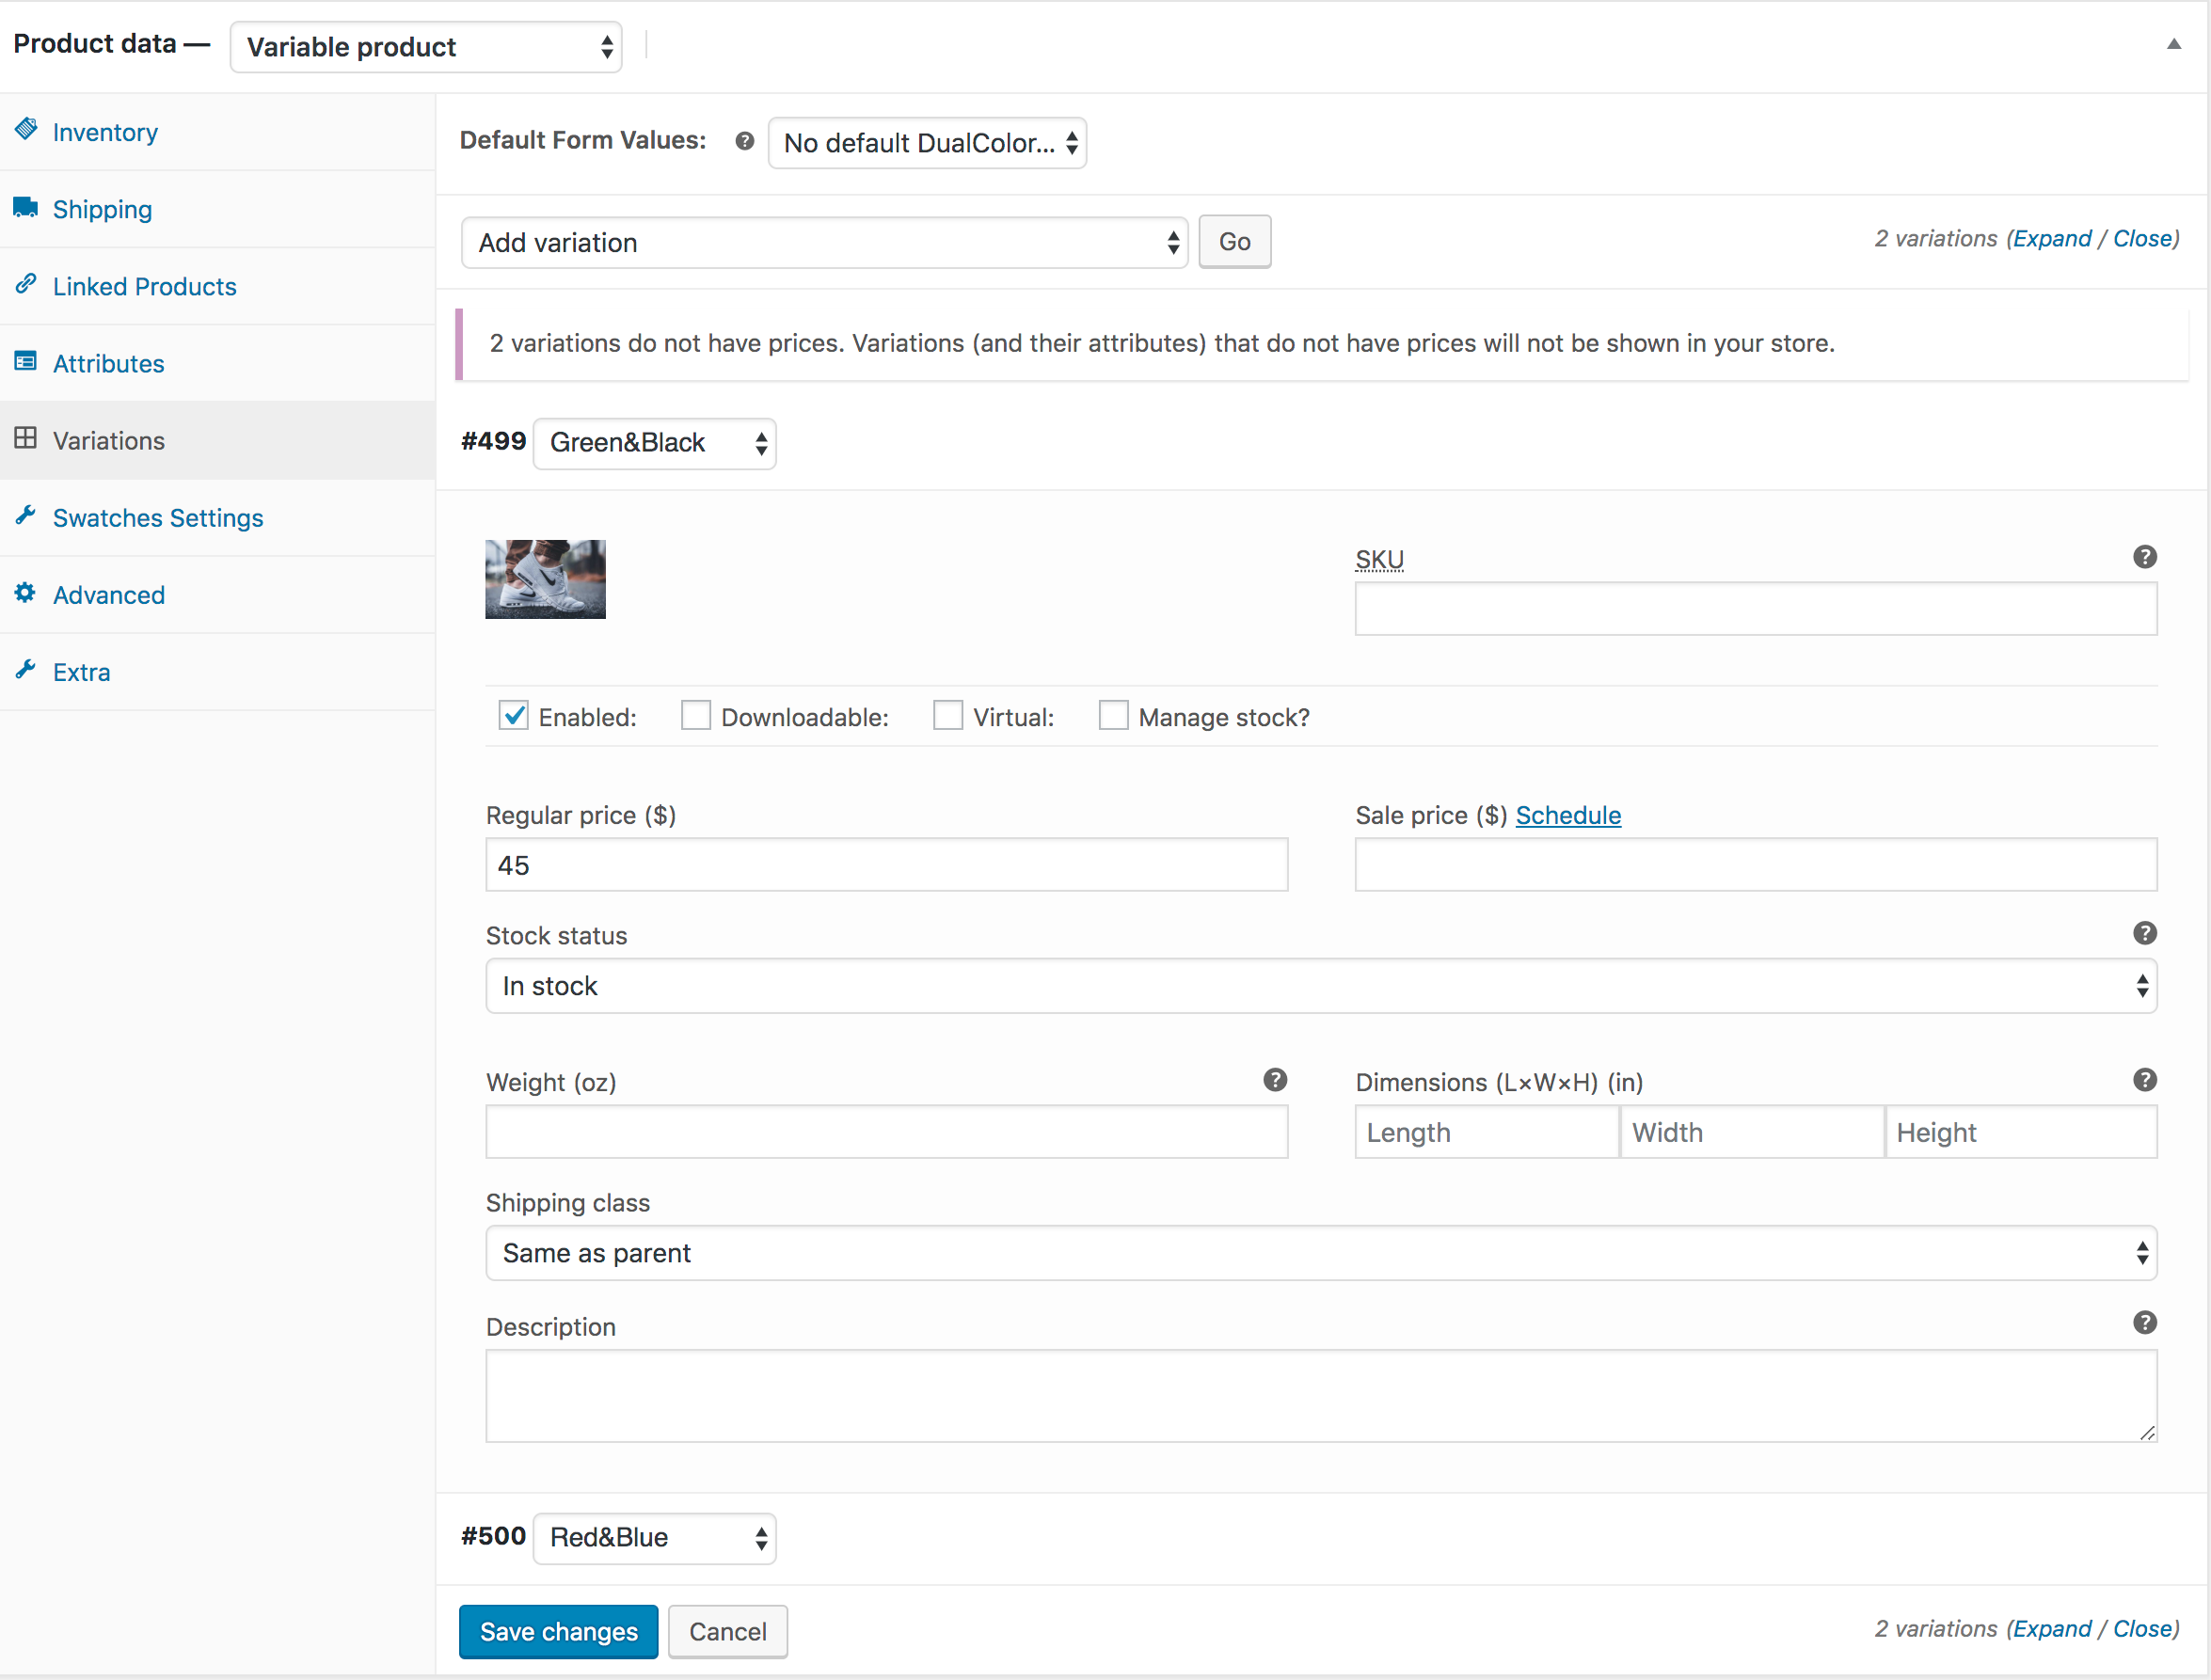
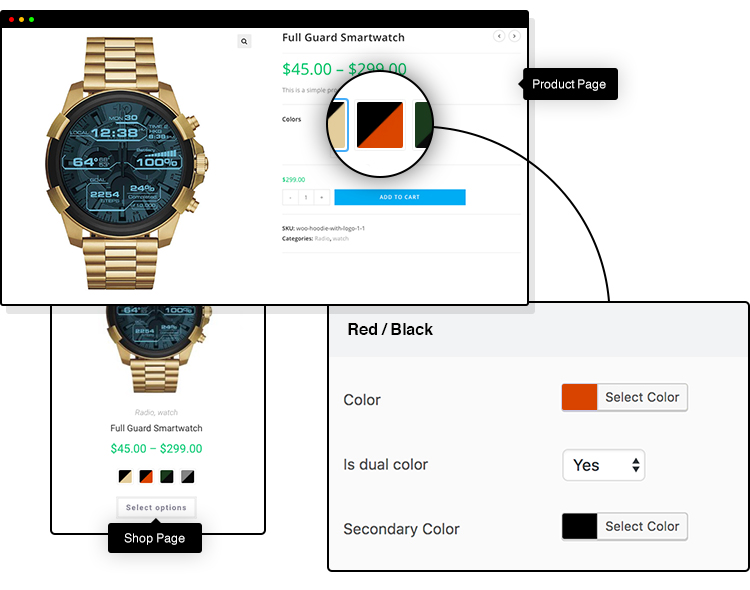
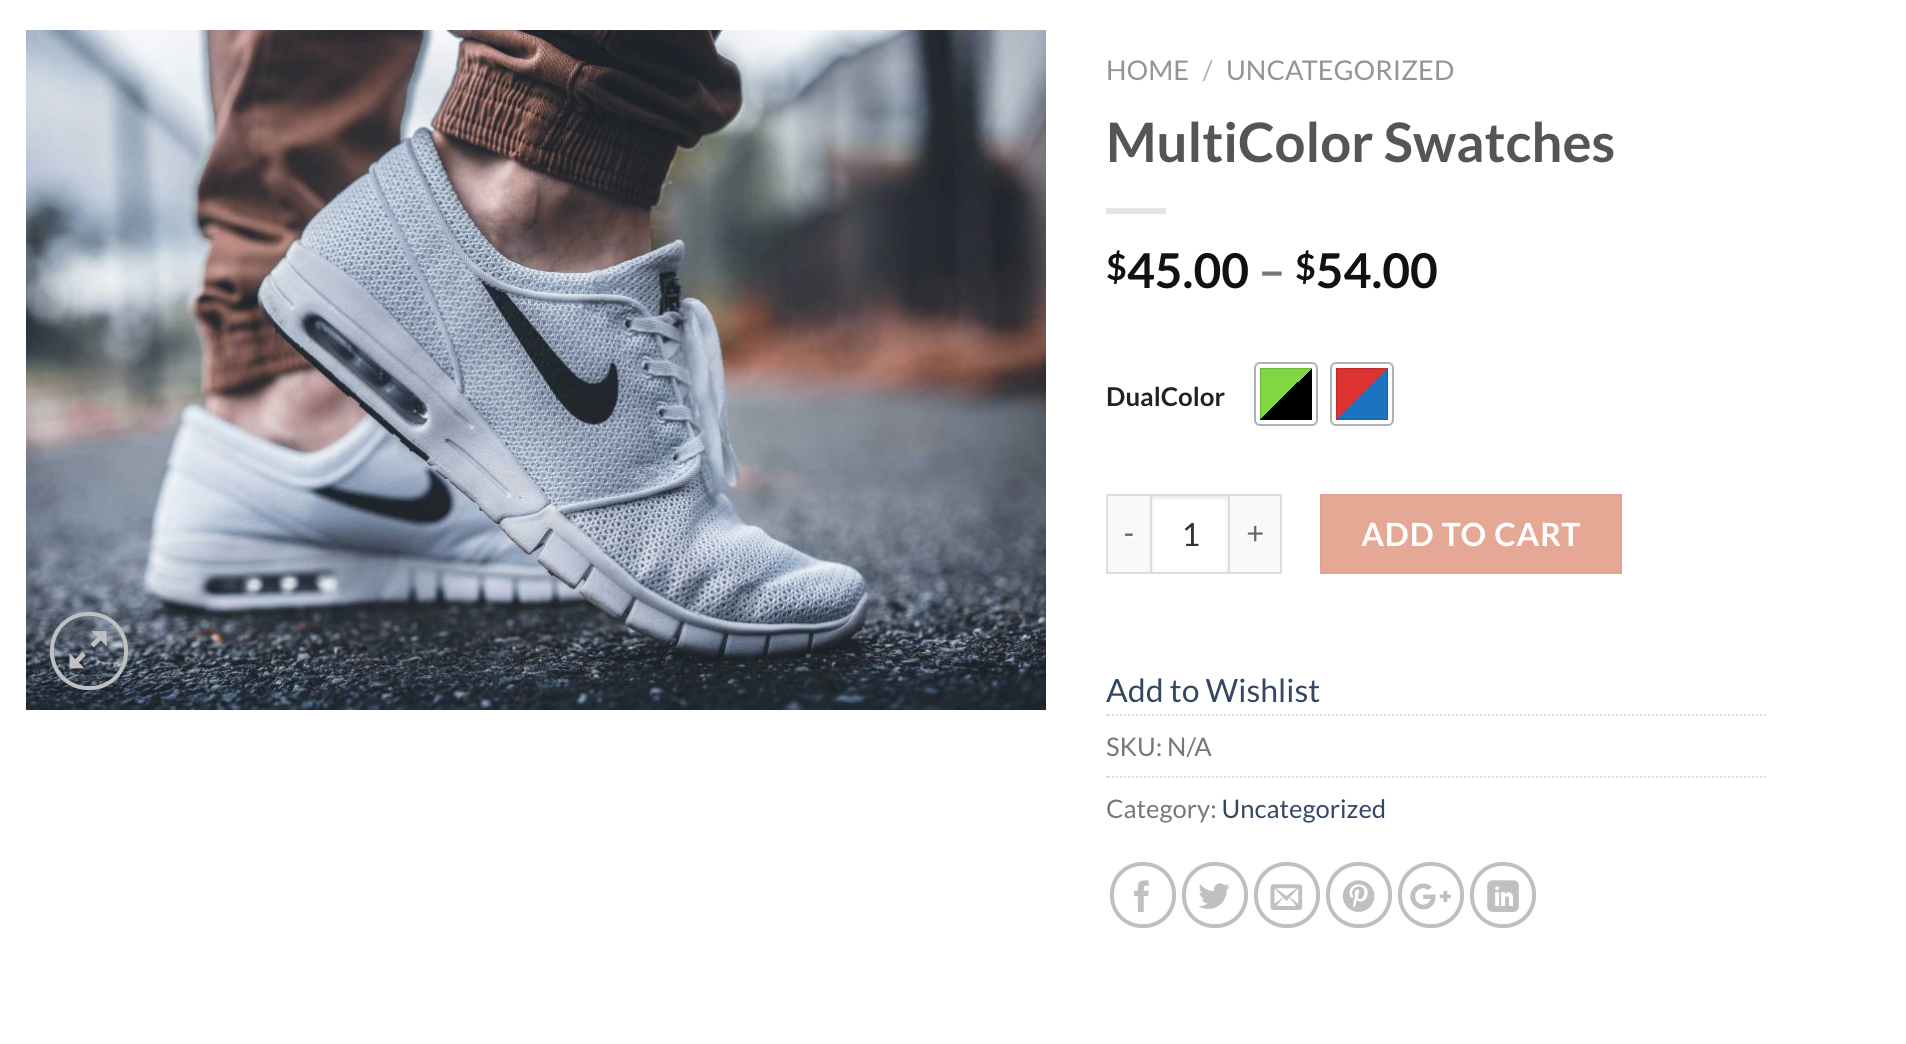
I've done the same for the Red&Blue variation. Click on the Save Changes button to update the changes. Now publish the product and get the product frontend. My product page is looking like the following screenshot.
Insert Extra Images Per Product Variations Back To Top
Frontend Preview
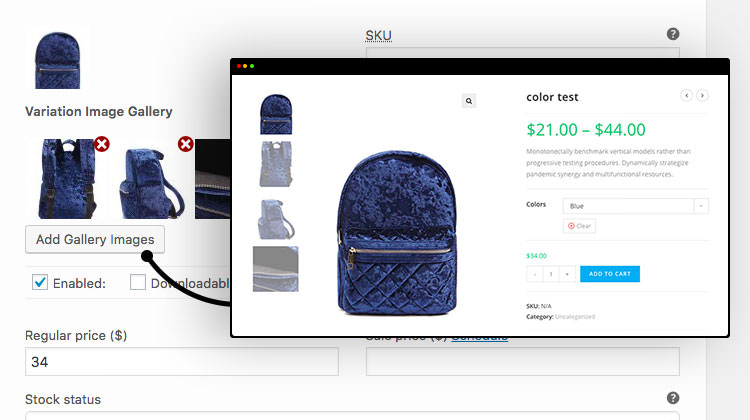
The feature allows to insert two additional images per product variation. To enable the feature, install and activate the WooCommerce Variation Image Gallery Plugin.
Tutorial
How To Enable Radio Swatches (Advanced) Back To Top
Frontend Preview
- How To Create To Radio Variation Swatches For Global Attributes
- How To Create To Radio Variation Swatches For Manual Attributes
- How To Create To Radio Variation Swatches From Scratch
.
How To Create Radio Variation Swatches For Globally Created Attributes
Video Tutorial
Head to the Products >> Attributes. All existing global attributes are listed in the attribute list page section. After installing WooCommerce Variation Swatches plugin, it adds Type field. By default it would show Select under Type title.
As WooCommerce Variation Swatches Plugin comes with 4 attribute types: Color, Image, Button and Radio. You can set any of attribute type for your desired attribute.
For demonstration purpose, Size attribute has been created. We'll add Radio attribute type for Size attribute.
To set Radio attribute type to Image attribute, click on Edit.

After selecting edit link, it will open attribute editing panel. Select Radio Type from the type dropdown.
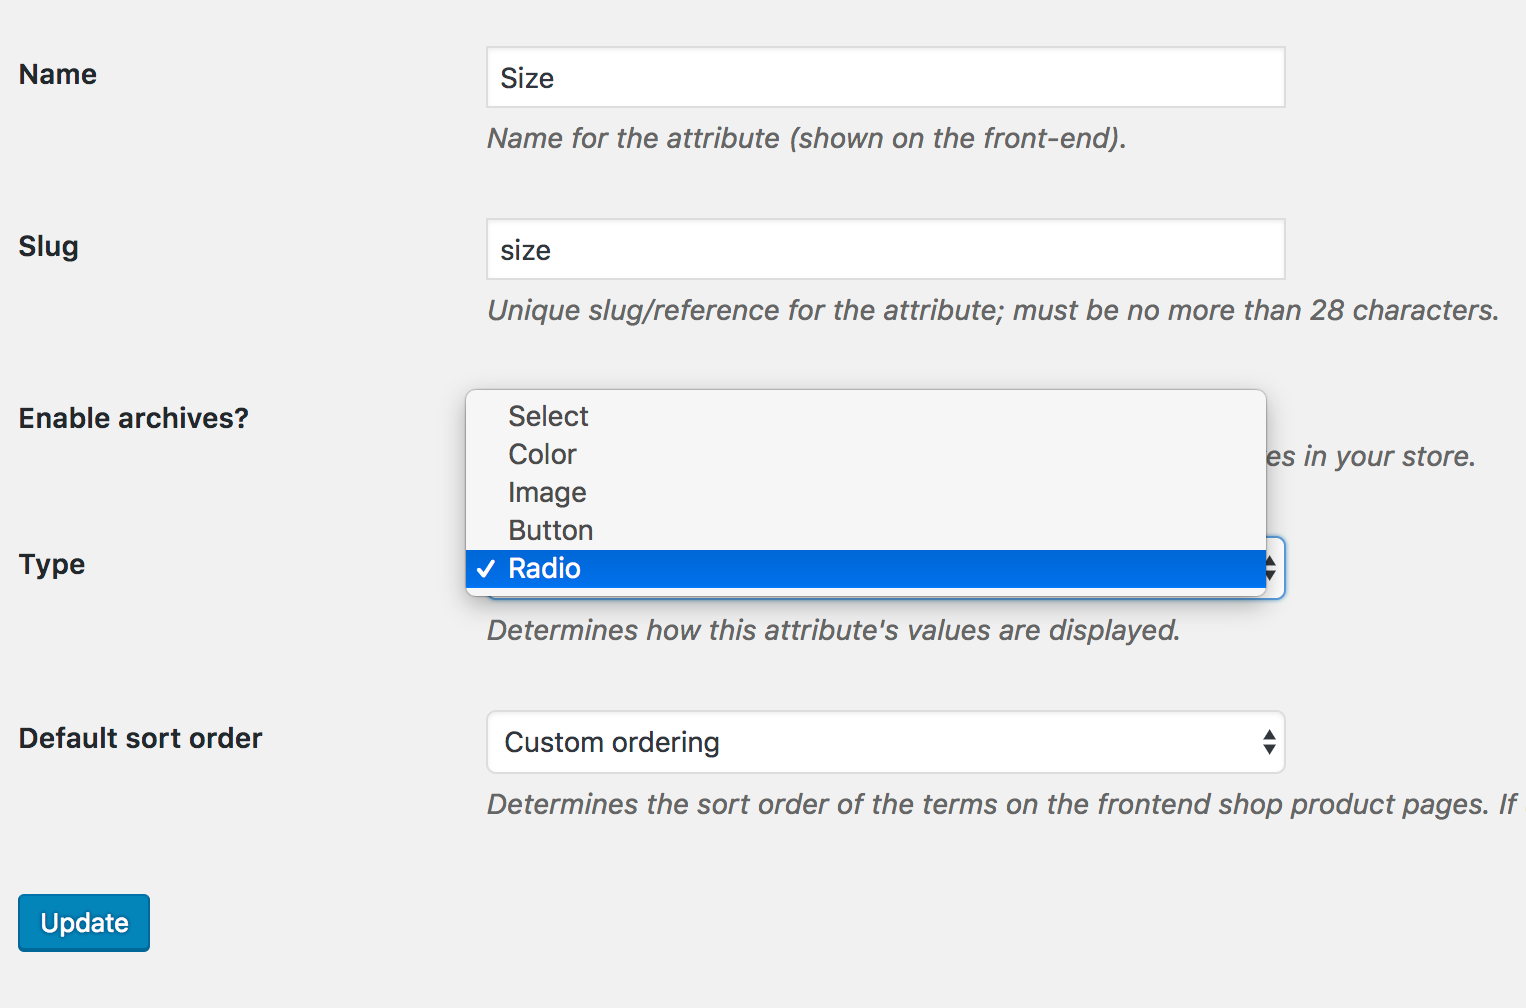
When attribute type selection is completed, get back to the attribute list page. The Attribute list would look like the following image. Now Size Attribute is showing Radio type instead of default Select type.

After selecting attribute type, the frontend of the product would look like the following screenshot. Don't be panic, if you find your attribute variations weird. It happens because you haven't set any image for variations yet.

.
How To Create Radio Variation Swatches From Manually Created Attributes
Video Tutorial
Step O1: Pro Plugin Setup
If you have variable products in your store and don't have product attributes created globally, it means you have created attribute and it's variations manually. To convert manually created attribute variations into image swatches, make sure you have premium version of WooCommerce Variation Swatches created.
Step O2: Change Manual Attribute Type
If you head to your Attributes tab from product data inside your product edit mode, and found variations are separated by pipe sign like the following screen. It means you have created variation manually.'
To Convert these manually created attribute variations, head to Swatches Settings tab, and select Radio type from Select (Default) Dropdown.

After selecting attribute type, the frontend of the product would look like the following screenshot.
.
How To Create Radio Variation Swatches From Scratch
Video Tutorial
Step 01: Create Attribute
At first, we have to create radio attribute and its variations globally. To create radio attribute globally, navigate to Products >> Attributes. As we’ll create radio attribute for our product. Fill the name field with your desired attribute name. In this tutorial, I’ve termed attribute name: Size.
You can leave Slug field empty. It automatically generates the slug for the attribute. From the Type dropdown select radio attribute type. When the mandatory fields are filled, select Add Attribute button.

After creating attribute, you will notice a list is created in the right side. Check the following screenshot.

Step 02: Create Attribute Variations
The more variation you would add, they would get added to this list. When an attribute is created, we need to create attribute variations. To create product variations, click on the Configure terms from the attribute list.

As we have created a radio attribute. We’ll add label title as variations inside the button attribute. In this tutorial, we’ll add Small, Medium, and Large variations. To create variations inside radio attribute. Fill the Name field with your desired variation name, leave the slug field empty and save the setting each time.
Step 03: Enable Attribute Variation in Variable Product
It’s time to enable radio swatches inside a variable product. To enable radio swatches in your desired product. Get into your desired product edit mode. Make sure you have variable product selected from Product Data.
After selecting the Variable product from Product data dropdown, head to the Attributes Tab. Click on Custom product attribute dropdown. In this dropdown, you can see all your globally created attributes. As we’ve only created a Size attribute, it’s now showing Size attribute.
Now select the Size attribute and click on Add. You can see the following screens appears afterward.
If you want to select all available variations of the size attribute, click on Select all button. If you want to deselect all selected variations at once. Click on Select none button. Add all variations selecting Select All button, checked Used for variations settings and click on Save Attributes button. Check the following screenshot for guideline.
In this tutorial, I am going to select Create variation from all attributes and click Go button. It’ll add all available variations like the following.
You can see the above image that Small, Medium, and Large image variations are there. From this screen you can add variation image, variation price, and other variation specific details. When you have done with adding all your required details in each variation, click the Save Changes button.
Remember! Don’t forget to add the price in each variation, otherwise, variations won’t be visible on the product frontend.
How To Change Variation Image Gallery Selecting Single Attribute Like Amazon And AliExpress (Advanced) Back To Top
Generally, WooCommerce variation gallery images get changed when all it’s attribute variations are matched. With this feature, the variation gallery can be changed selecting single attribute variation like Amazon and AliExpress.
Preview Images
Video Tutorial
Step 01: Plugin Installation
It's the premium feature WooCommerce Variation Swatches plugin. Make sure you have WooCommerce Variation Swatches Pro plugin besides the free version.
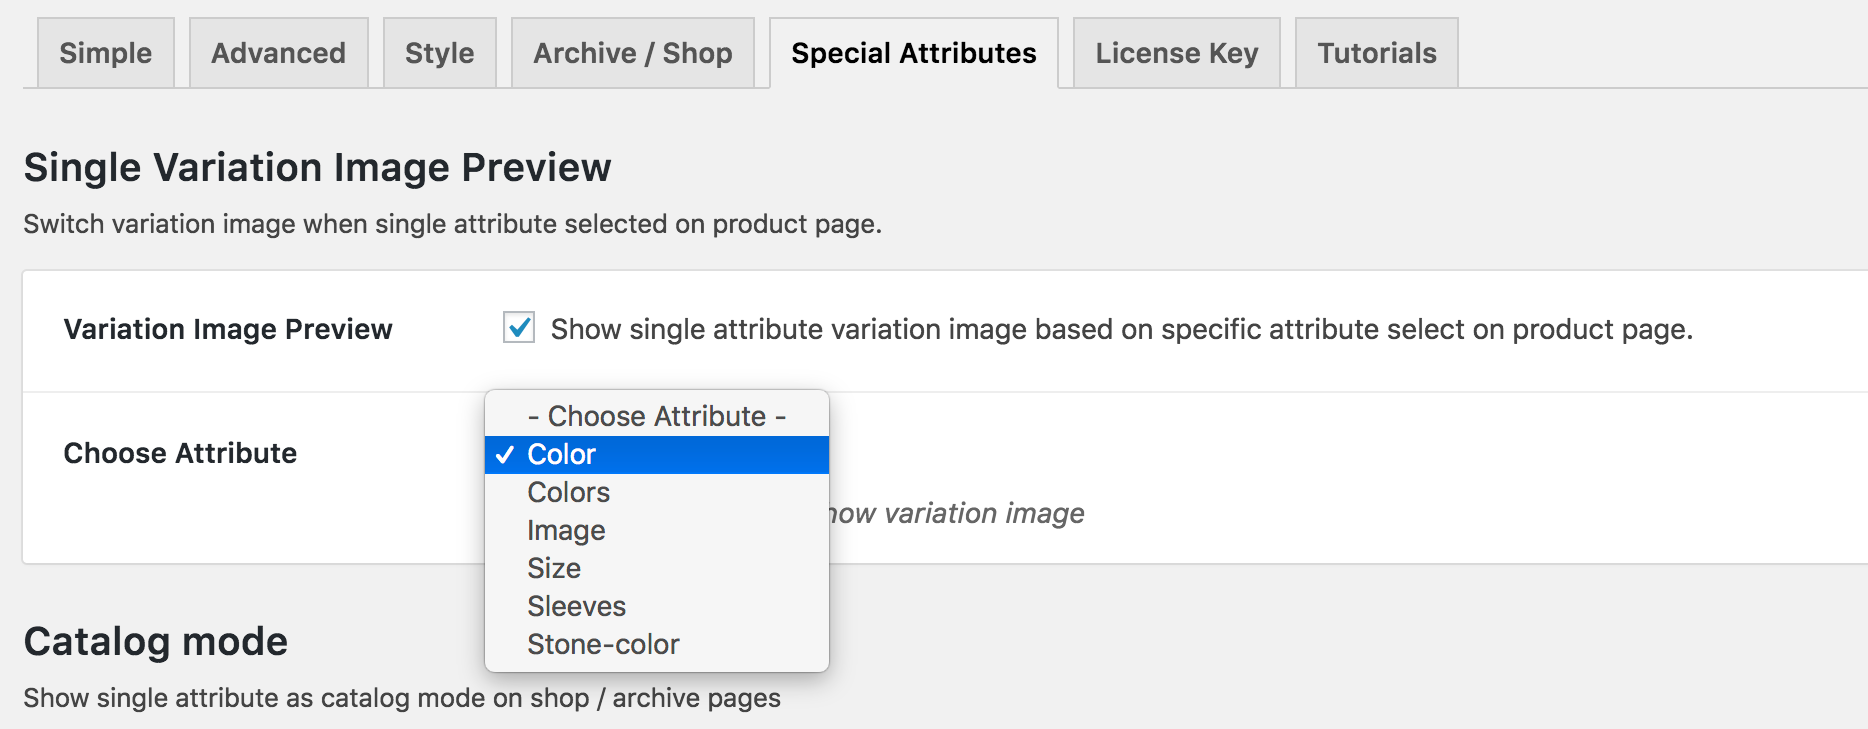
Step 02: Configure Global Settings
To enable global settings for changing variation image gallery based on only selected variation, head to the Special Attribute >> Single Variation Image Preview from Swatches Settings. Enable Variation Image preview settings and select your desired variation from Choose attribute settings. The variation you select from here, will change variation gallery image without selecting other attribute variations.
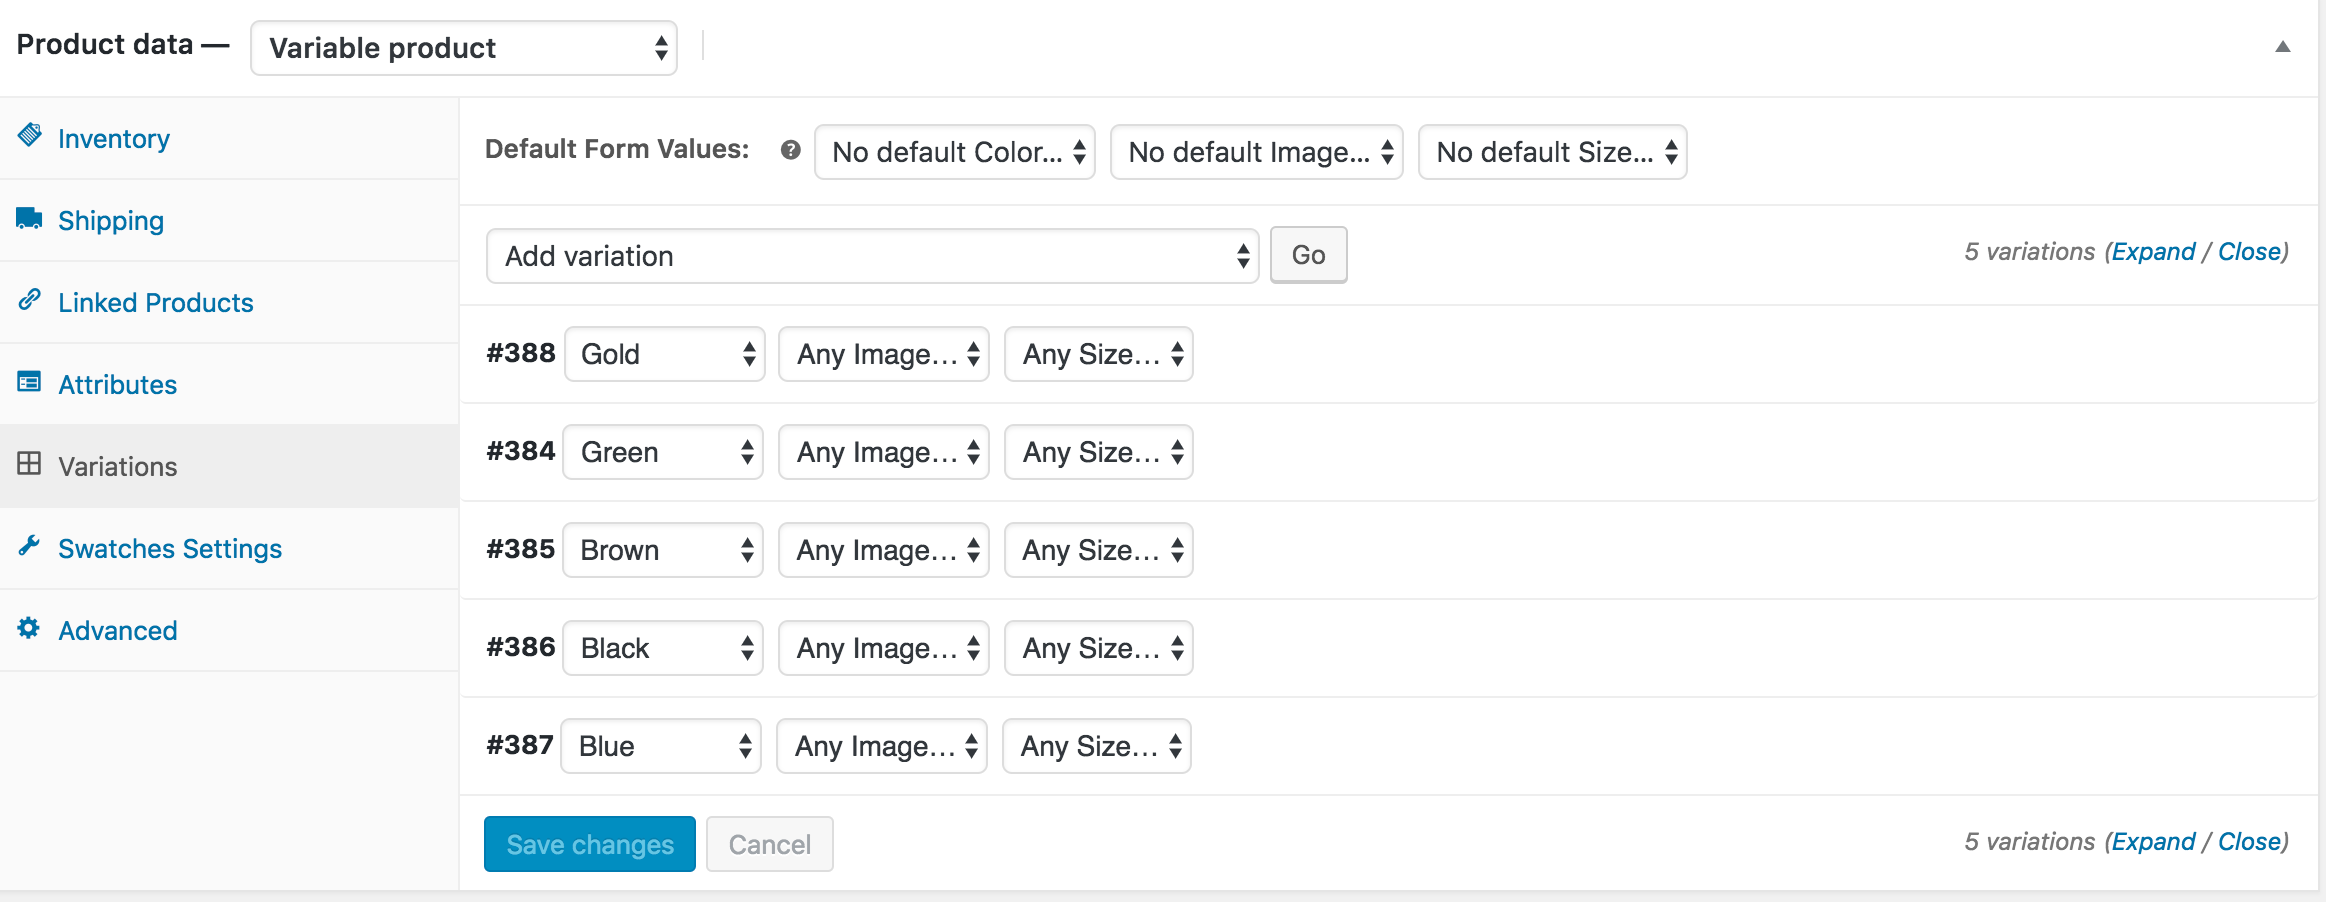
Step 02.01: Arrange Attribute Variations
To enable settings, check the following screenshot to set product attribute variation. As I select Color variation globally, color variations have been set individually and left other variation to Any.
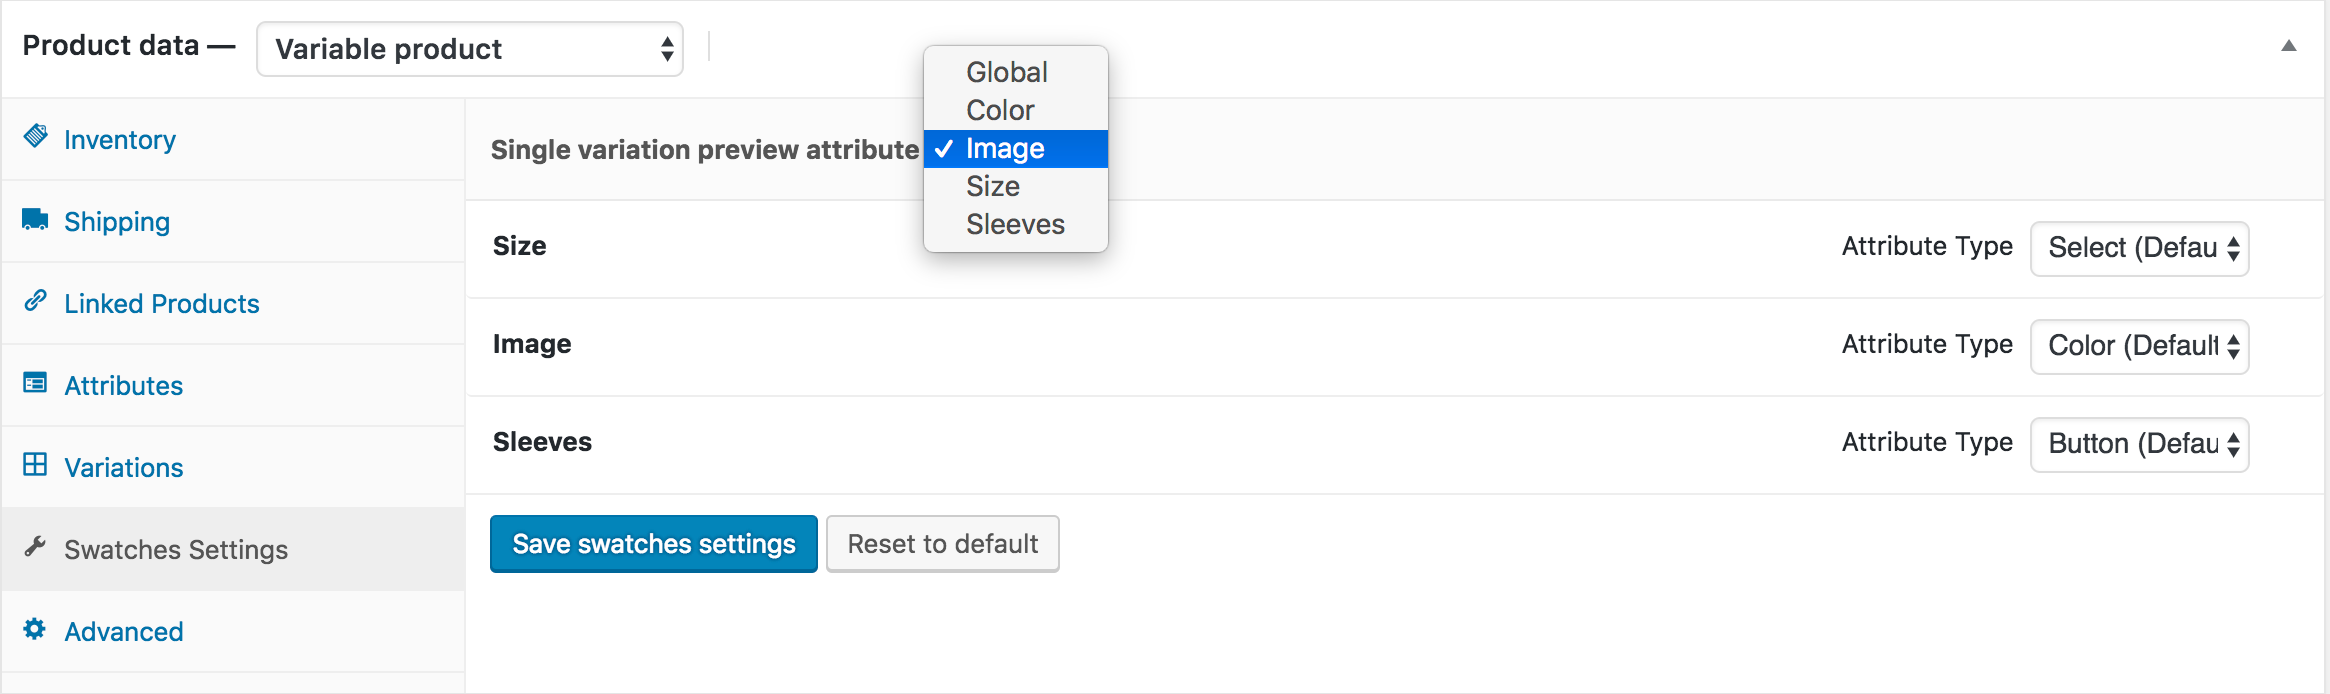
Step 03: Individual Product Settings
If your globally selected variation is connect with your entire store variable product. you may not need this option. You may need the following option in the given situation.
Some products may not have the attribute connected with that you would select globally. Or For some product you want to change product gallery based other attribute without following global settings. In this case this settings would be helpful.
Get to the product edit mode and head into Swatches Settings. Select your desired attribute(Not Globally Selected) from Single variation preview attribute. In the screenshot, I've added not globally selected Image Attribute.
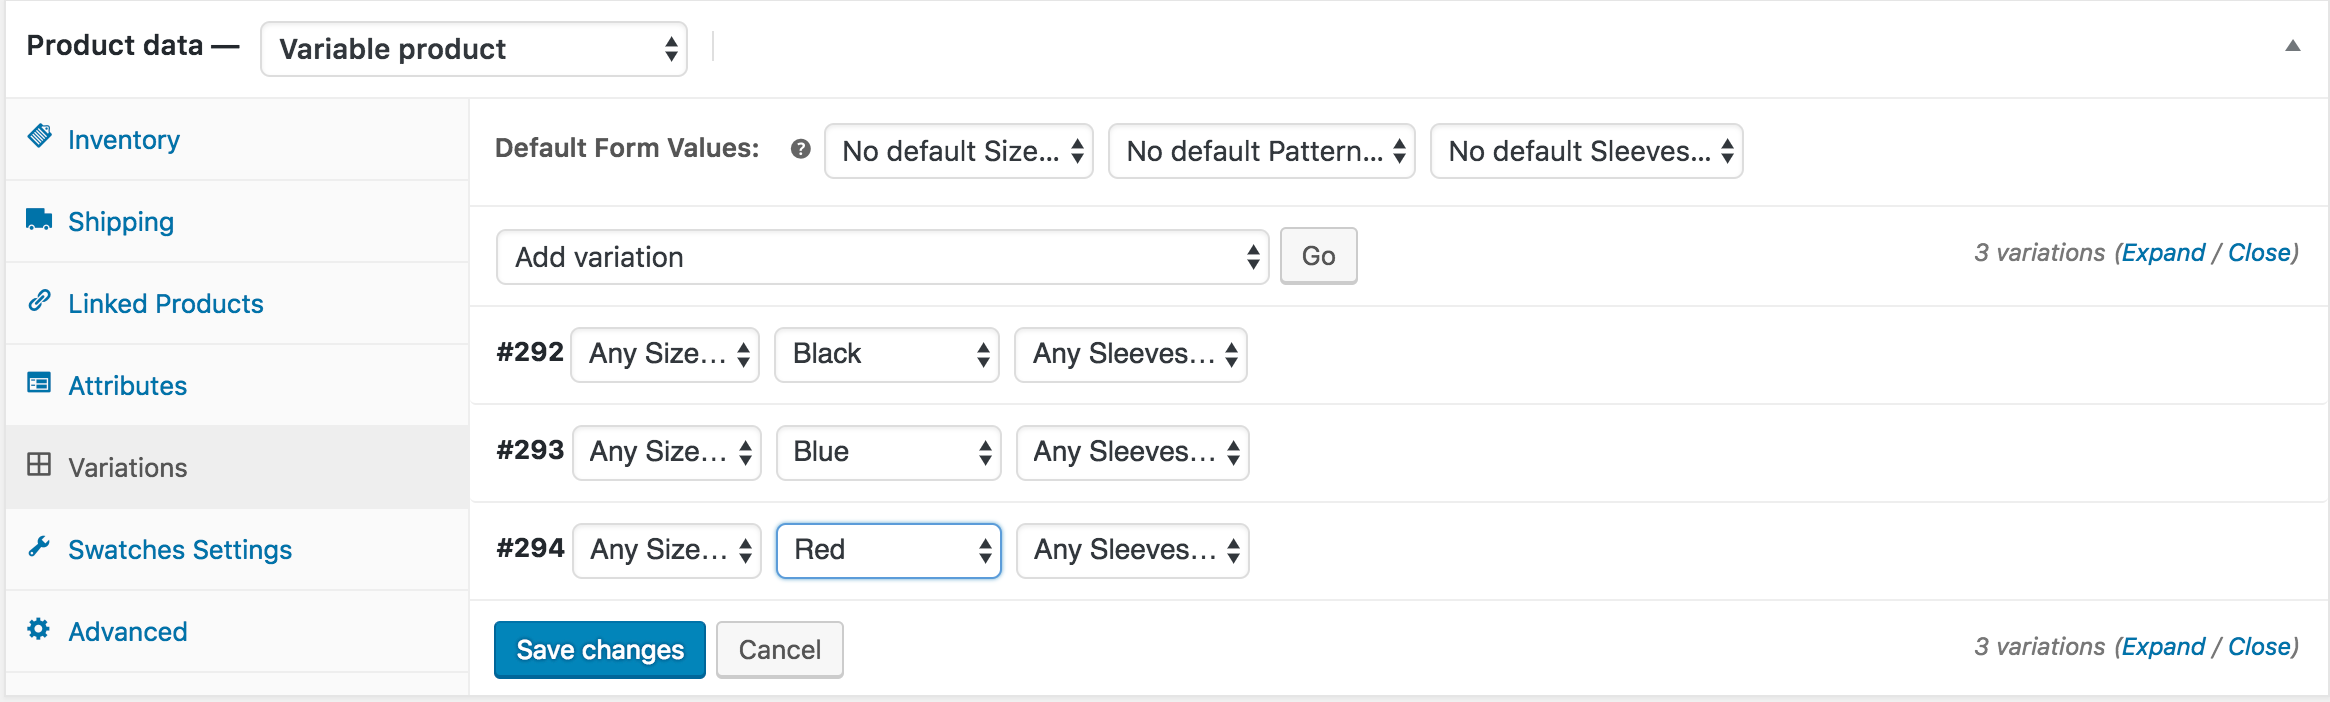
Step 03.01: Arrange Attribute Variations
To enable settings, check the following screenshot to set product attribute variation. As I select Image variation, image variations have been set individually and left other variation to Any.
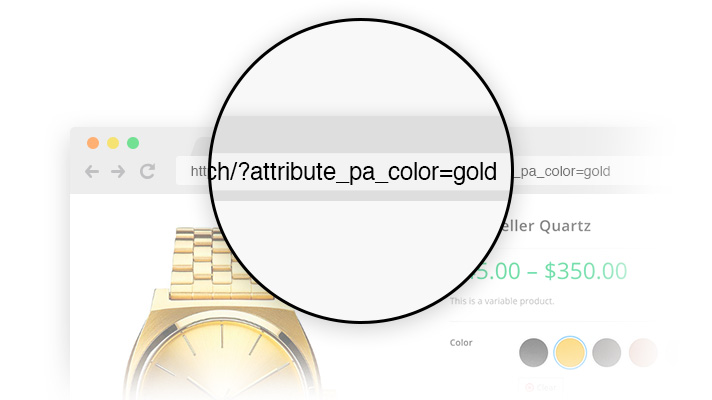
Generate Attribute Variation Link (Advanced) Back To Top
WooCommerce don't provide option to generate link for variation. In this plugin we've added this feature first time. It allows to generate link for your selected variation and send the variation link to your to your custom for quick purchase.
Frontend Preview
Video Tutorial
Step 01: Plugin Installation
It's the premium feature WooCommerce Variation Swatches plugin. Make sure you have WooCommerce Variation Swatches Pro plugin besides the free version.
Step 02: Configure Option
To enable the settings header to Advanced Tab from Swatches Settings. And check Generate Variation URL setting. After that Save Settings.
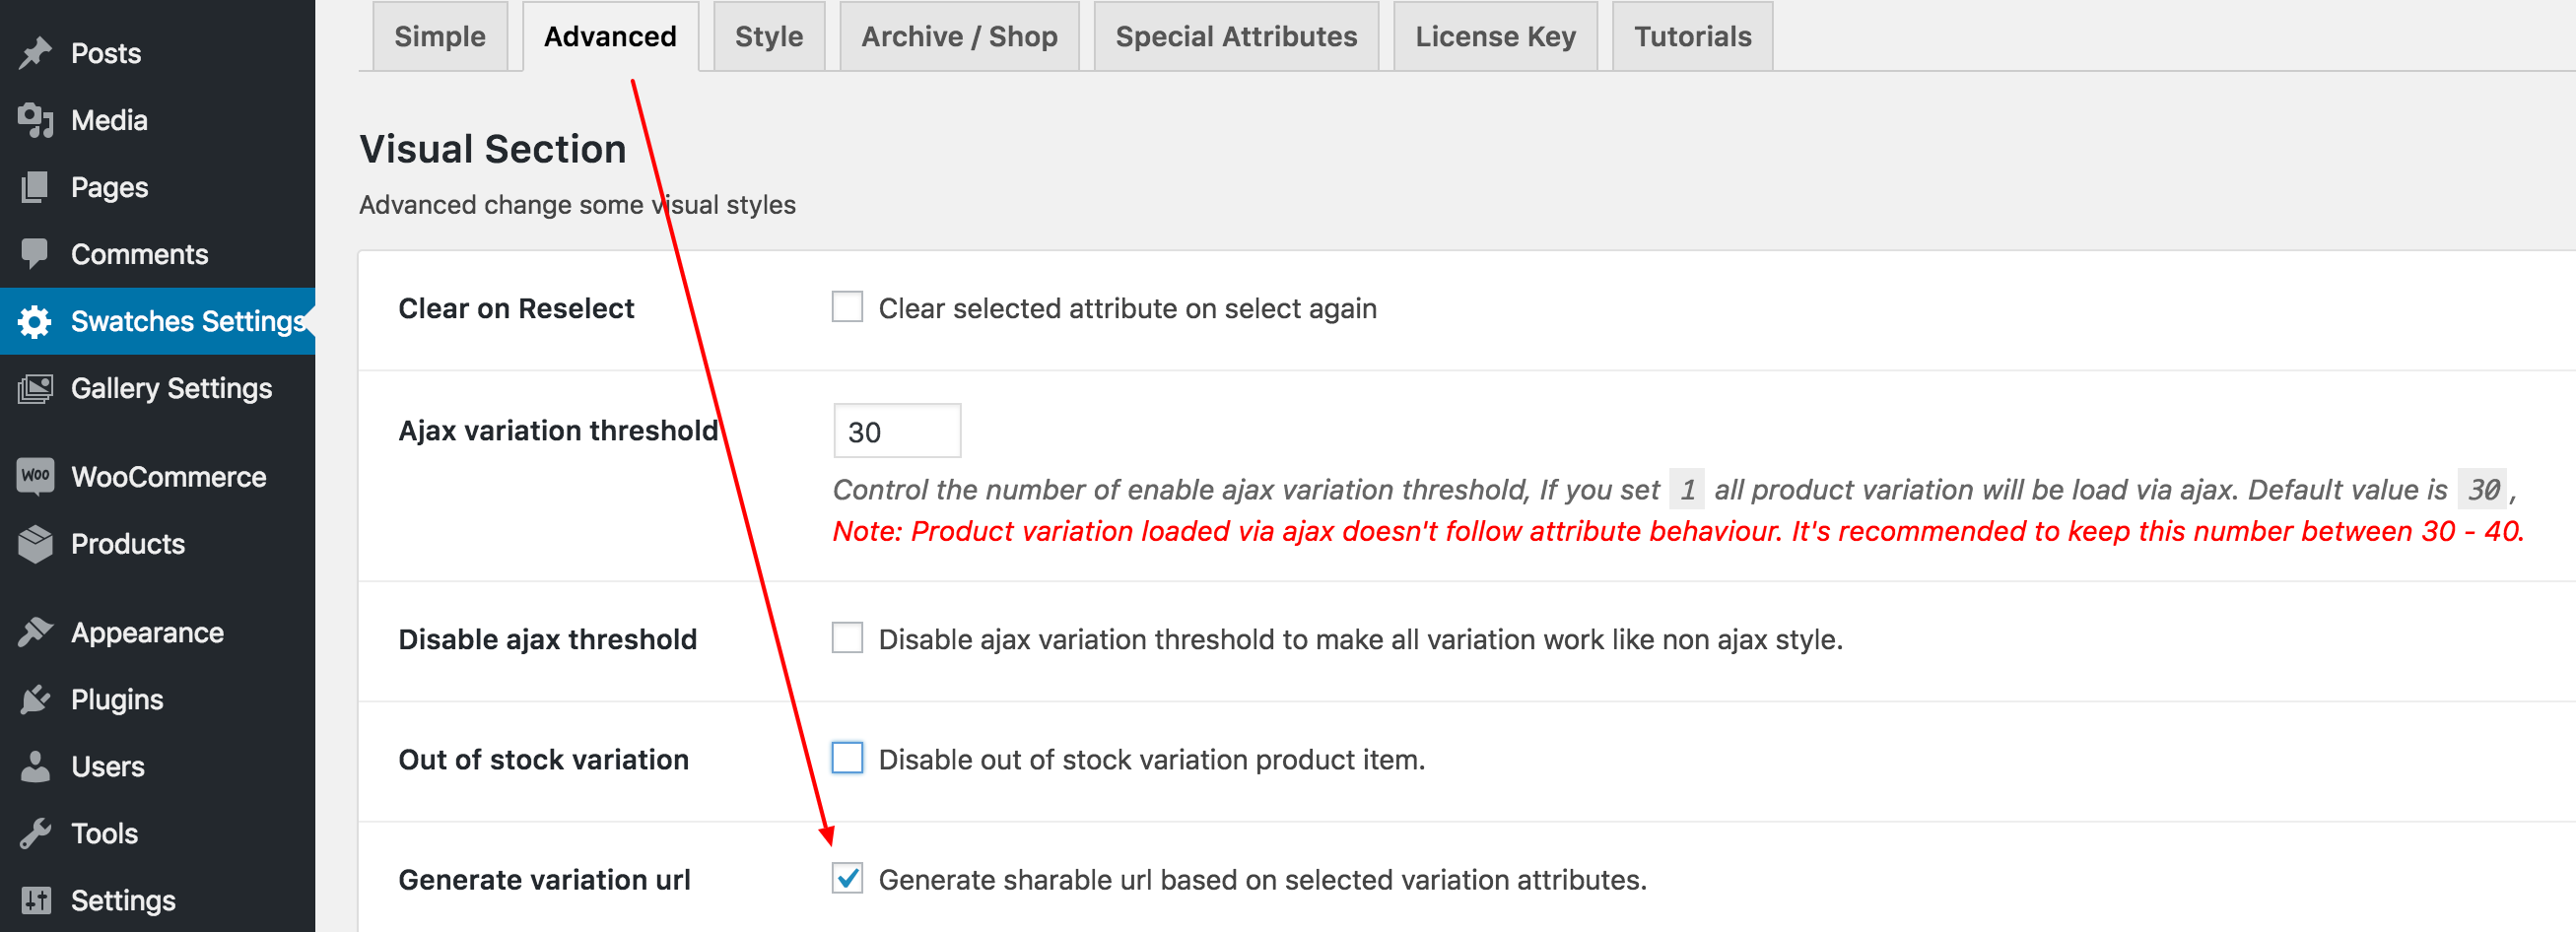
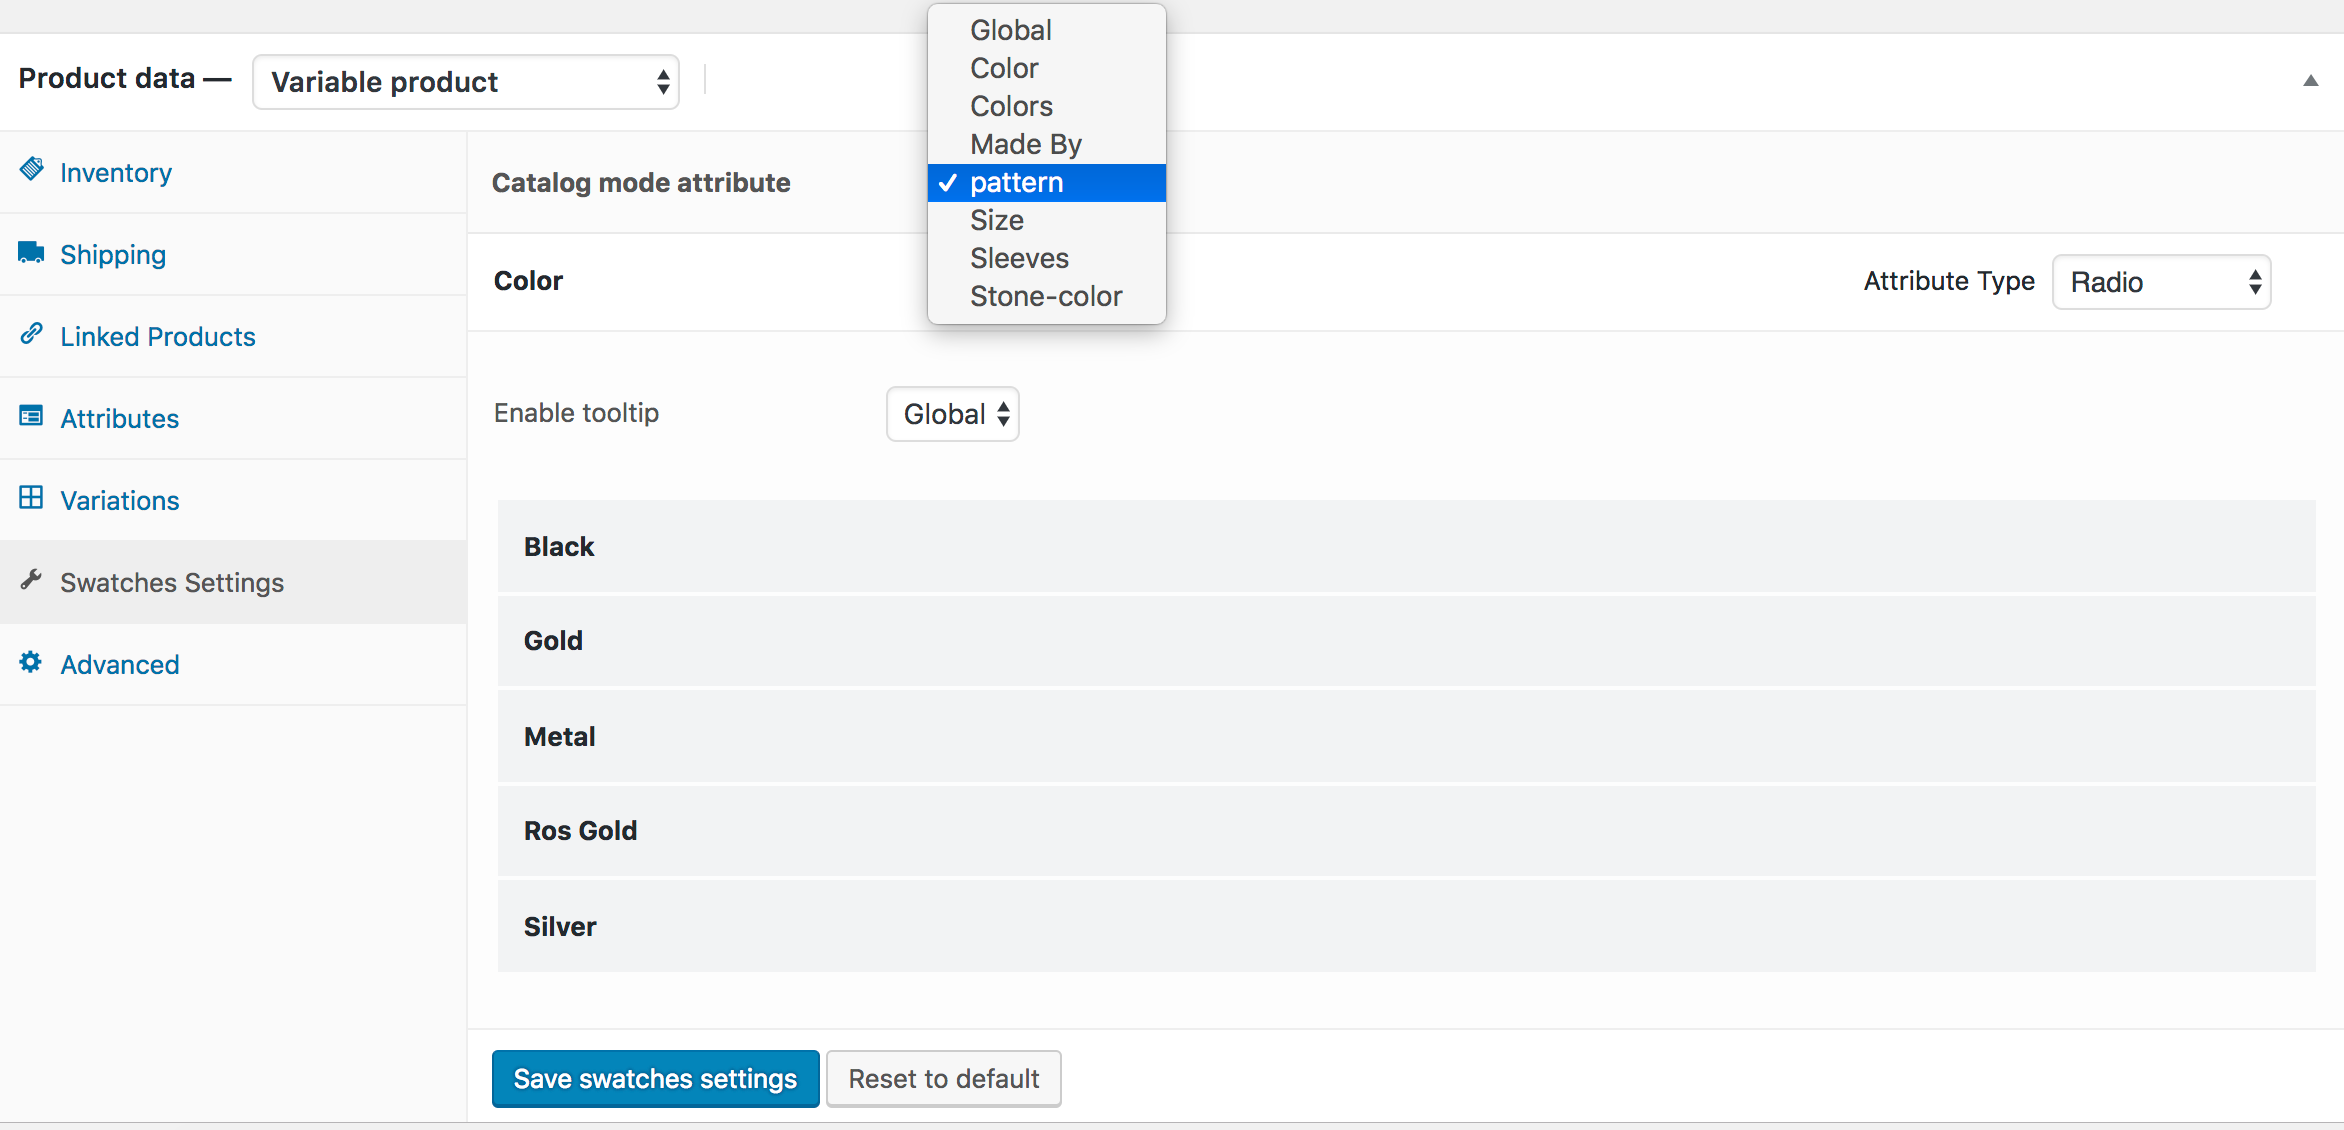
Enlarge Special Attribute In Product Page Back To Top
Frontend Preview
Video Tutorial
There are plenty of attributes in WooCommerce Variable Product, you many to keep a single attribute standout. To facilitate the opportunity, we added the option in the popuplar WooCommerce Variation Swatches plugin.
Head to Swatches Settings >> Special Attribute >> Large Size Attribute Section and select attribute type and set your desired size to make it standout.
Product Basis Swatches Customization (Advanced) Back To Top
Frontend Preview
Video Tutorial
Step 01: Plugin Installation
t's the premium feature WooCommerce Variation Swatches plugin. Make sure you have WooCommerce Variation Swatches Pro plugin besides the free version.
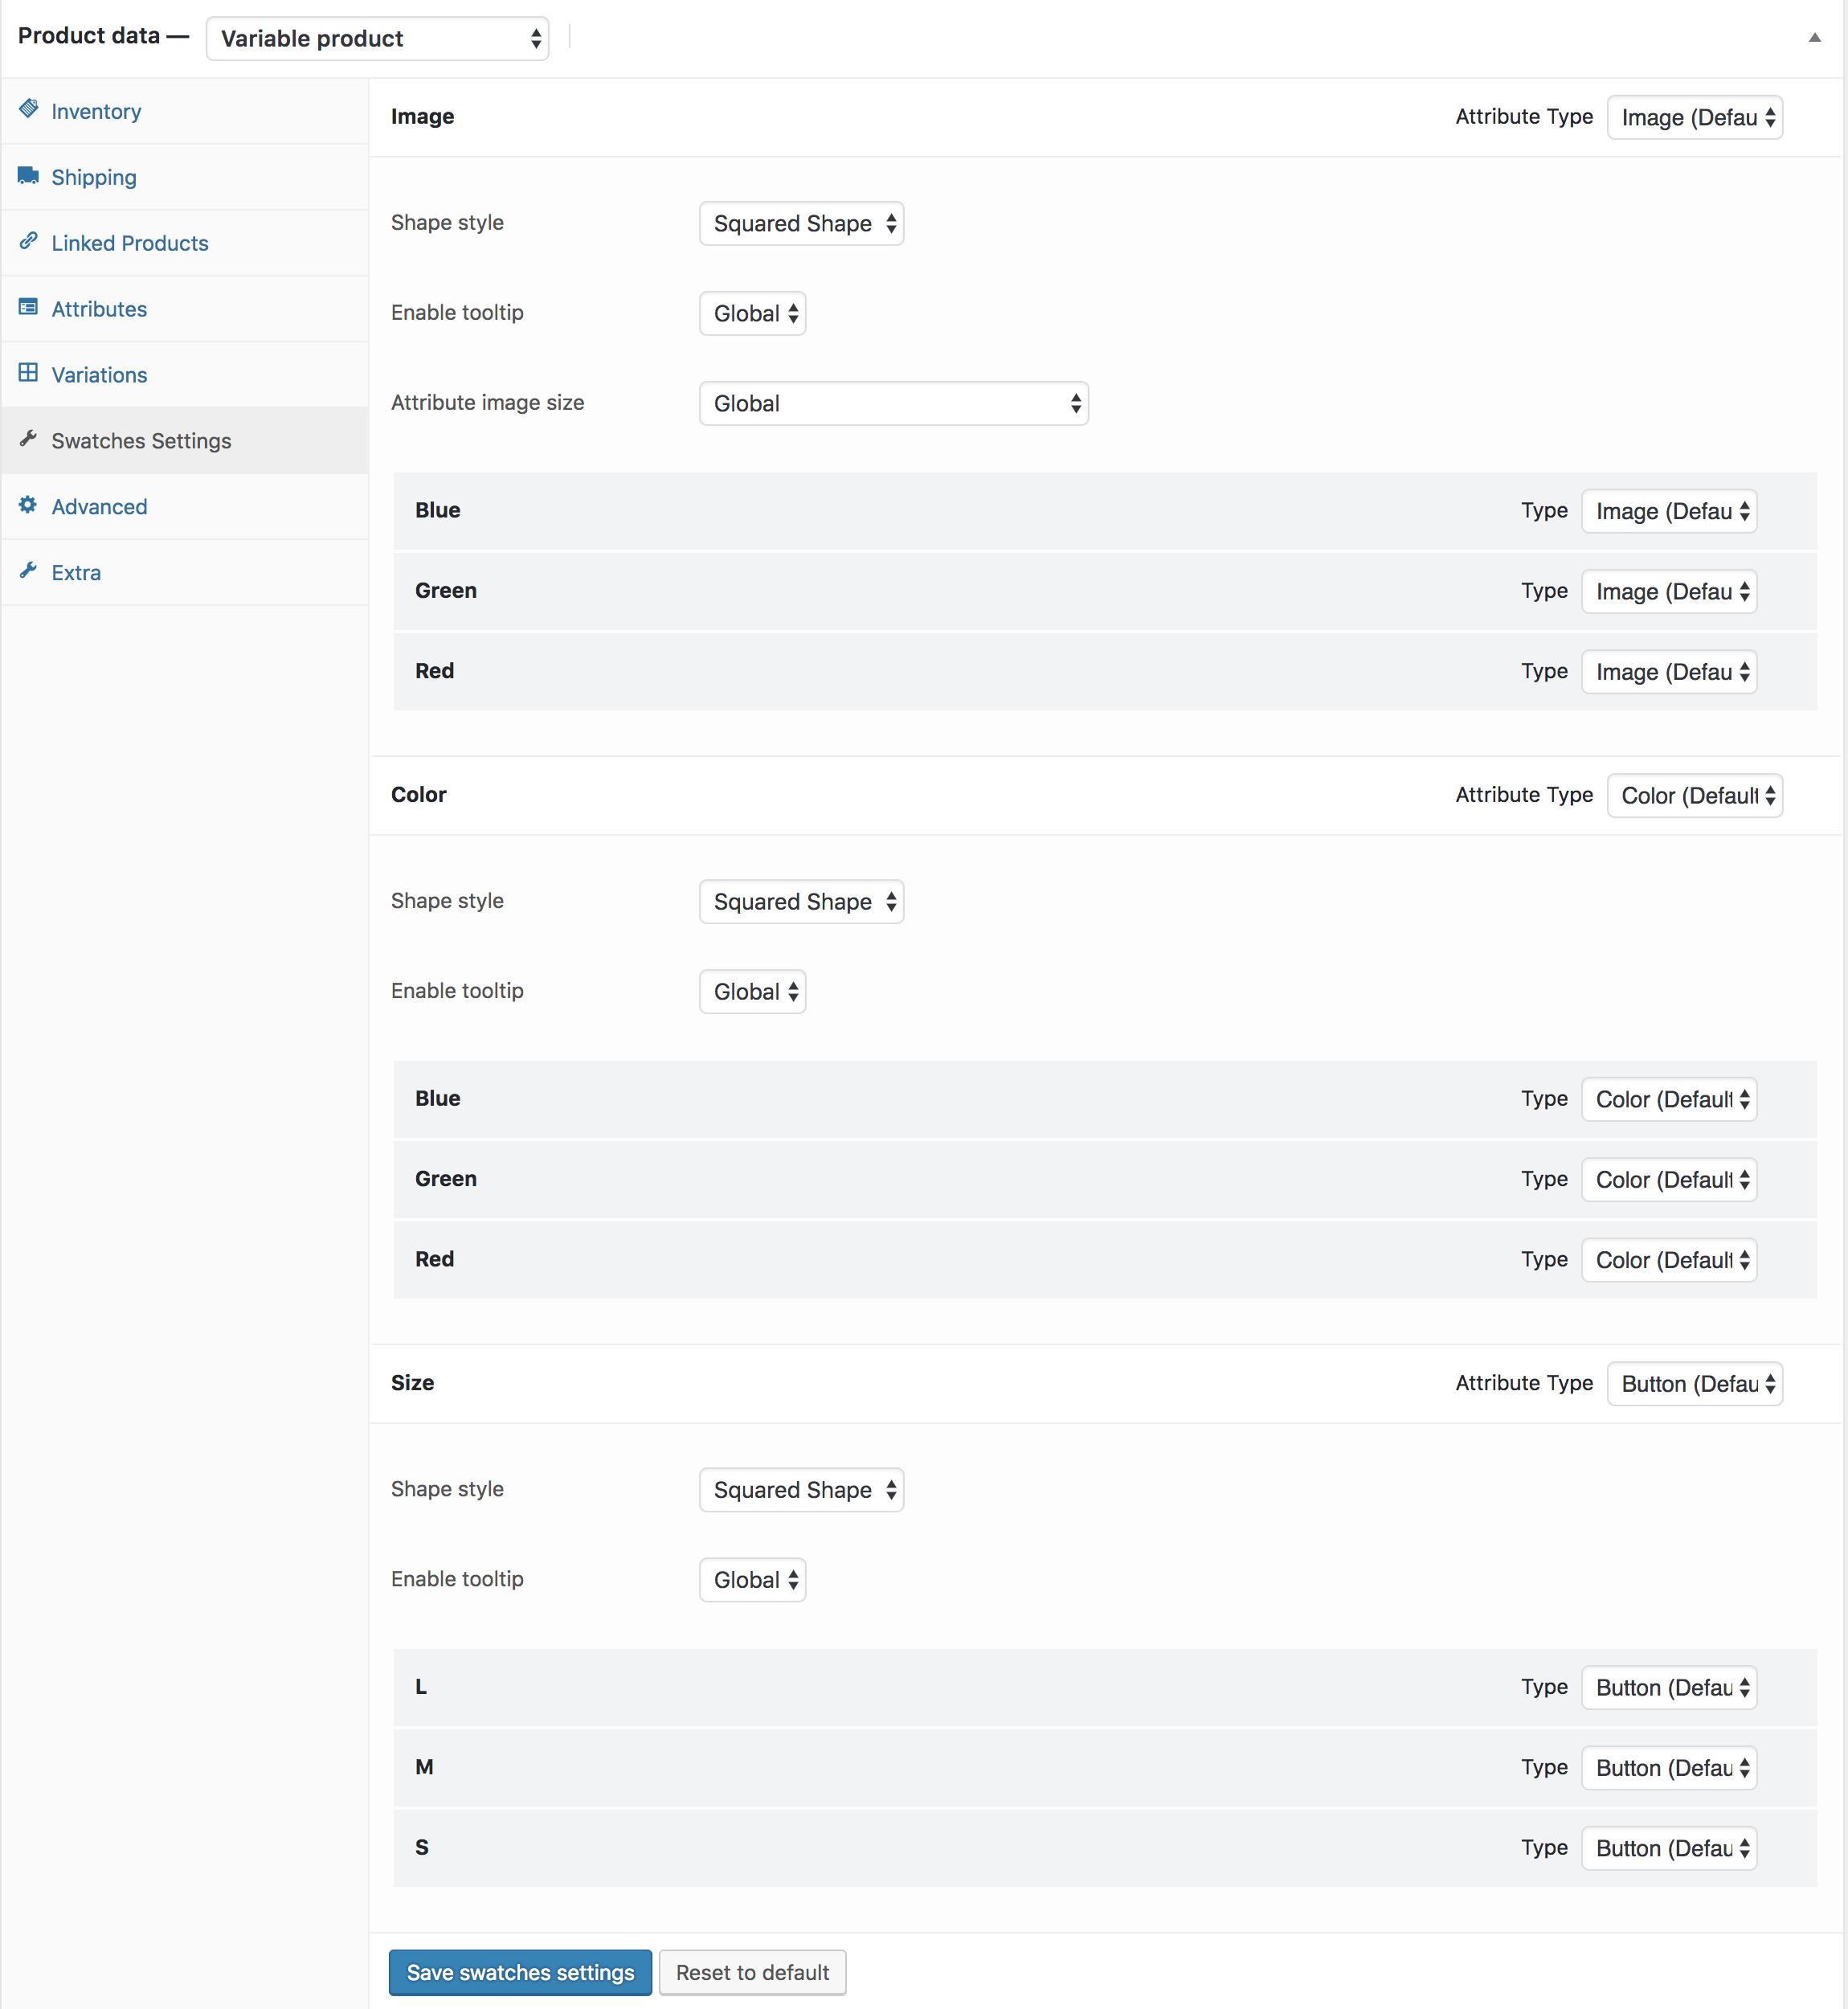
To customize product basis swatches, get into product edit mode. You would see Swatches Settings and Product Data. From there you can start customizing swatches.
Show Selected Variation Name Beside Label Back To Top
How To Enable Swatches on Archive/Shop Page With Add To Cart Button (Advanced) Back To Top
Frontend Preview
Video Tutorial
Step 01: Plugin Installation
It's the premium feature WooCommerce Variation Swatches plugin. Make sure you have WooCommerce Variation Swatches Pro plugin besides the free version.
Step 02: Configure Settings
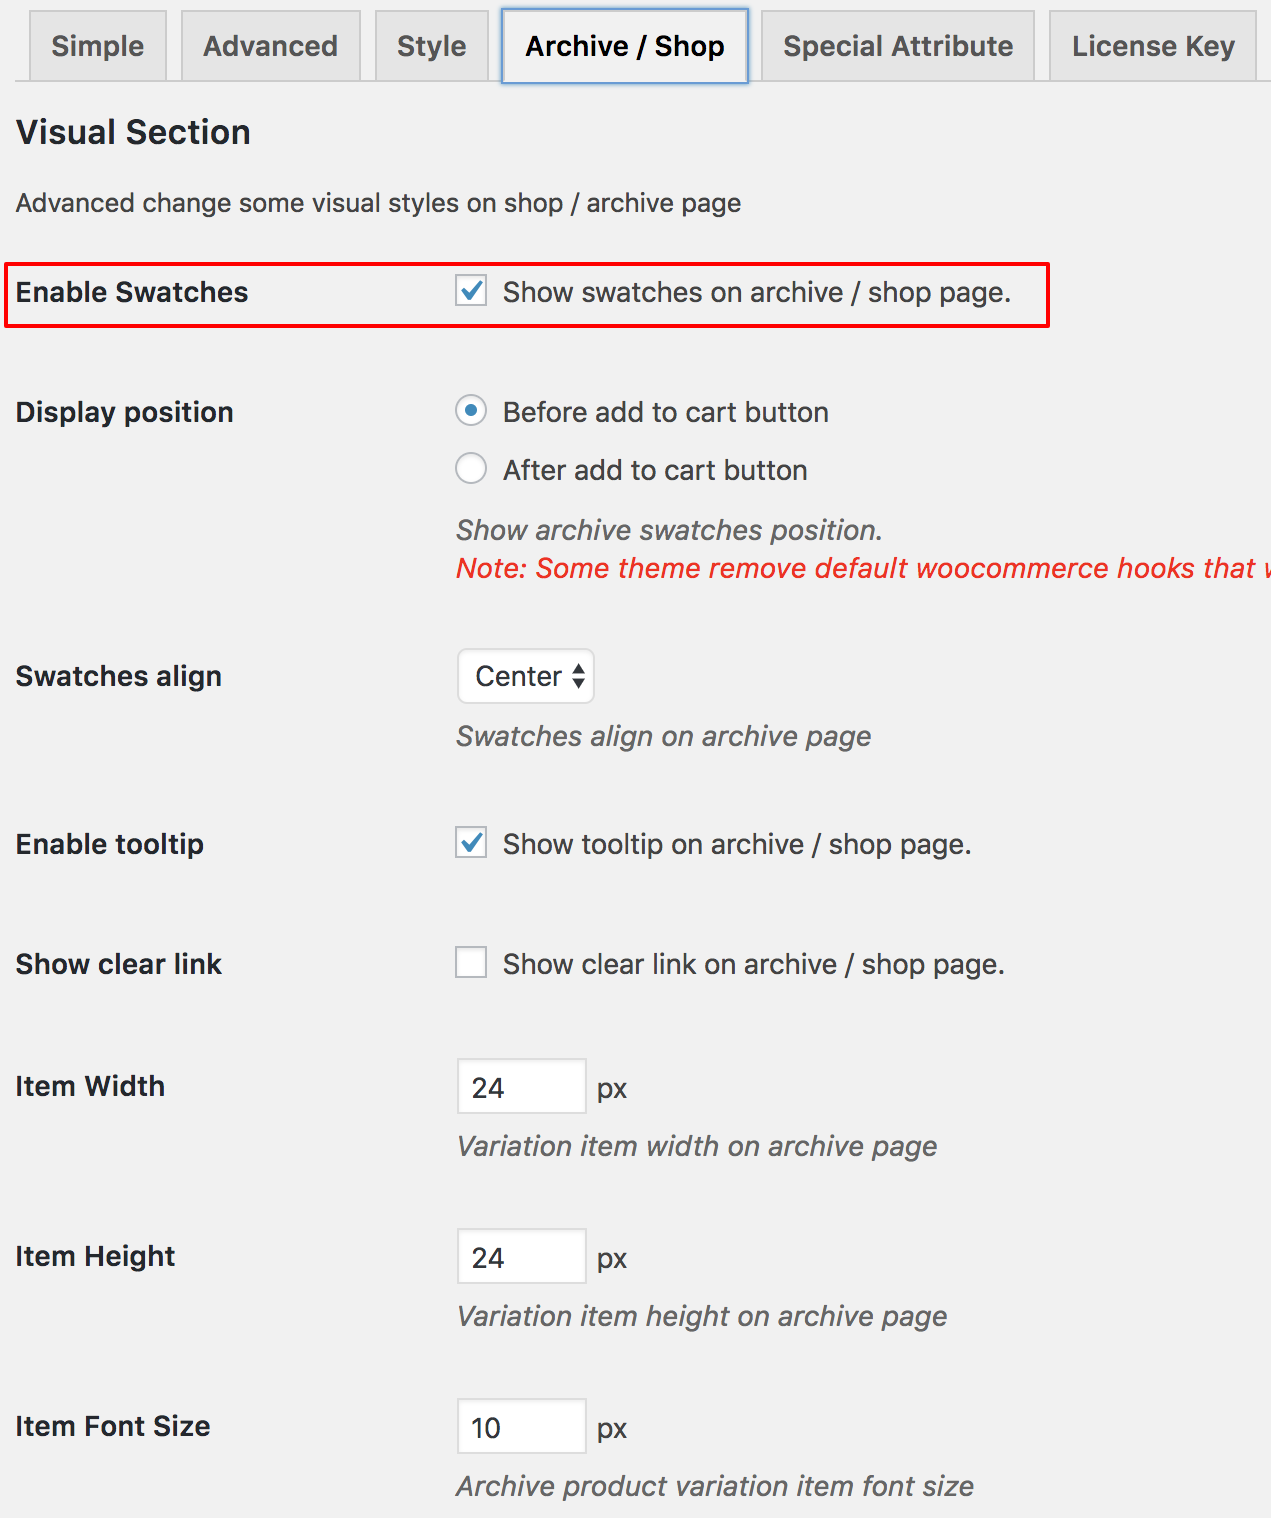
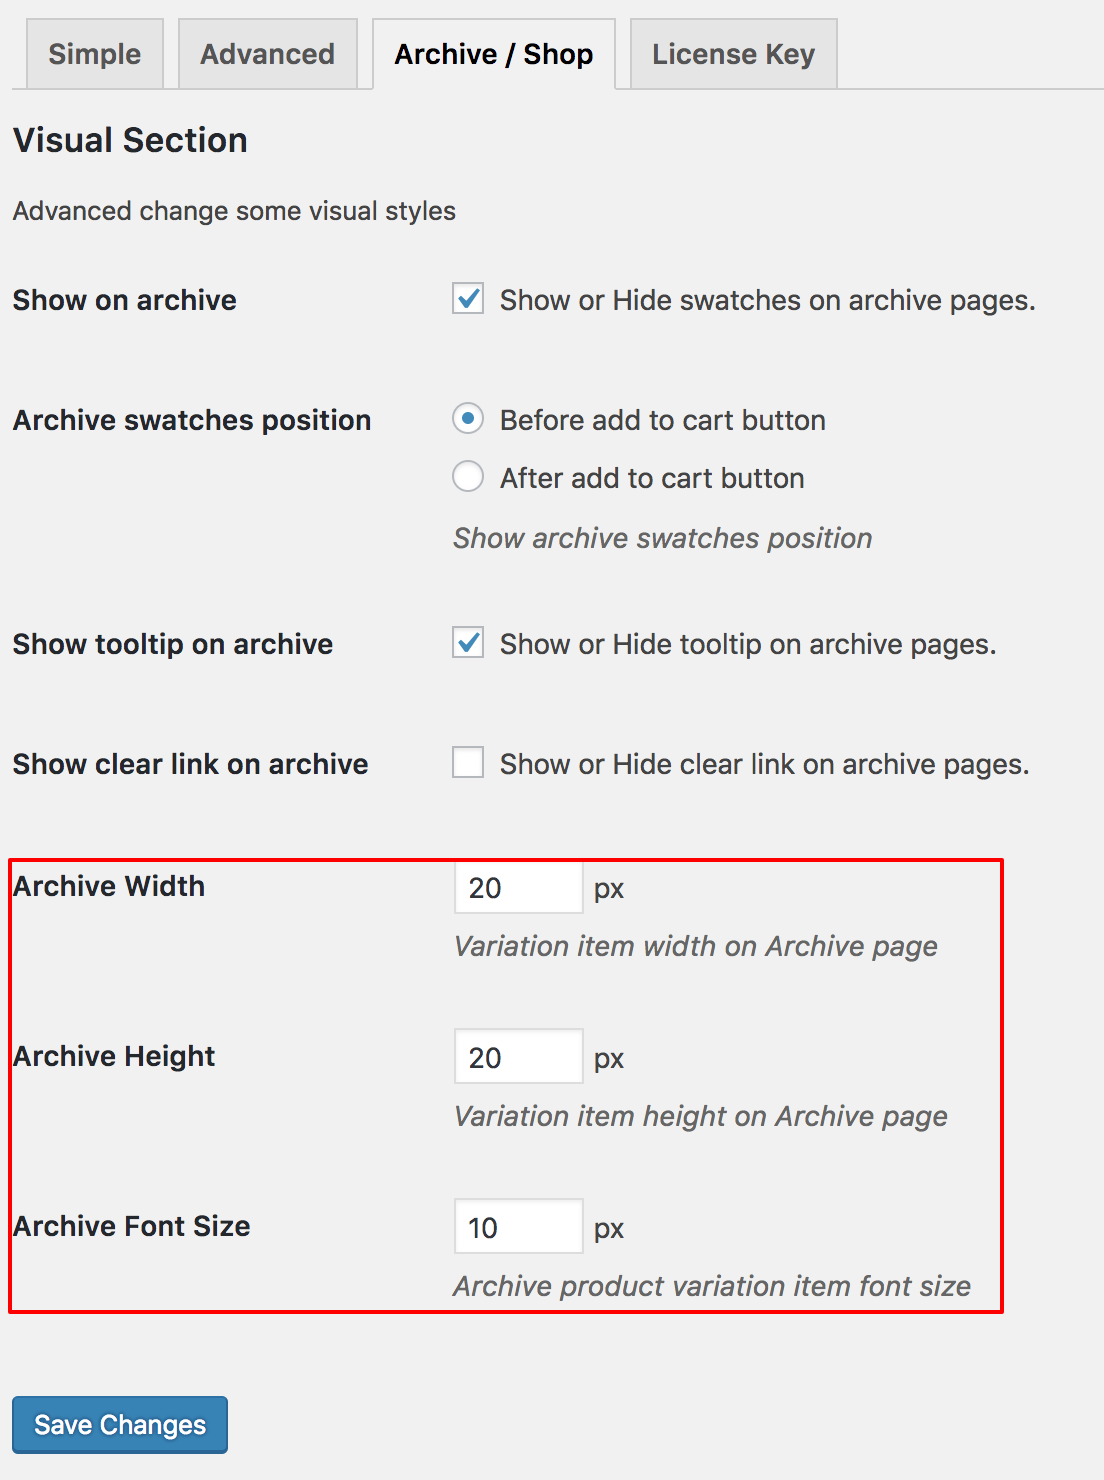
To enable color, image, label, and radio swatches on the store pages. Navigate to Archive / Shop tab from Swatches Settings. Check the settings Show on archive to show swatches in the store/archive page. Even In Flatsome theme you can enable swatches before and after add to cart button.
Multiple Attributes in Product Page, But Show Only Single Attribute in Catalog Page (Advanced) Back To Top
Frontend Preview
Video Tutorial
Global Settings
If you want to show single attribute in shop page without showing them all attribute swatches like product page., make sure you have WooCommerce Variation Swatches Pro plugin besides the free version. it's the premium feature WooCommerce Variation Swatches plugin.
To enable single attributes in the shop page. Head to the Swatches Settings >> Special Attribute. Check Show Single Attribute Settings and select Which attribute you want to show globally from Choose Attribute Button.
From Catalog Mode Display Event, you can specify how image will change on Click or on Hover.
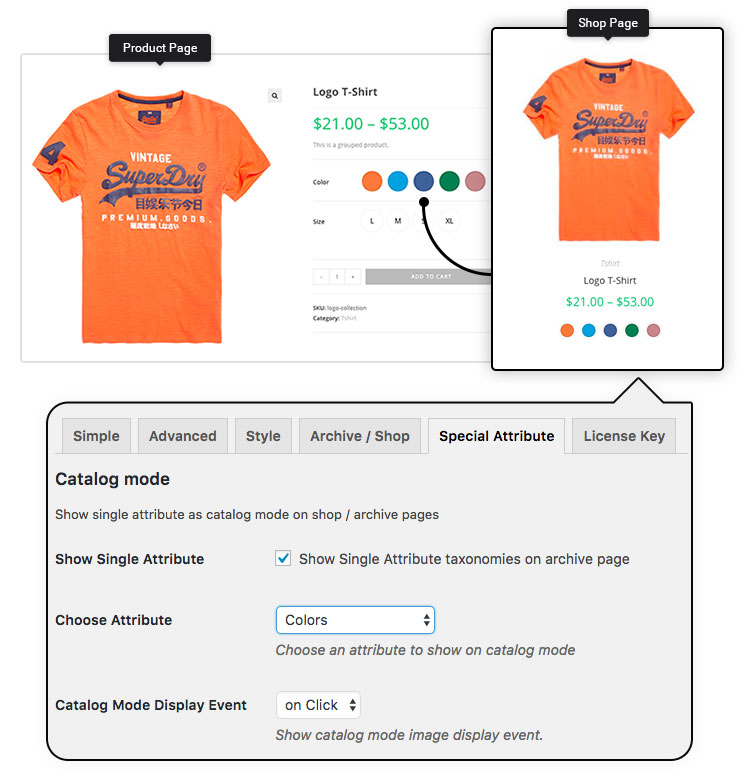
Individual Settings
Suppose you have set attribute type Color from the global setting, it will show only color attribute on the catalog/archive page. If you have want to change them per product basis, you need Individual Settings.
For example, you need to show color attributes for all products, but for 2 or 3 product, you need to show image or button swatches. You can do that from this settings.
Customize Tooltip Background and Font Color (Advanced) Back To Top
Customize tooltip background and text color from the Advanced settings.
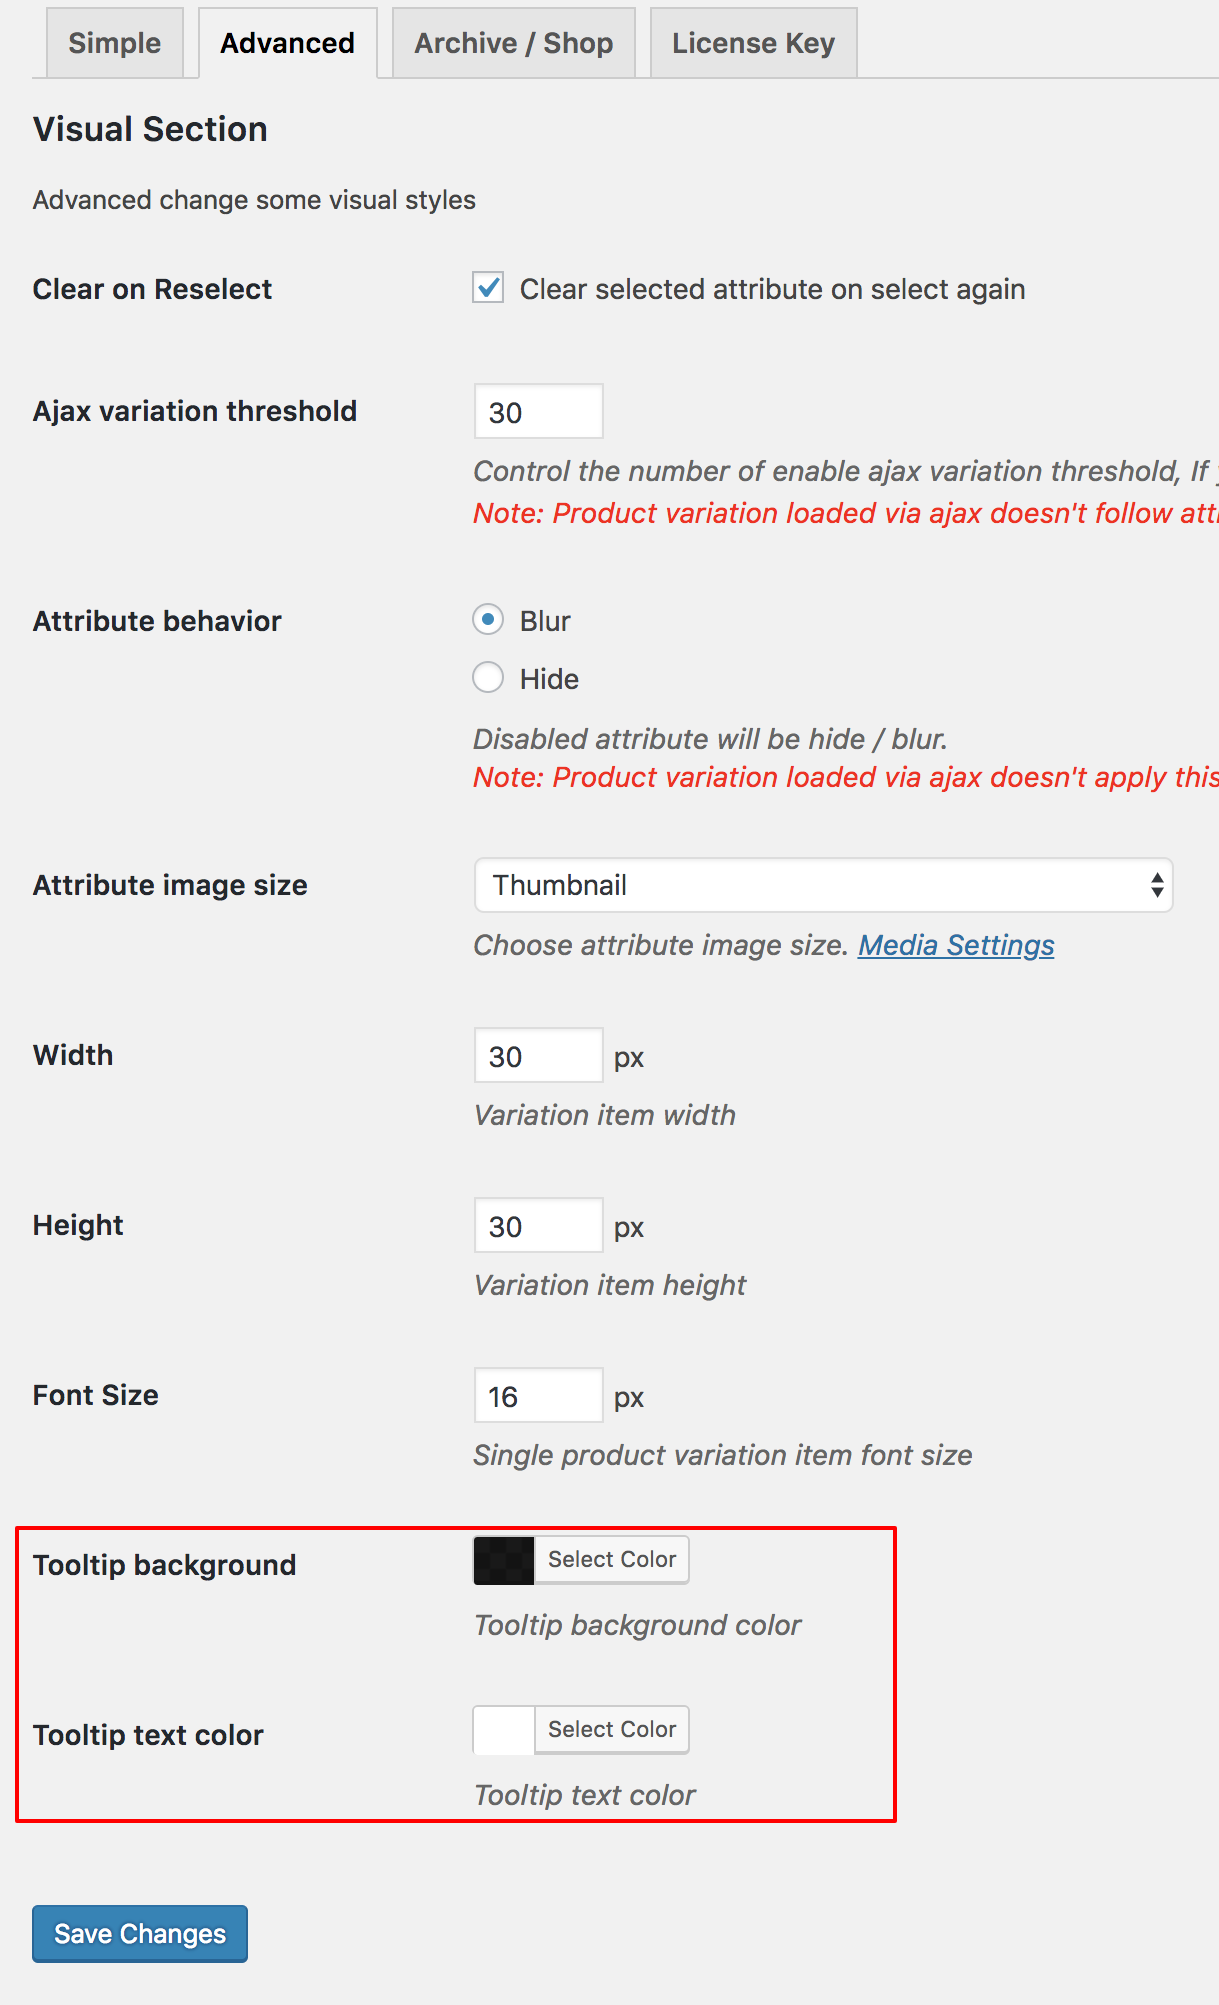
Get to the Tooltip Background setting and select your desired background and text color and save the settings. It will change the default tooltip style globally.

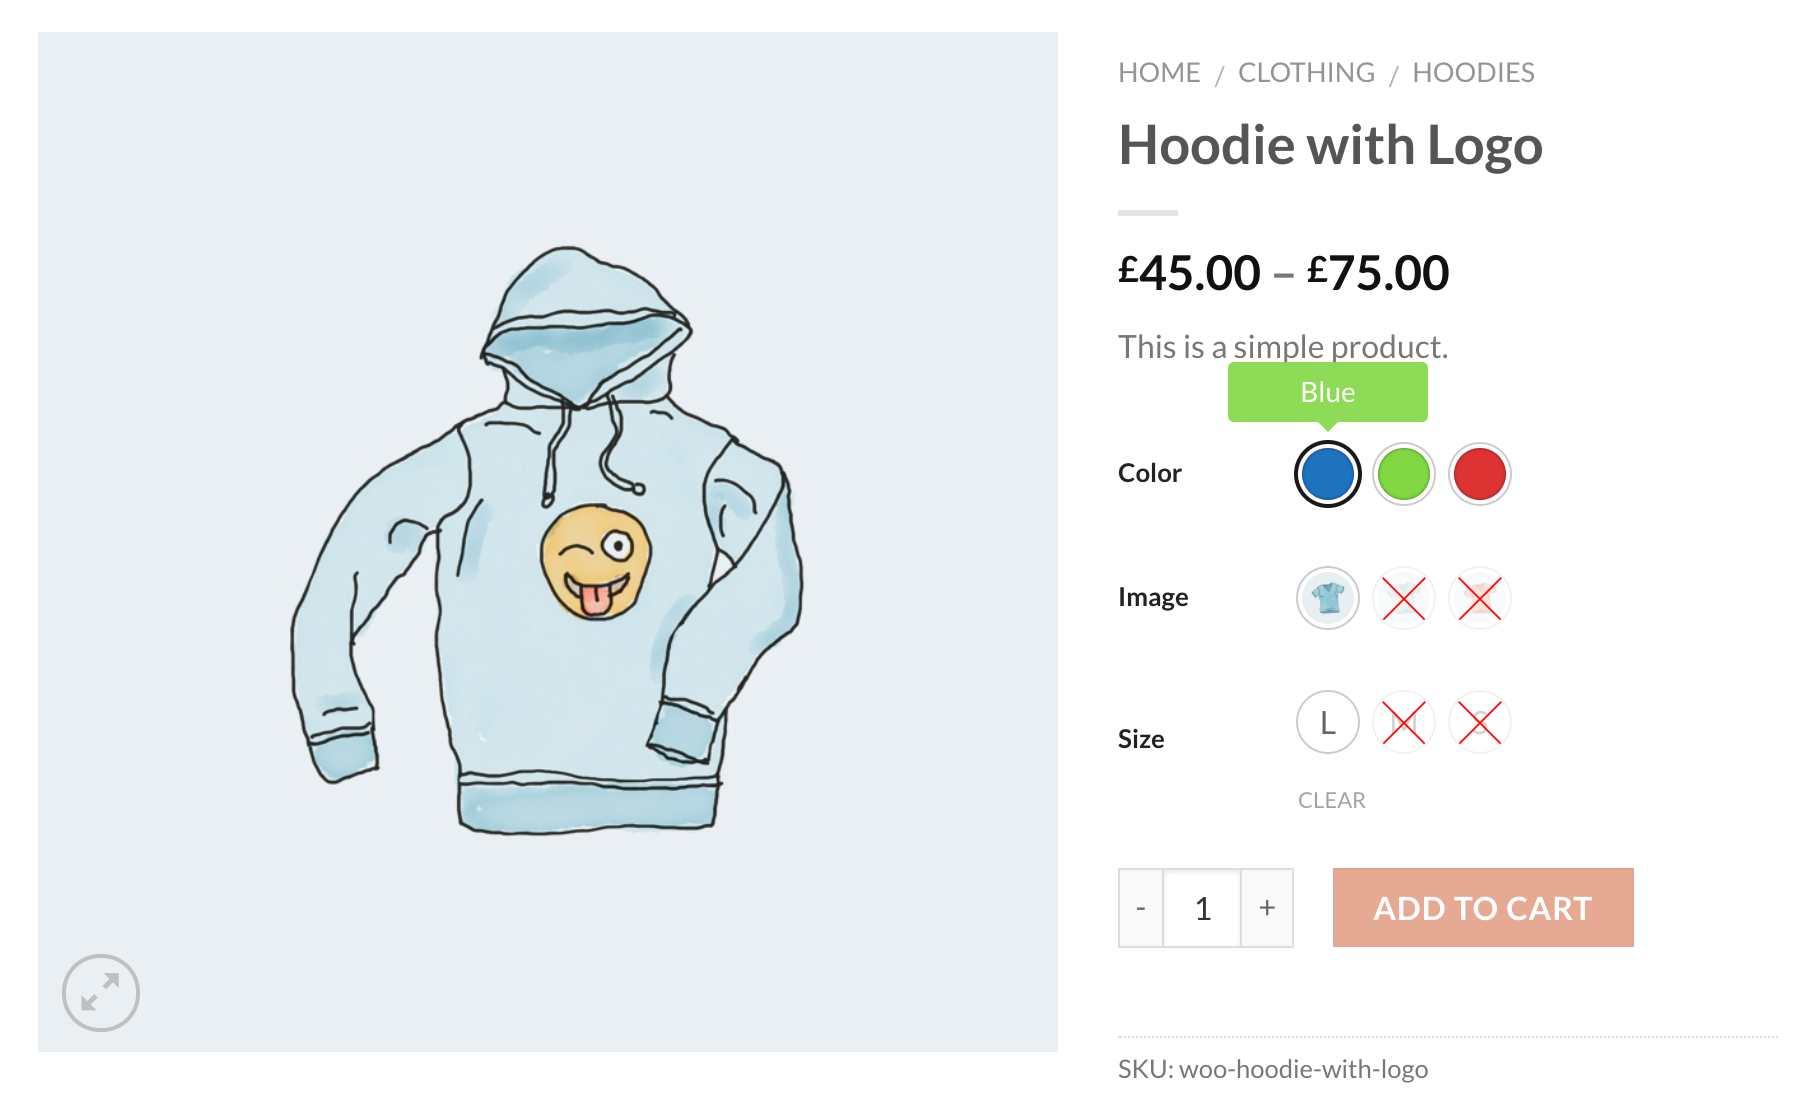
The tooltip frontend Preview looks like the following screenshot.
Tooltip Display Setting on Archive / Shop Pages (Advanced) Back To Top
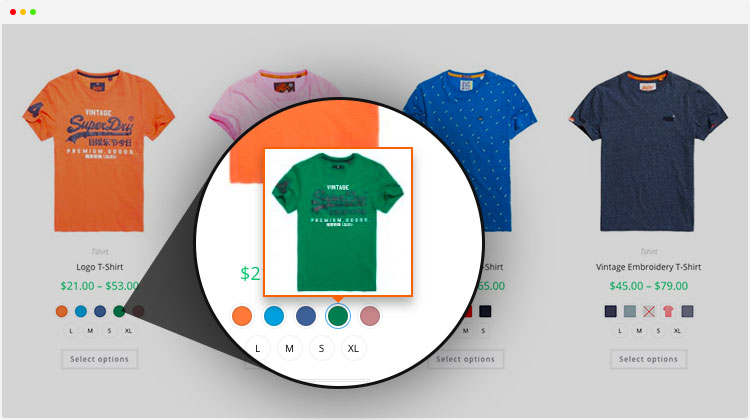
Image Tooltip
Text Tooltip
WooCommerce Variation Swatches is offers simple setting to enable and disable tooltip from swatches on archive pages. Head to Swatches Settings >> Archive / Shop. From Show Tooltip on archive to show or hide tooltip on archive pages.

Show Variation Product Stock Notice Back To Top
Set More Limit To Equalize Catalog Swatches Back To Top
Animated Preview
To equalize unequal number of variation swatches on the catalog page, head to Swatches Settings from Special Attributes. From Catalog Mode Section, specify Attribute Display Limit.

Settings Preview
Category & Group Swatches Back To Top
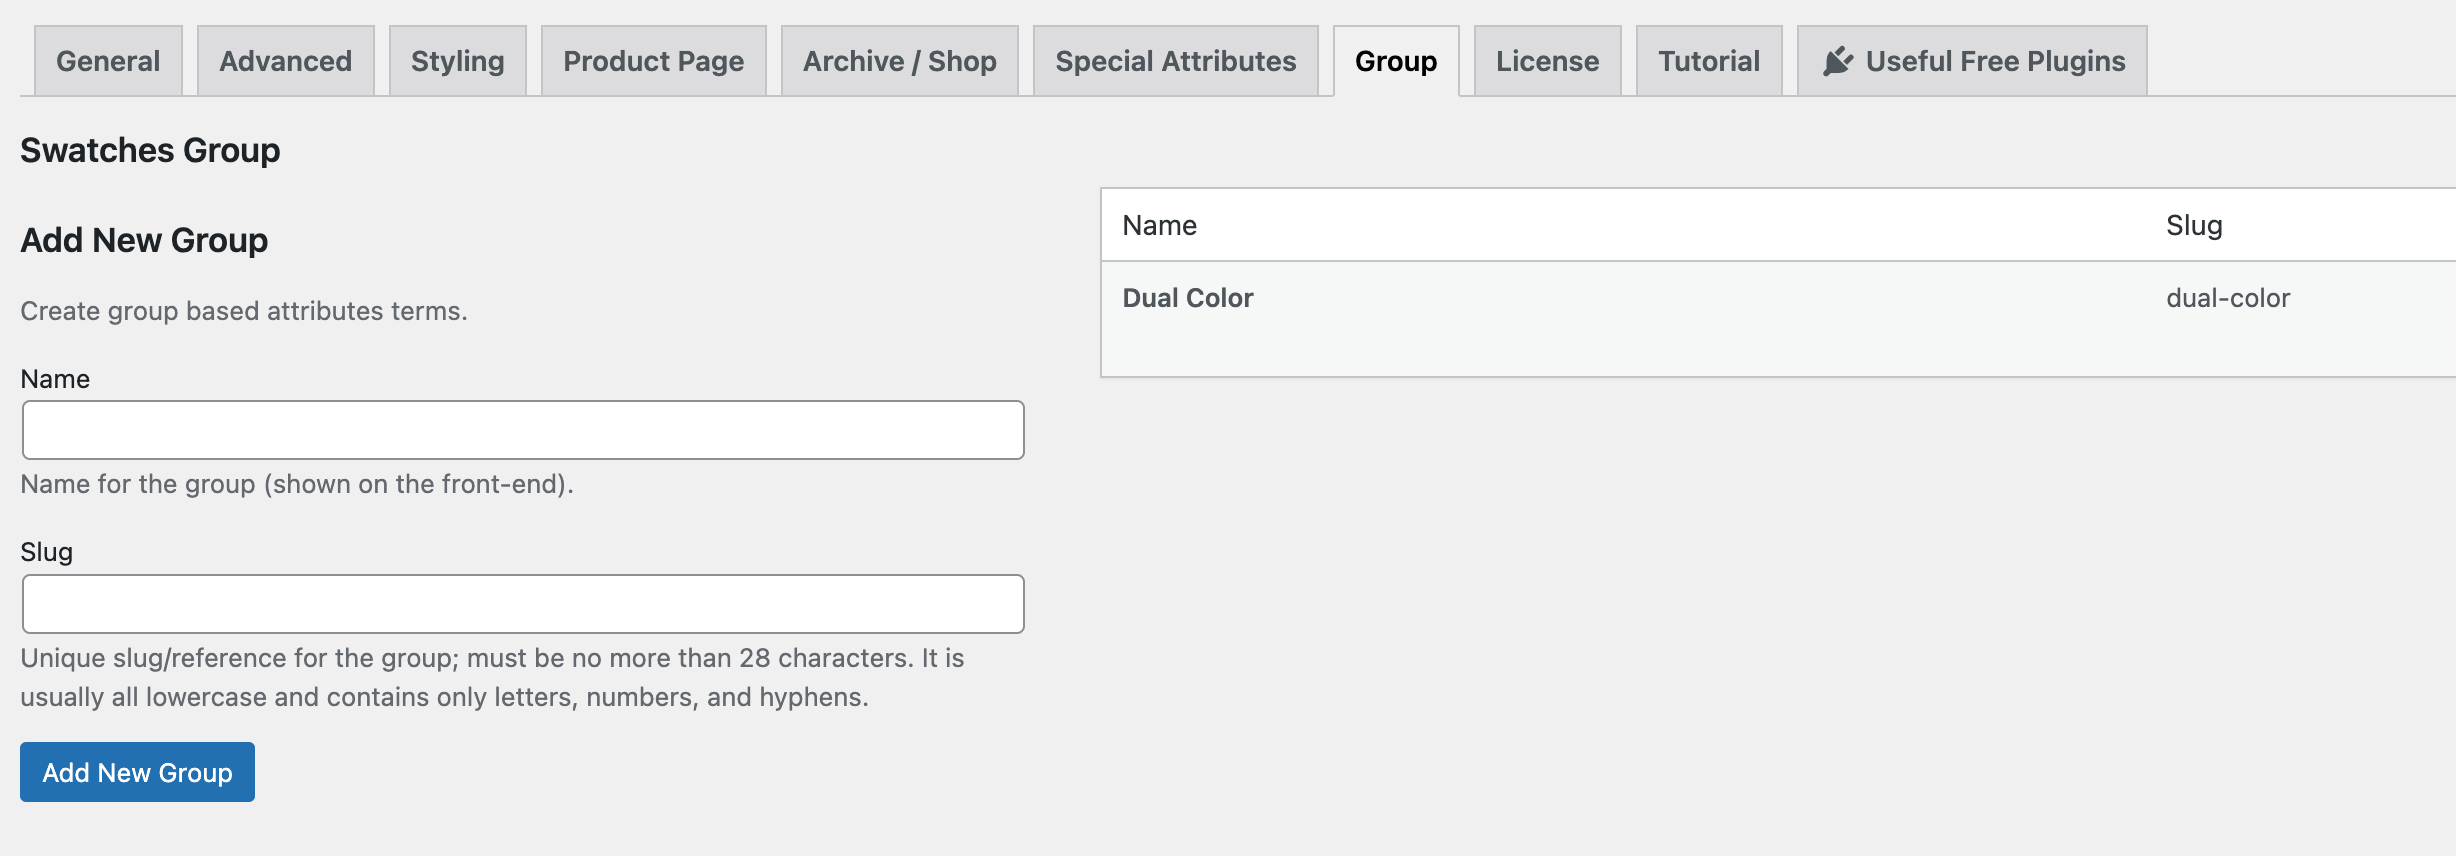
Navigate To the WordPress dashboard. Navigate to GetWooPlugins >> Swatches Settings. Press Group Tab.
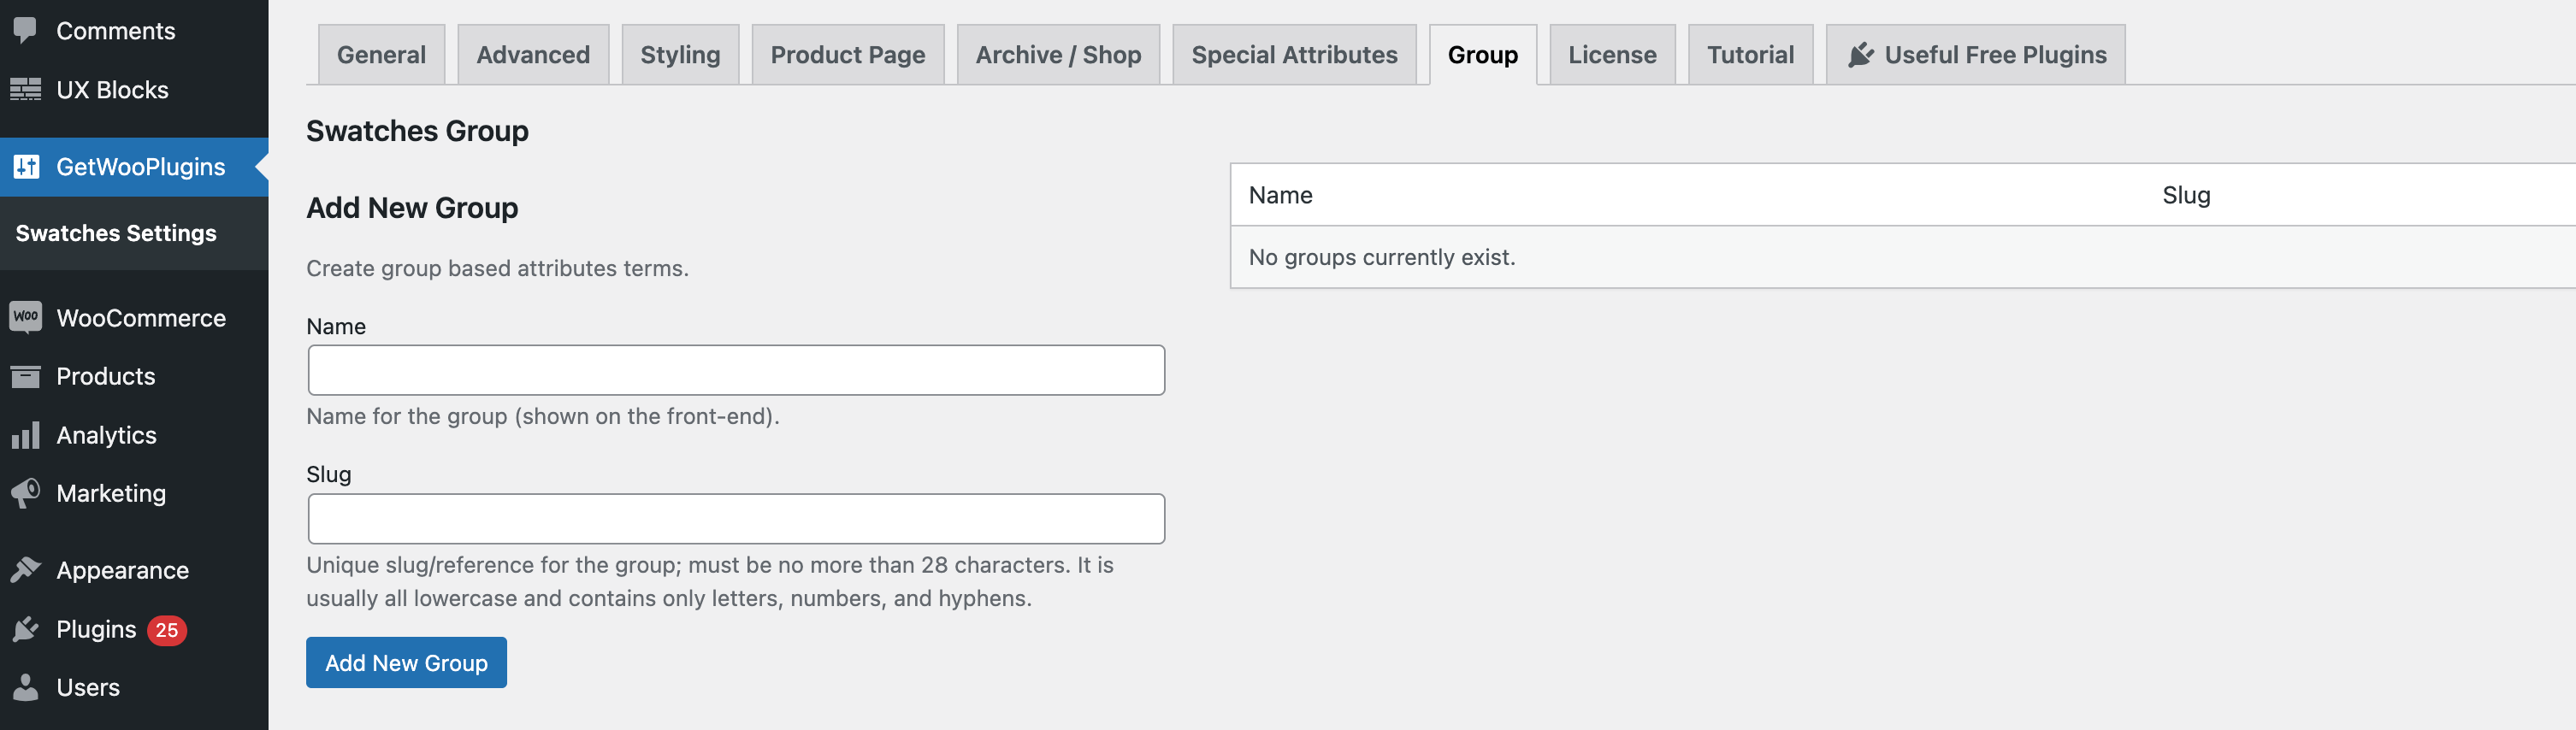
Give the name of your swatches group. I've added a name called "Dual Color".
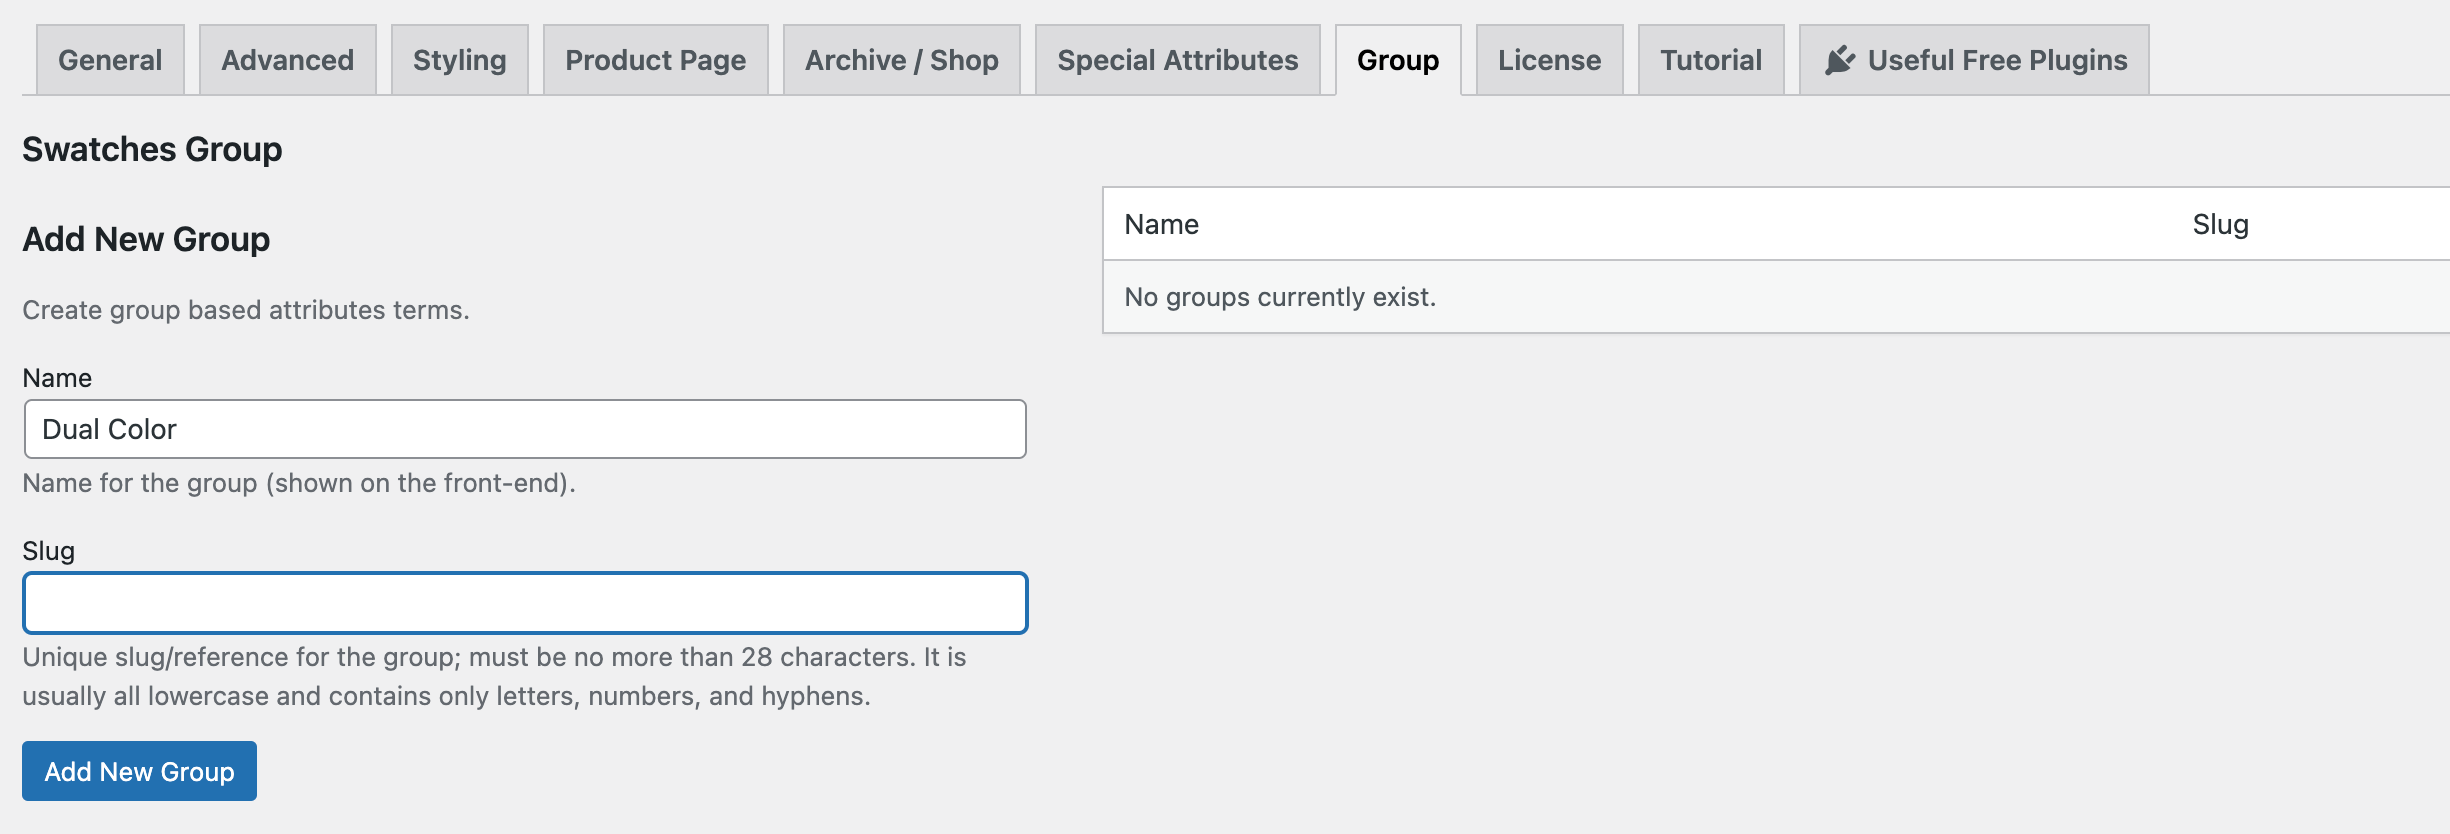
I've pressed "Add New Group". It will create an item like my given name, Dual Color.
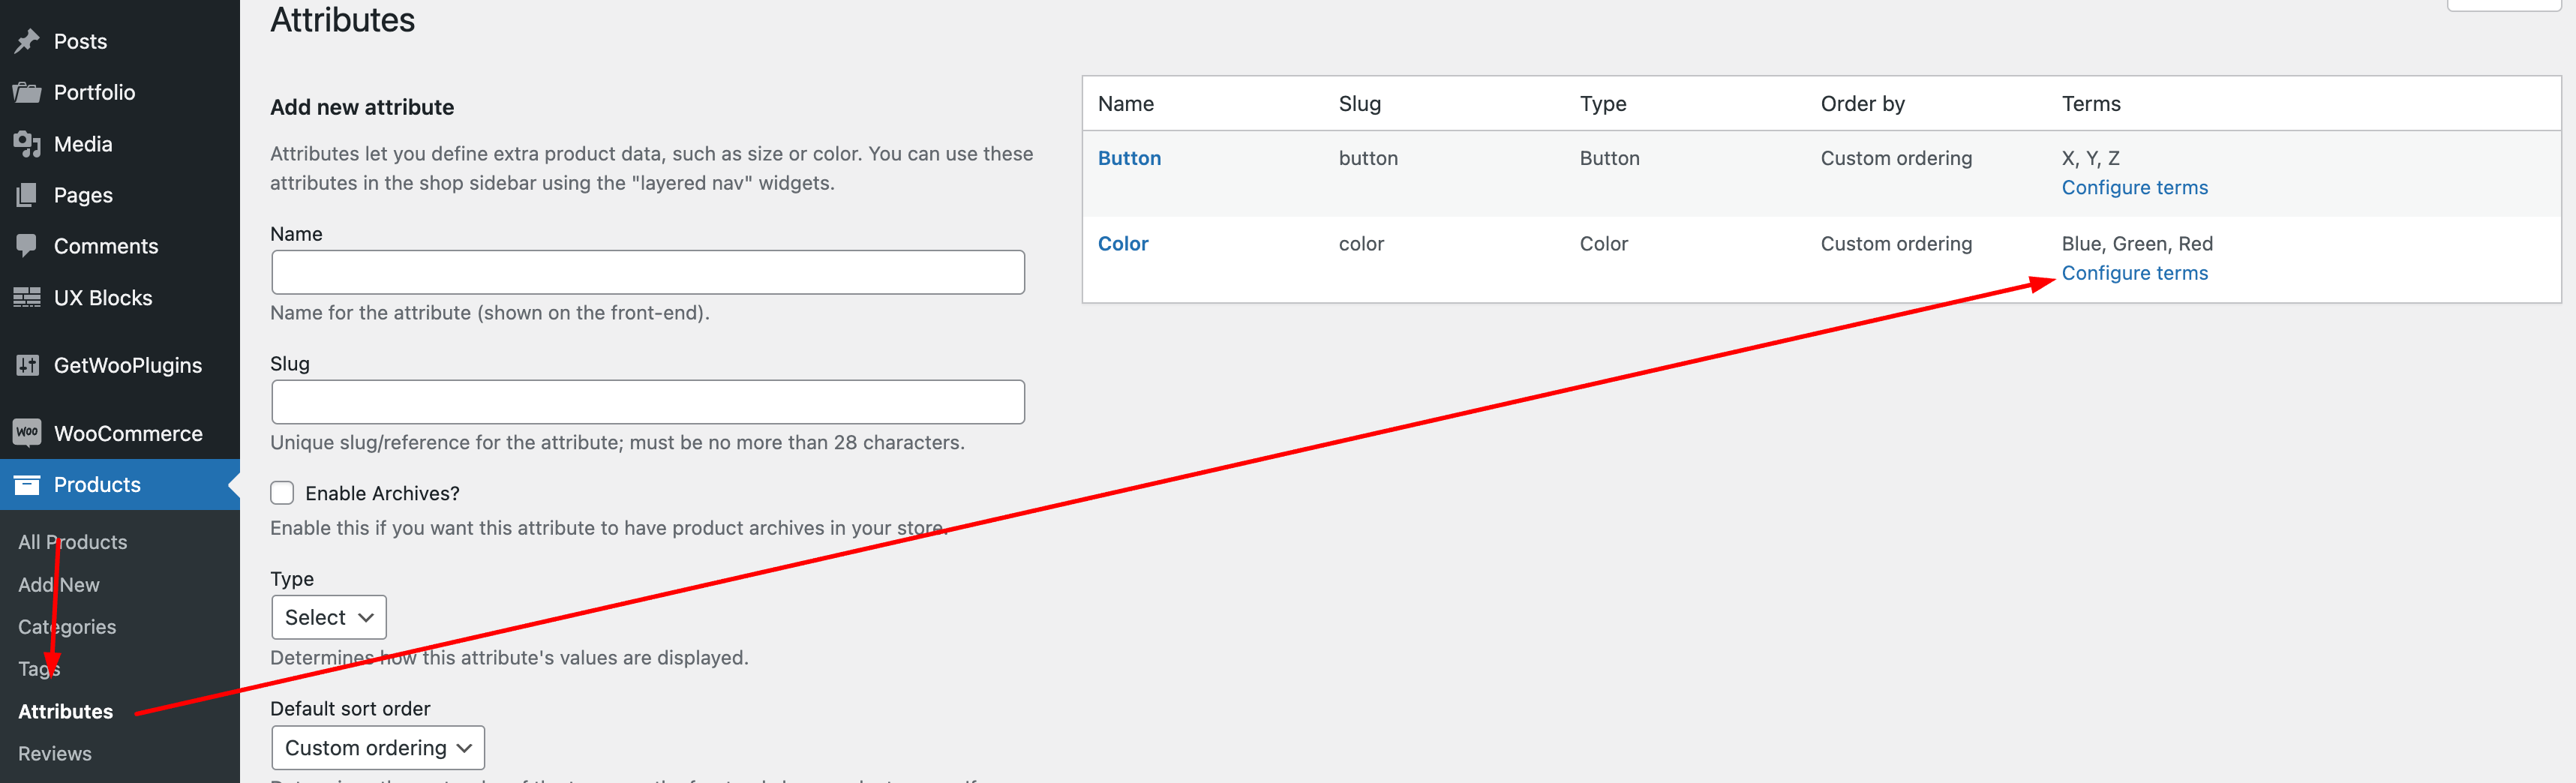
Head to the Products >> Attribute. Press the Configure terms link from your desired global attribute.
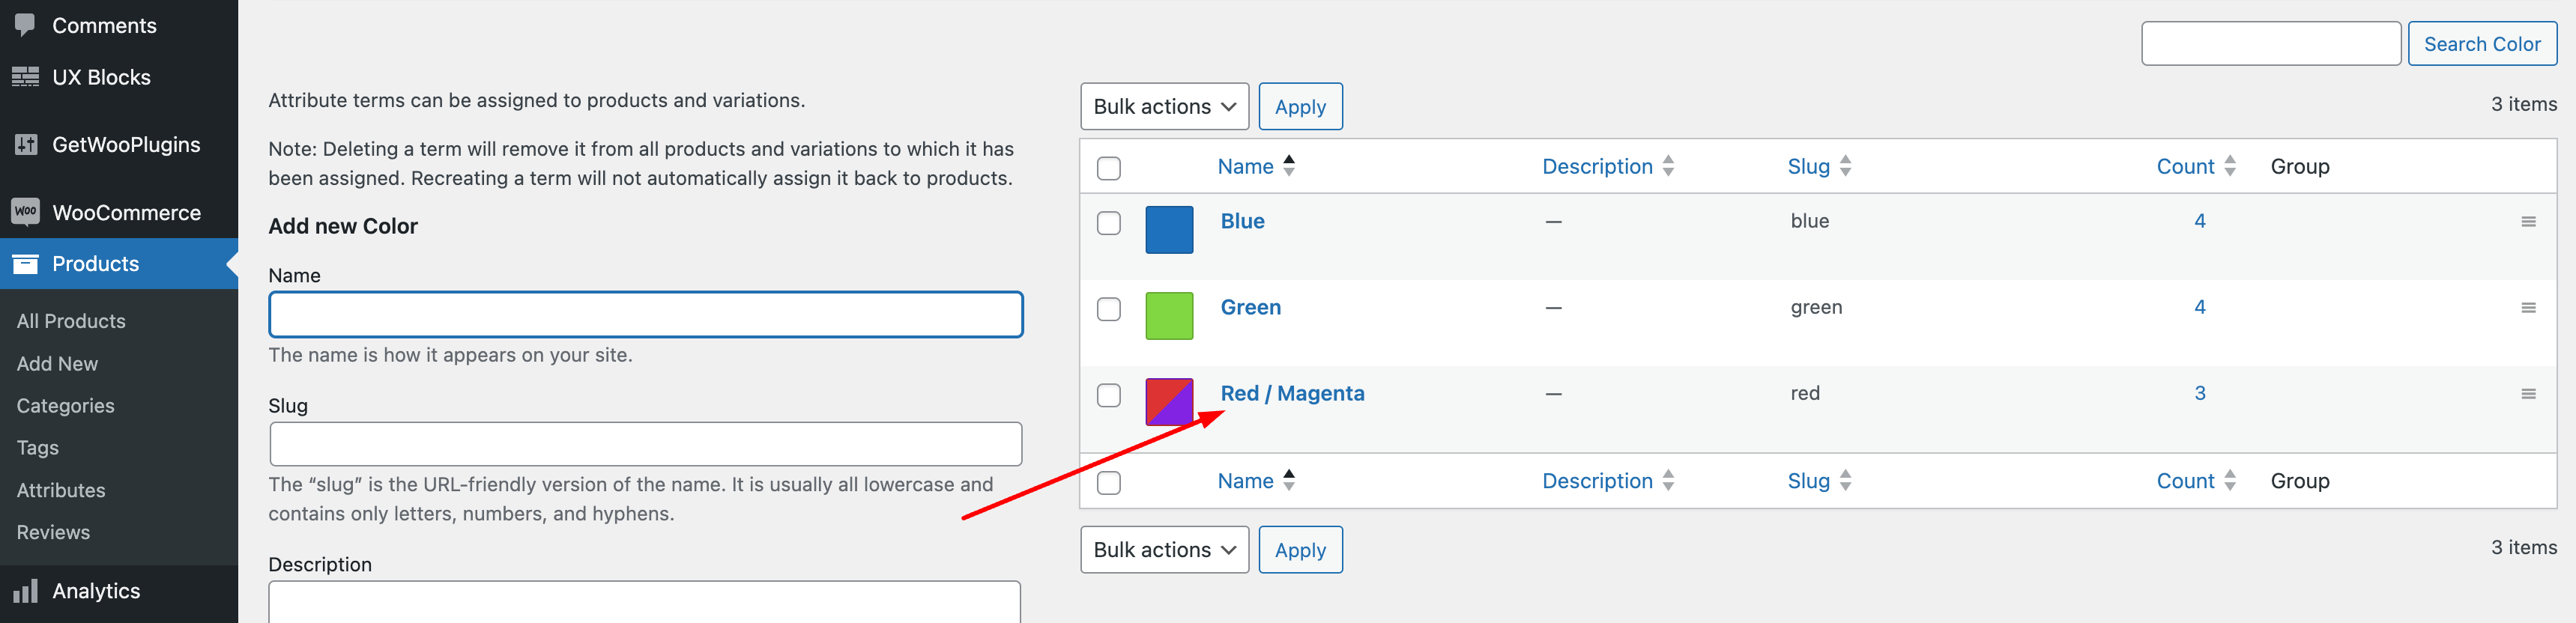
Now, select your desired variation/term to edit the option.
Scroll down to the variation bottom. Select your desired group name from the Group dropdown.
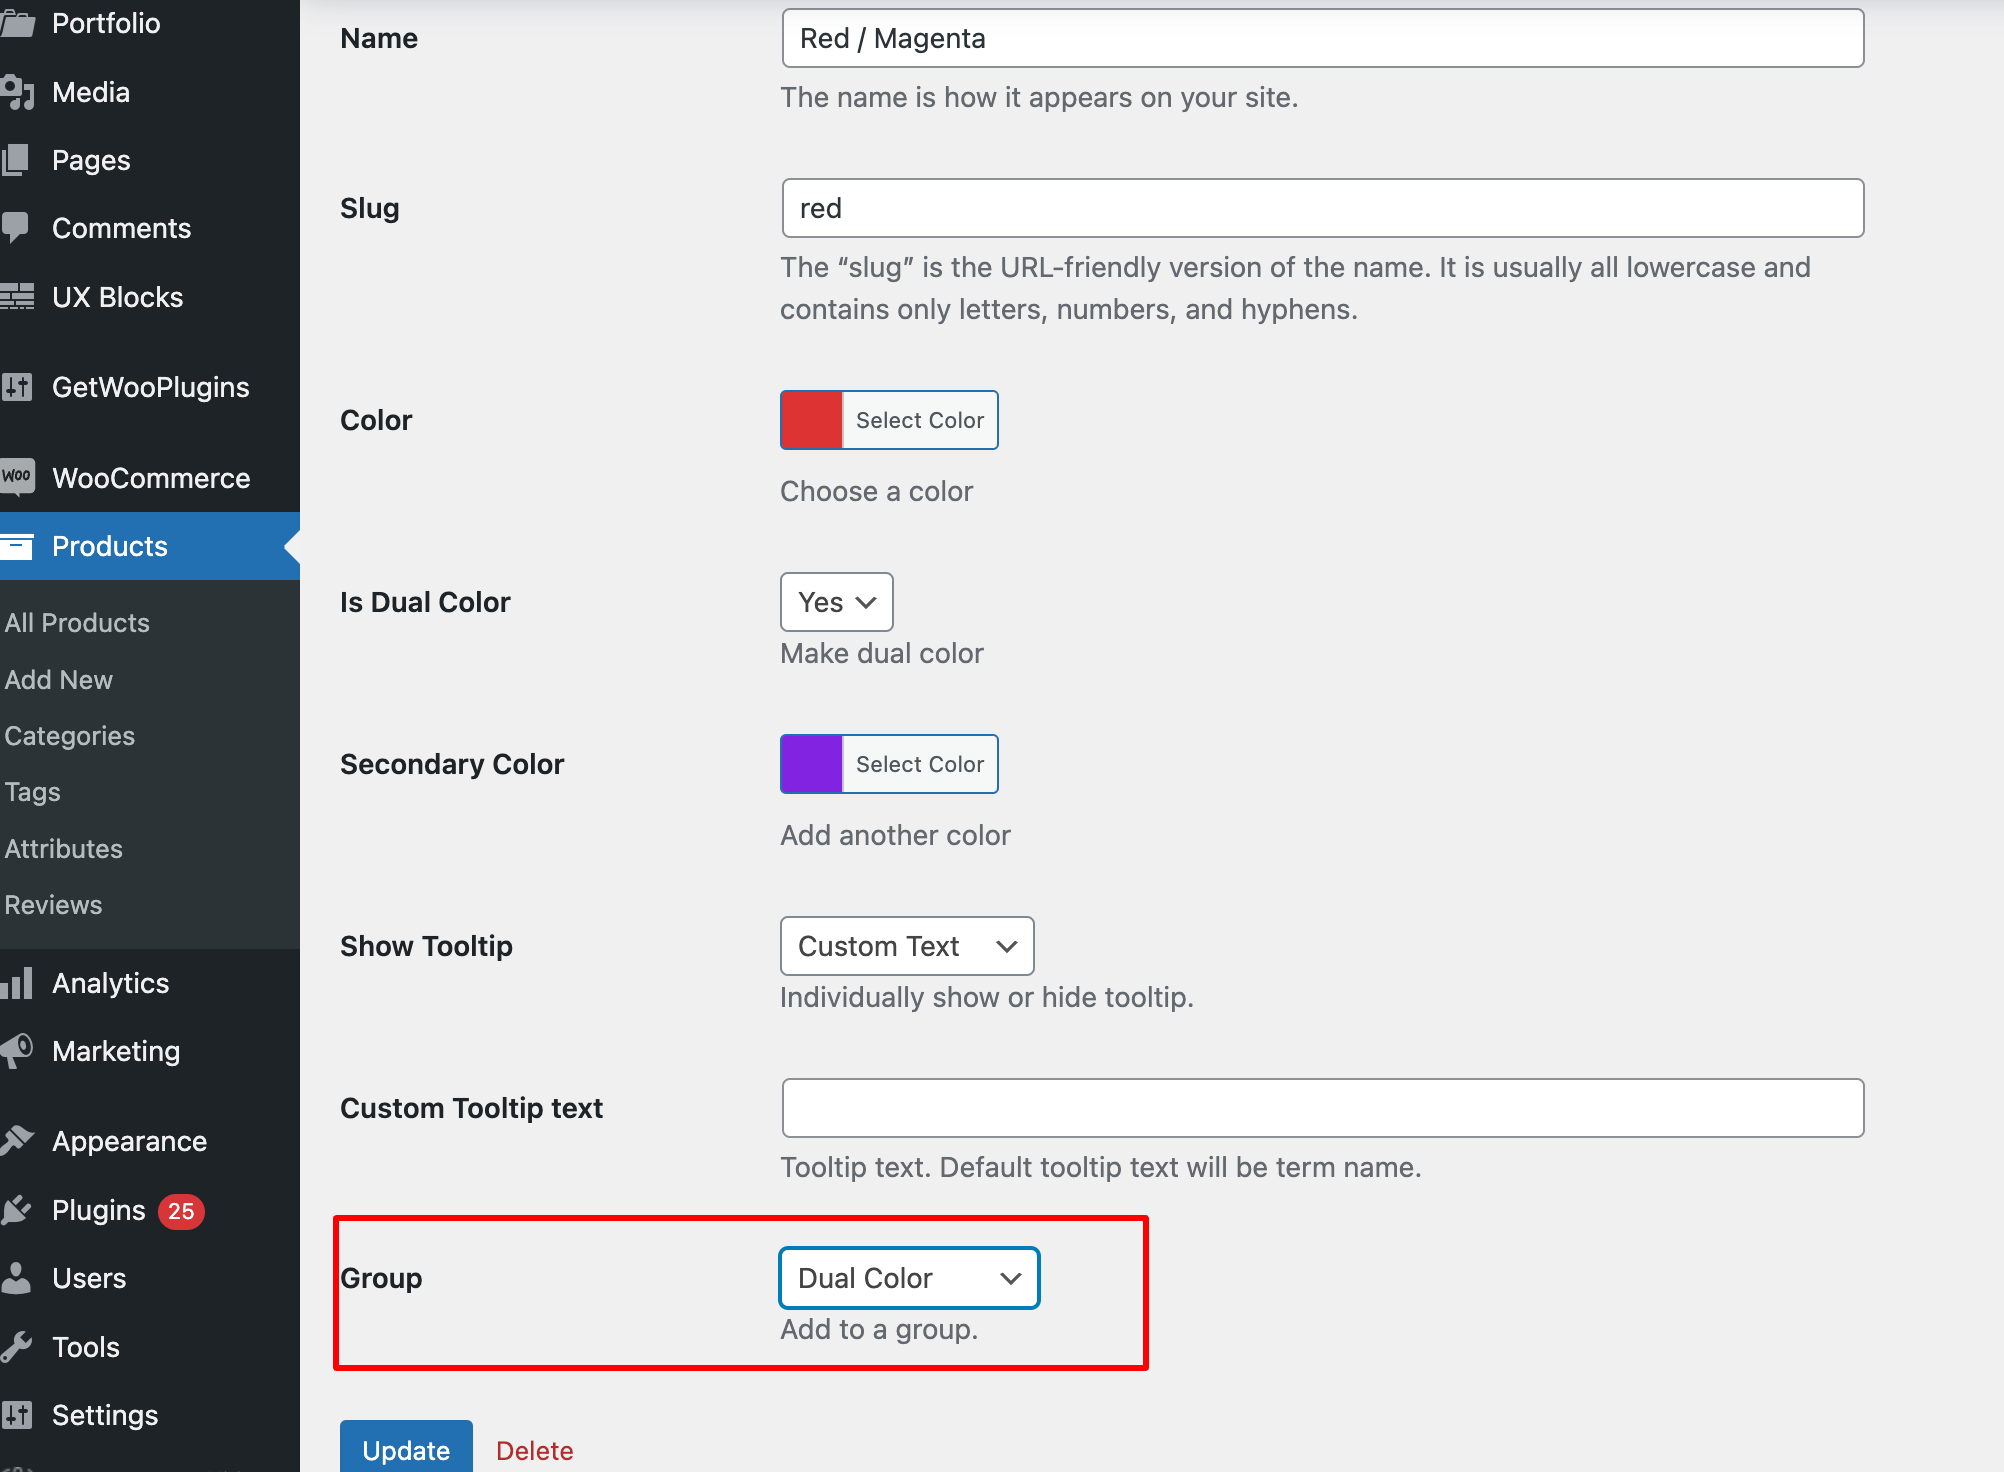
Please check the preview how it looks after configuration.
Clear Button Display Setting on Archive / Shop Pages (Advanced) Back To Top
Clear is allows to create the selected attribute variation. WoocCommerce Variation Swatches plugins offers option to enable and disable clear button on archive page.
![]()
If the clear button is visible, the clear button would look like this.
![]()
Keep Attribute Variation Selected on Product Page After Choosing from Catalog page Like Walmart Back To Top
Round and Square Swatches Back To Top
Square Swatches Preview
Round Swatches Preview
Square & Round Swatches Preview (premium Feature)
Video Tutorial
Global Settings
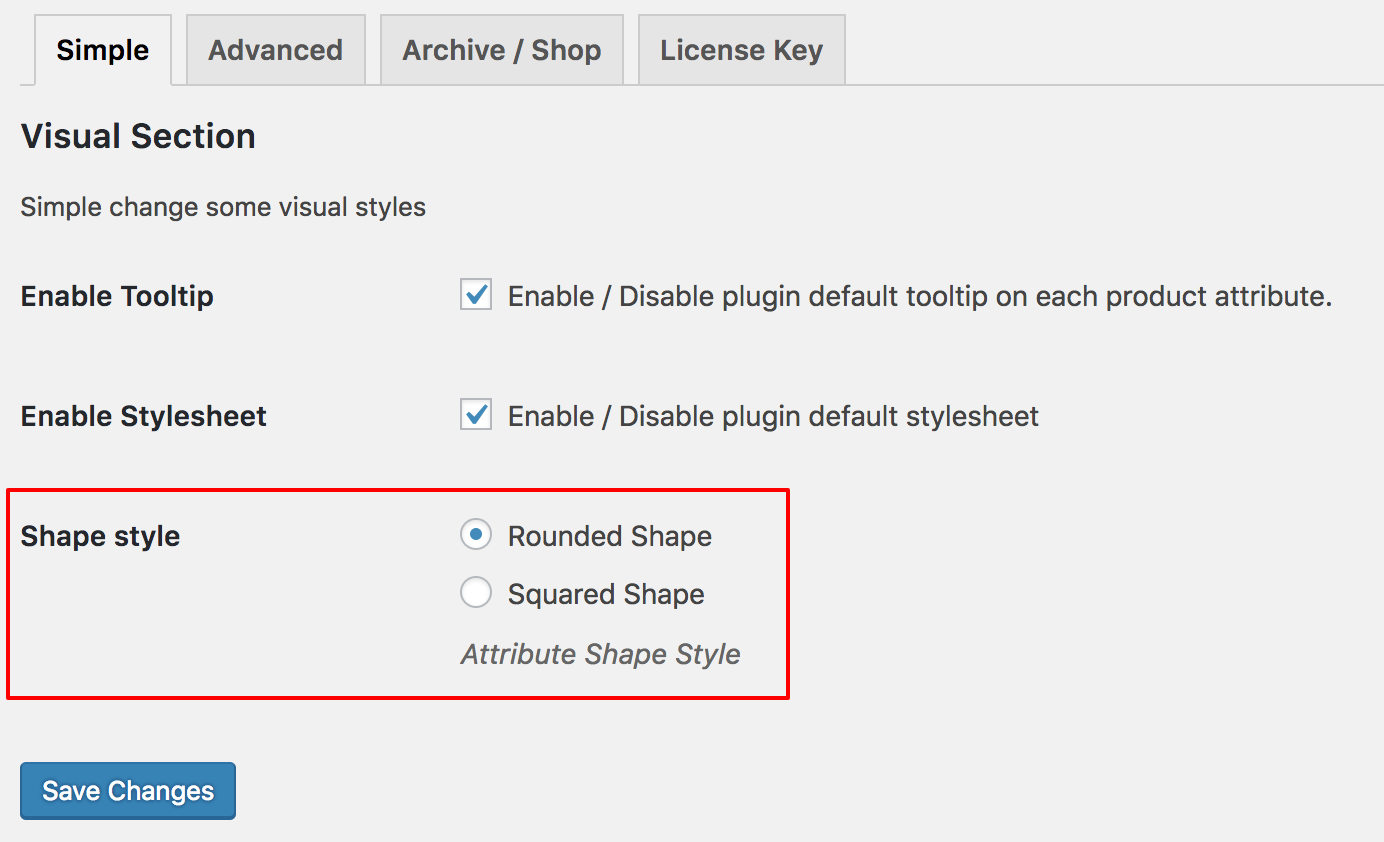
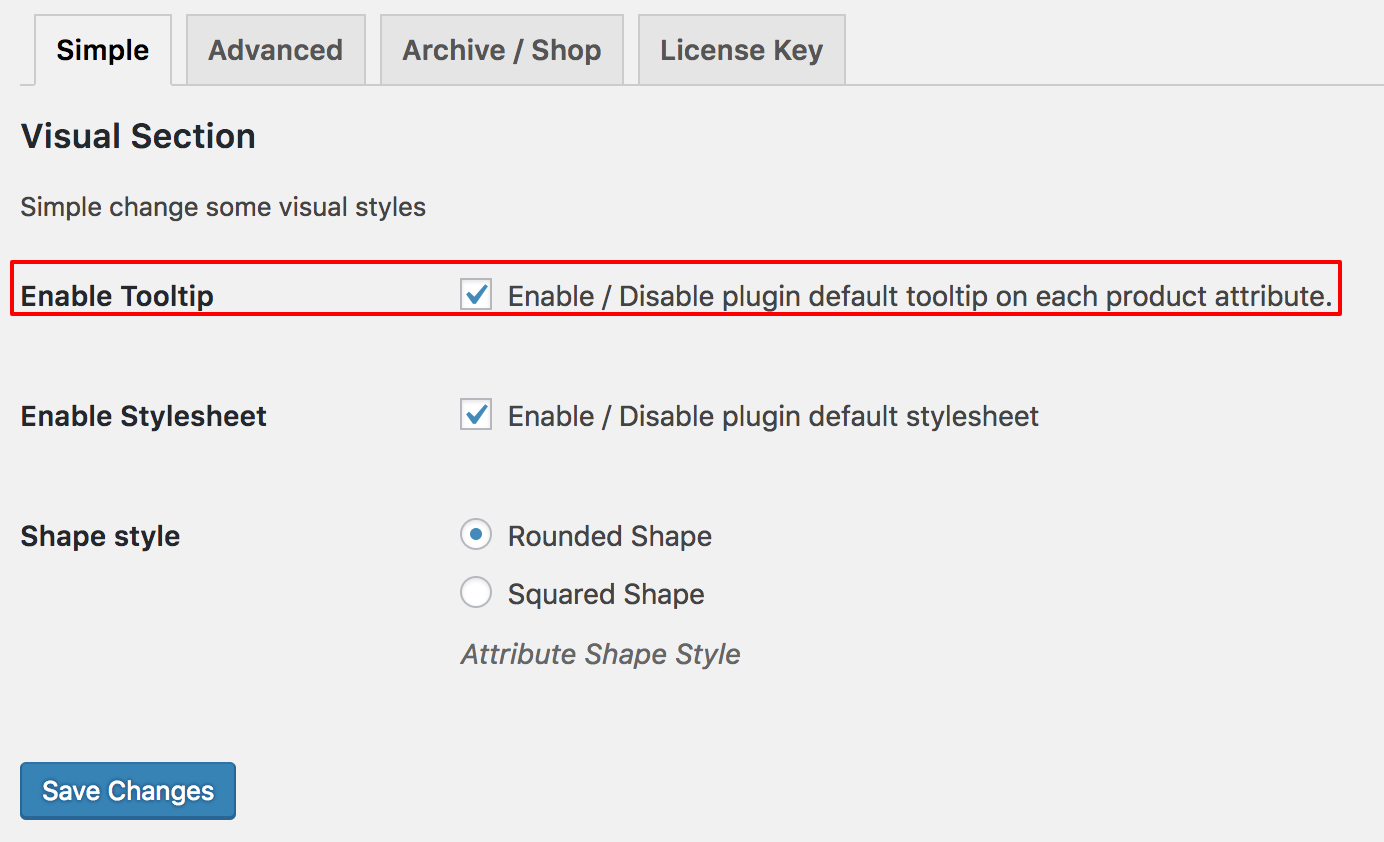
Variation Swatches can be demonstrate in two shapes. The Round Shape and Square Shape. The shape can be switch globally from the plugin backend Swatches Settings >> Simple.
Individual Product Attribute Based Setting
It's the premium feature WooCommerce Variation Swatches plugin. Make sure you have WooCommerce Variation Swatches Pro plugin besides the free version.
Step 02: Configure Global Settings
When you specify Round Shape or Square Shape style from Swatches Settings >> Simple, it sets shapes style globally for entire store attribute. Suppose you have set round shape globally, but you want to some attribute of your product in Square shape. Do you can that from the Product edit mode Swatches >> Settings.

How To Enable Image Tooltip Back To Top
Frontend Preview
Video Tutorial
Step 01: Plugin Setup
It's the premium feature WooCommerce Variation Swatches plugin. Make sure you have WooCommerce Variation Swatches Pro plugin besides the free version.
Step 02: Image Tooltip Setup
Navigate to the Products >> Attributes and get into your desired variation edit mode select Configure Terms link from your desired attribute. When you are inside your selected variation edit mode, insert image as tooltip from Tooltip Image setting selecting Upload / Add Image button.
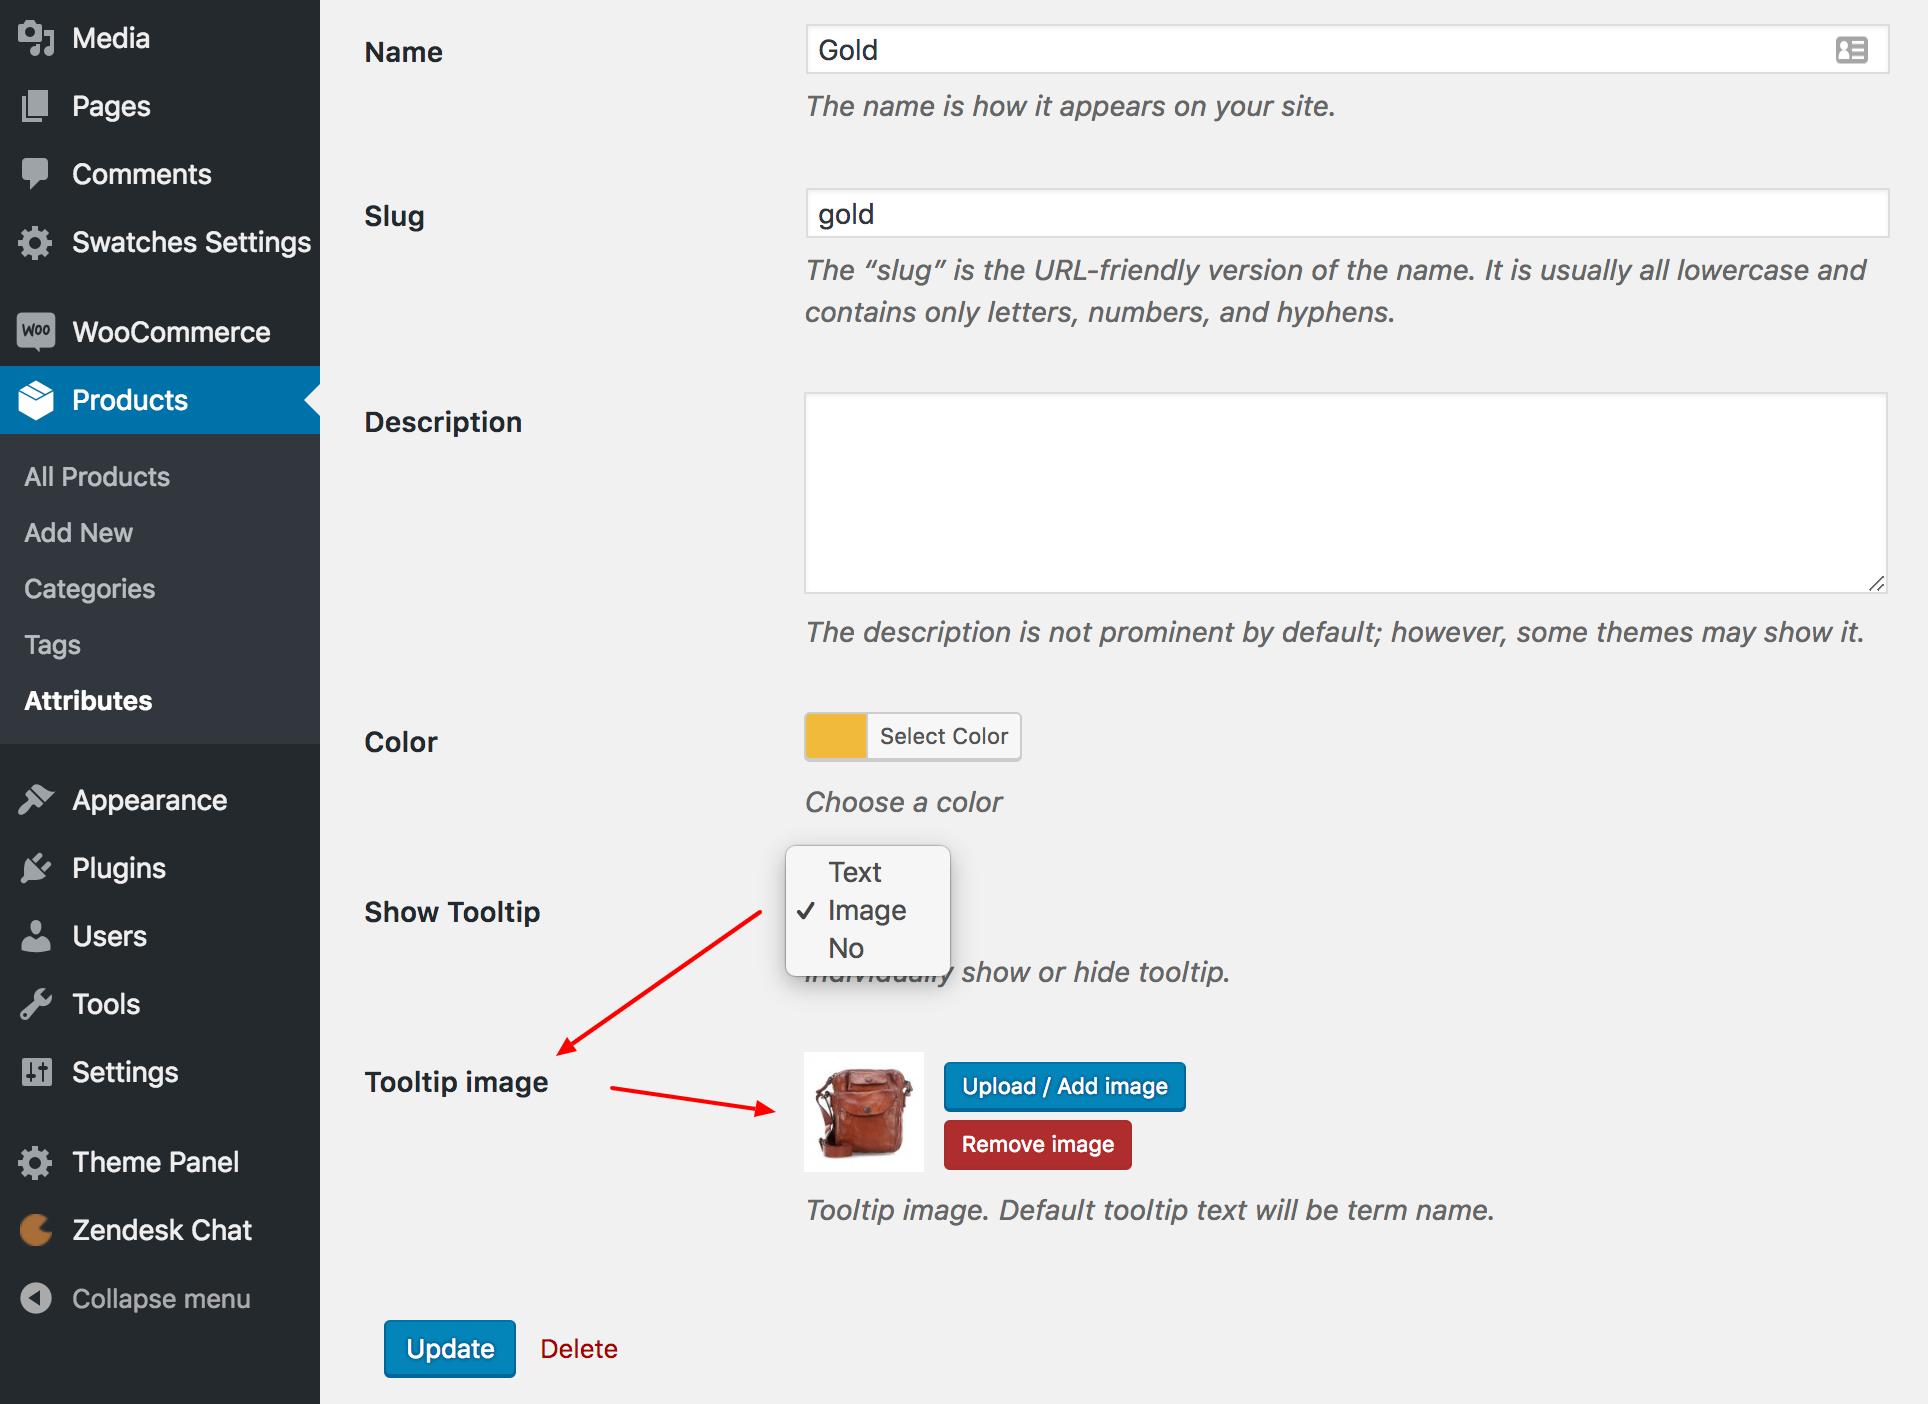
Now, the product connected with this variation will show this image as tooltip throughout the store.
Individual Product Settings
If you want to insert image tooltip image based product basis variation, WooCommerce Variation Swatches plugin has the option to that. To insert product basis variation swatches tooltip, head to product edit mode and get in Swatches Settings Tab from Product Data Setting.
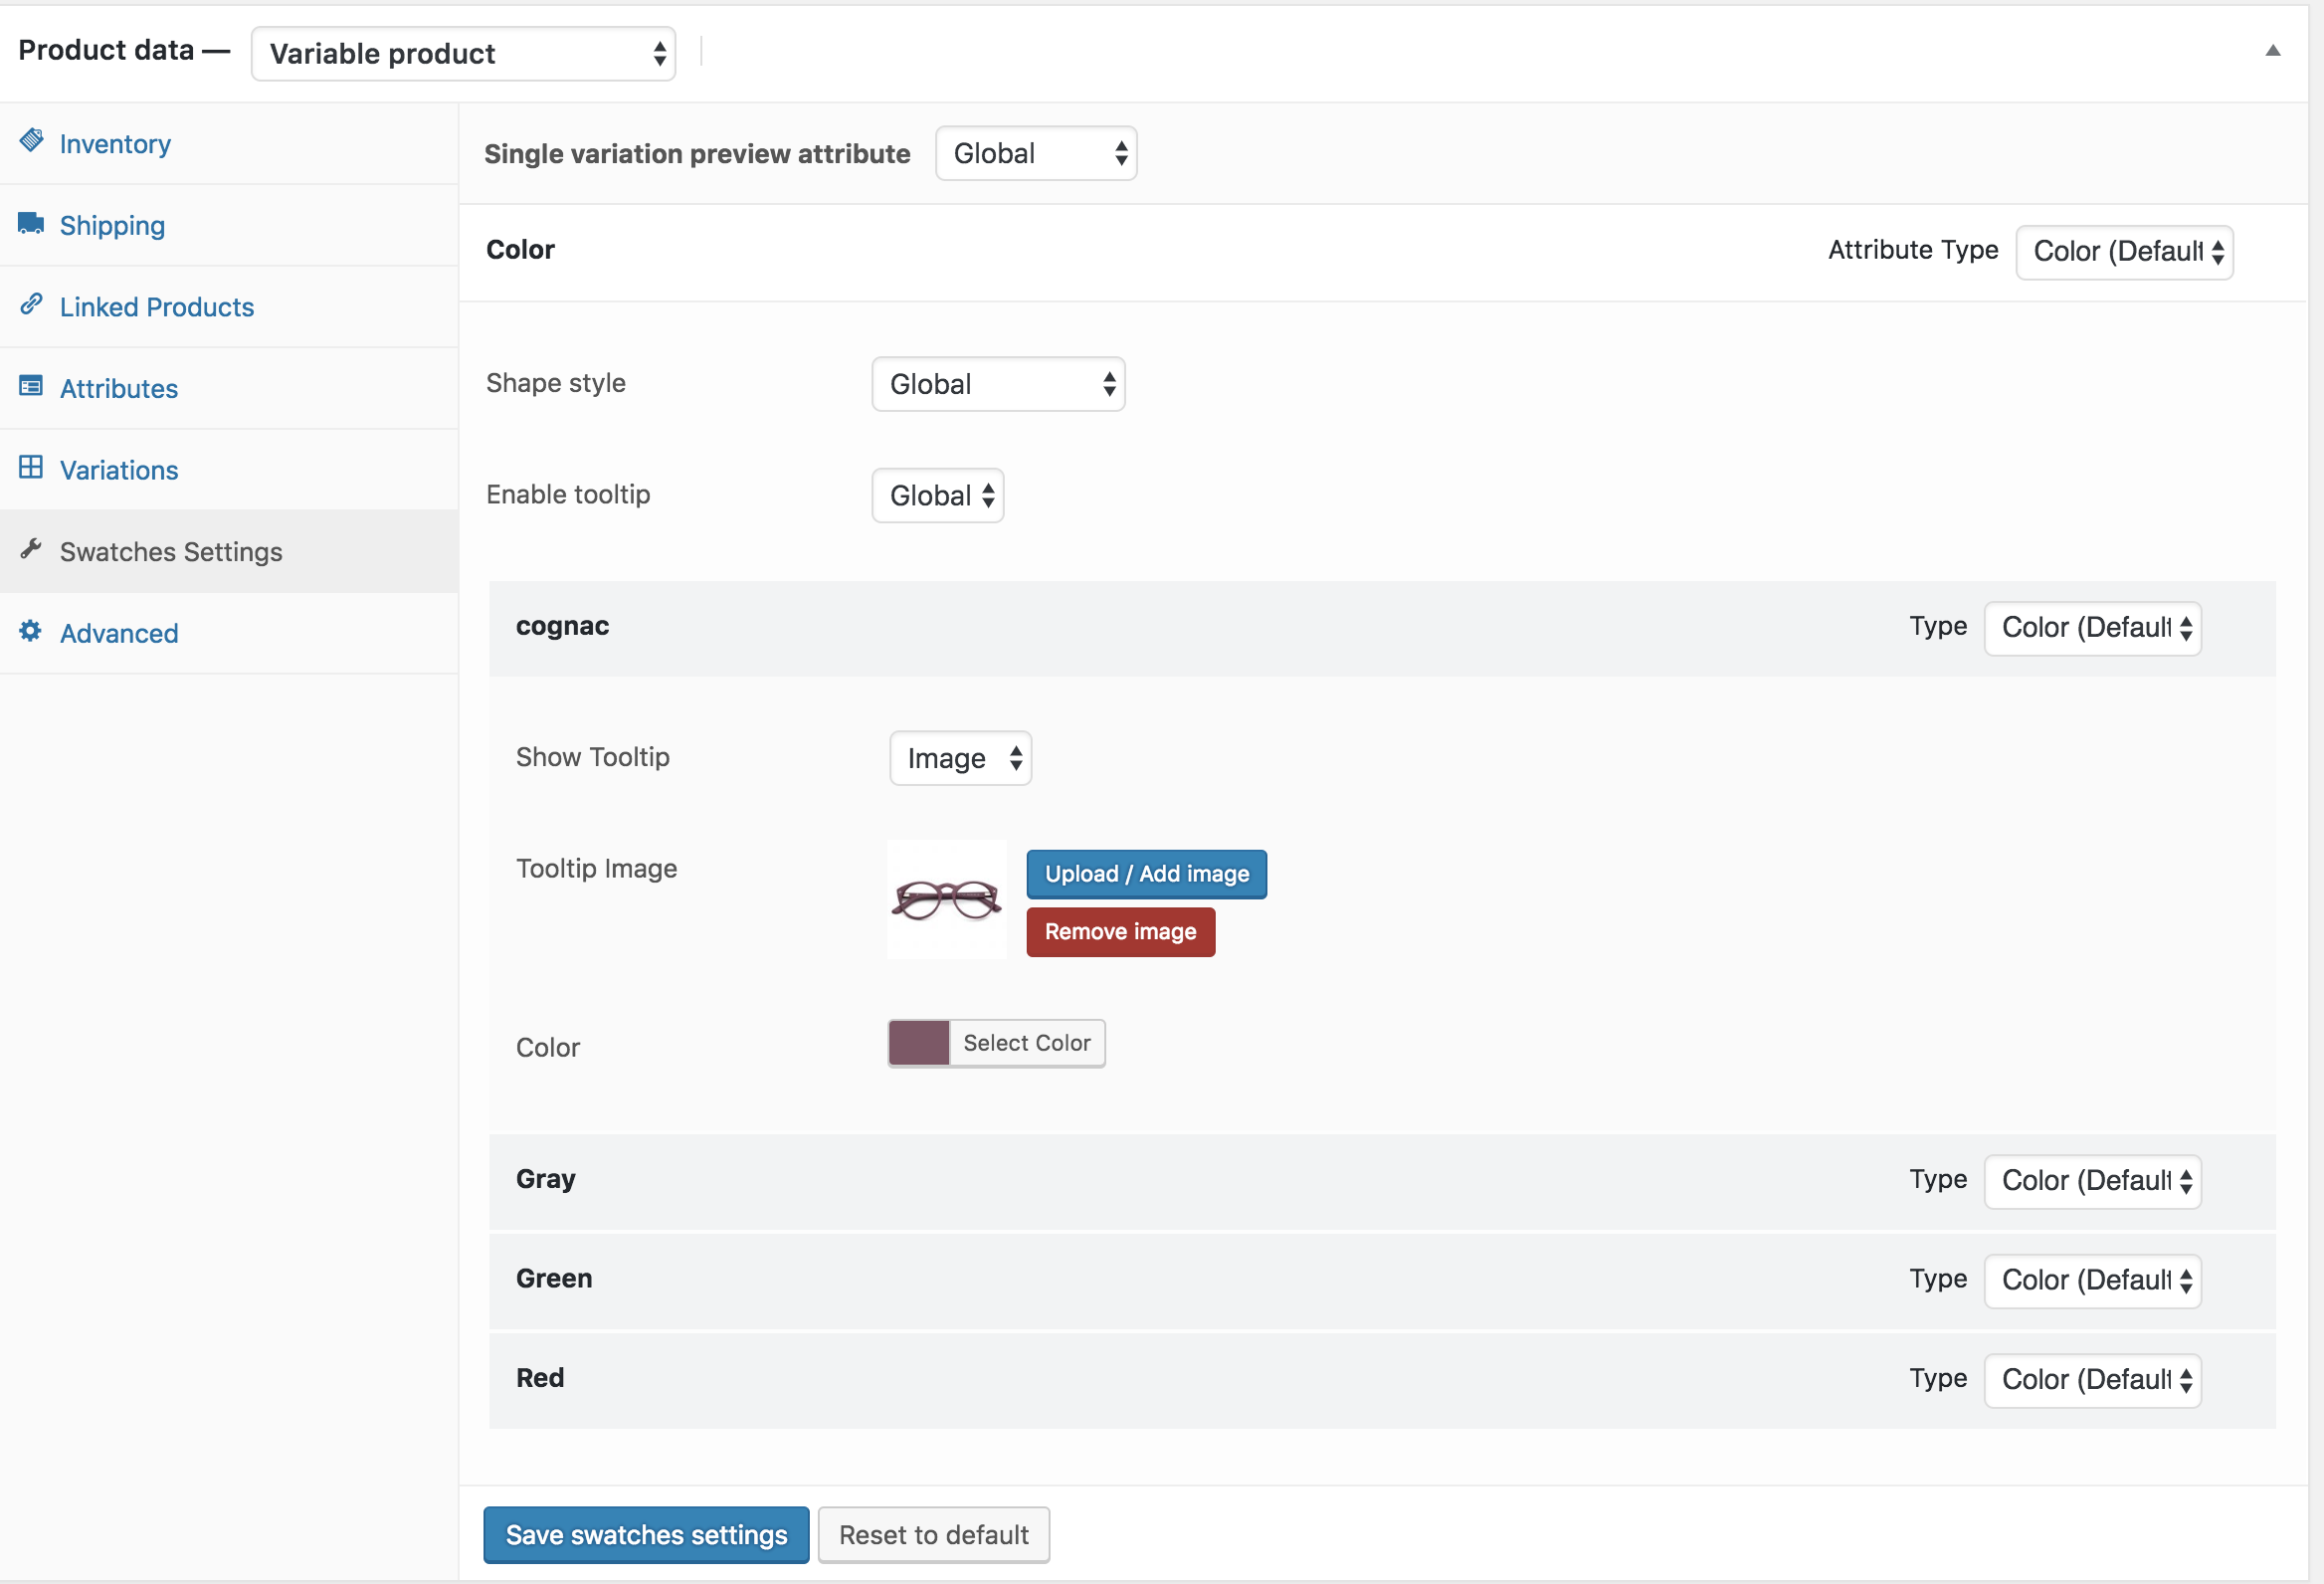
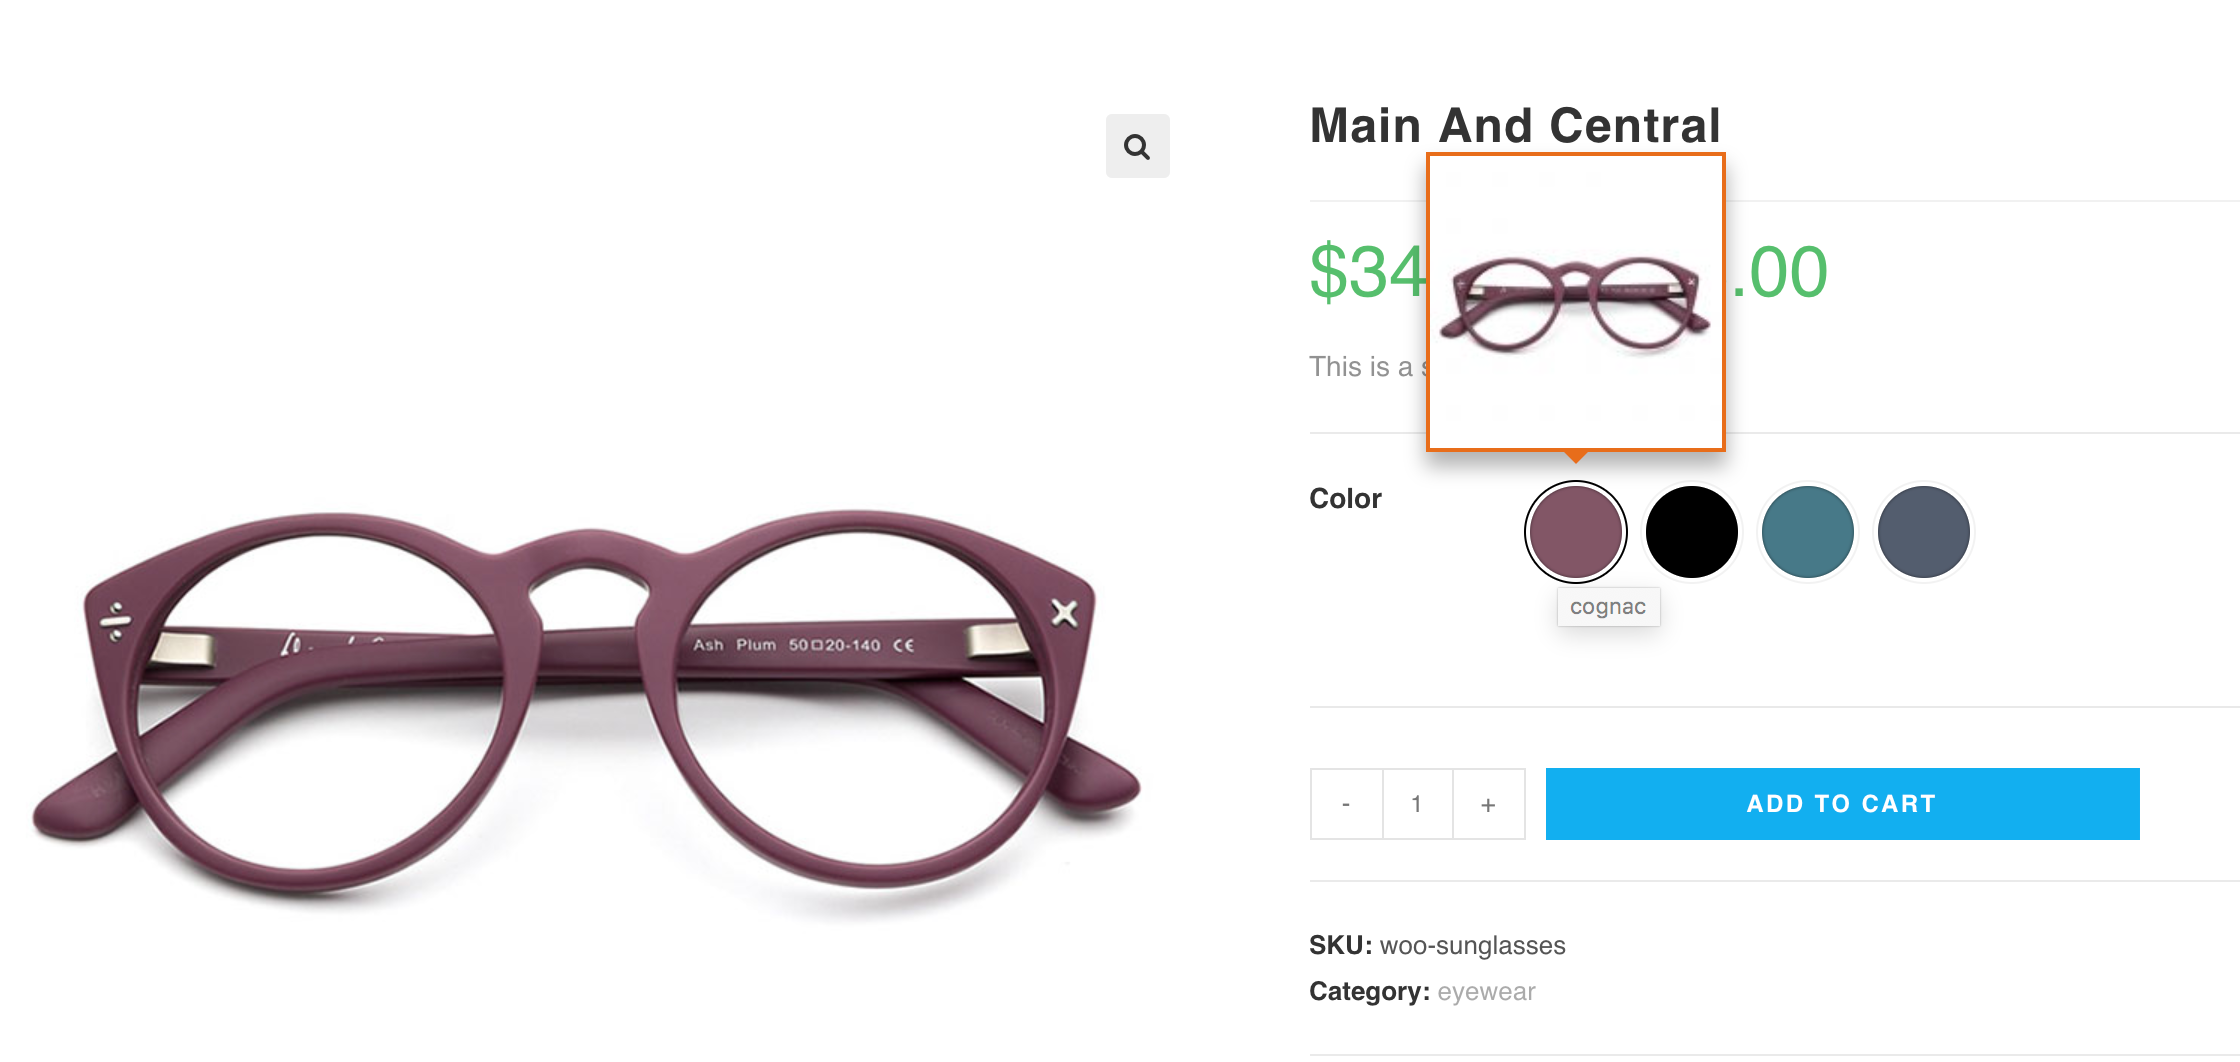
As you can see in Cognac variation, I've added new Tooltip Image Setting setting for this product variation. It'll not show the globally added tooltip image from Products >> Attributes. After this, the frontend would look like the following image.
How To Enable Text Tooltip Back To Top
How To Disable Tooltip Globally Back To Top
Customize Swatches Width, Height and Font Size (Advanced) Back To Top
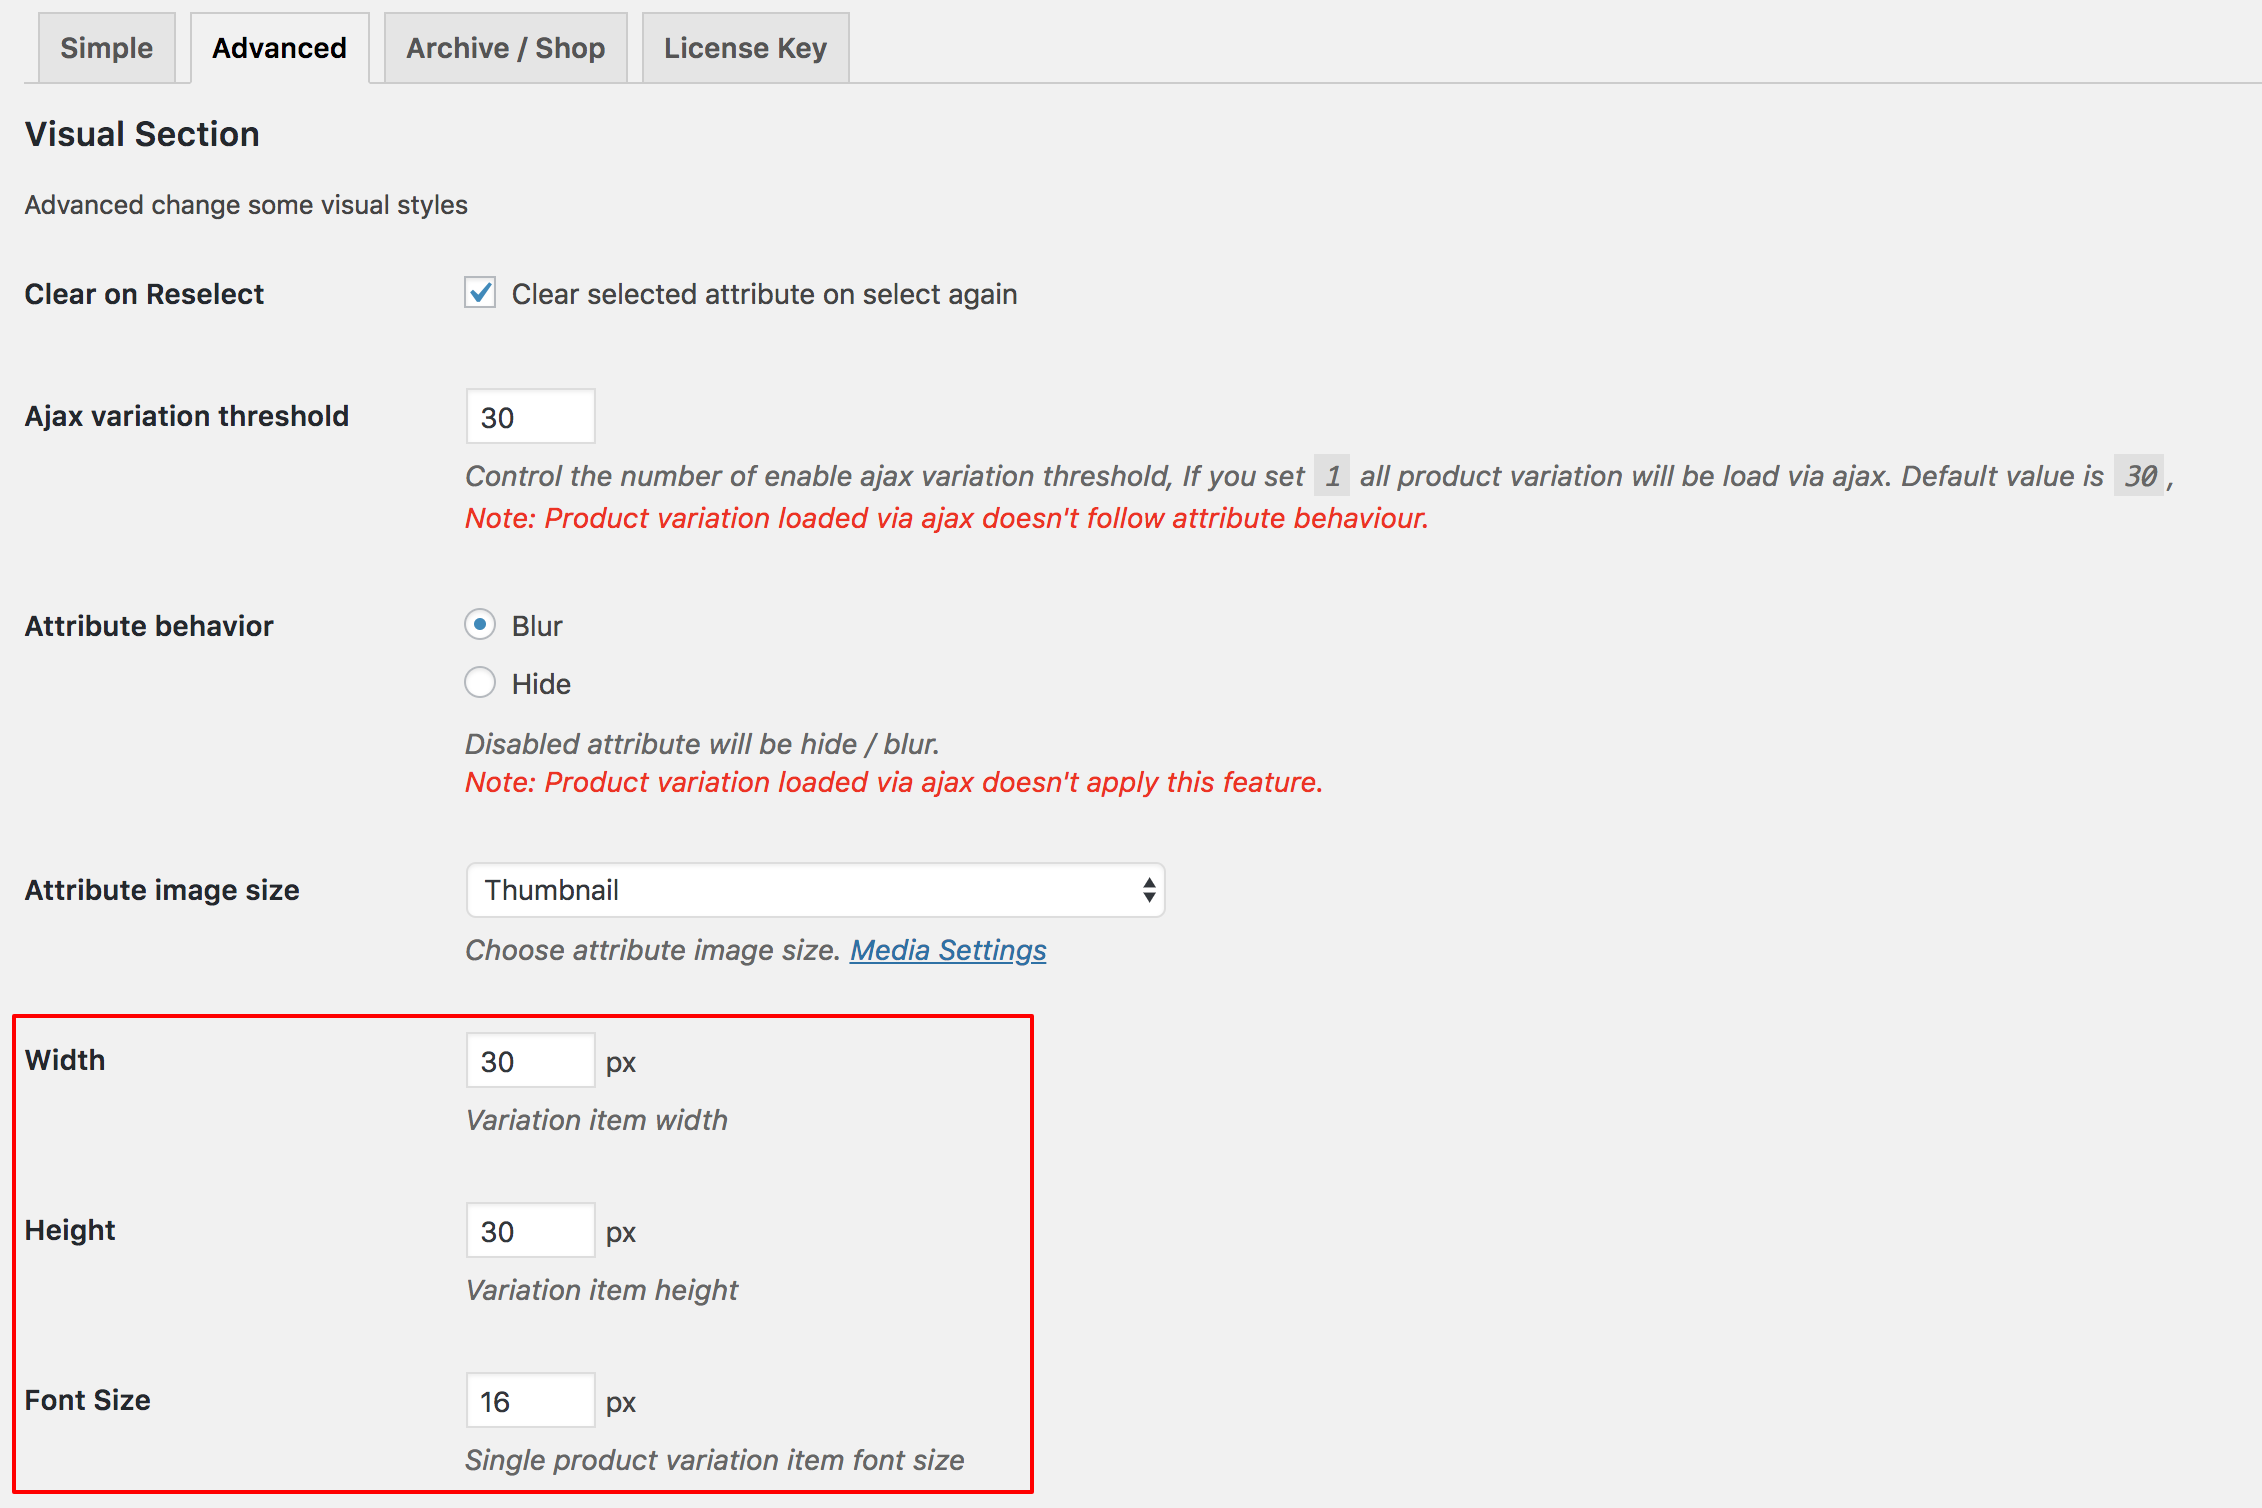
Either it comes to customize swatches width, height, and font size in product pages or archive / shop / category page, WooCommerce Swatches plugins allows from backend with ease. To change swatches width, height, and font size in the product page, navigate to Swatches Settings >> Advanced.
To change swatches width, height, and font size in the shop / archive / category / tag page, head to archive / shop tab.
WooCommerce Color Filter Widget Back To Top
Enable / Disable Swatch Tooltip Back To Top
WooCommerce Variation swatches comes with option to enable / disable product page tooltip. Navigates to Swatches Settings >> Simple. Enable and disable tooltip from Enable Tooltip settings.
Shortcodes For Archive Swatches Back To Top
[wvs_show_archive_variation]
Cross / Blur / Hide Out of Stock Product Back To Top

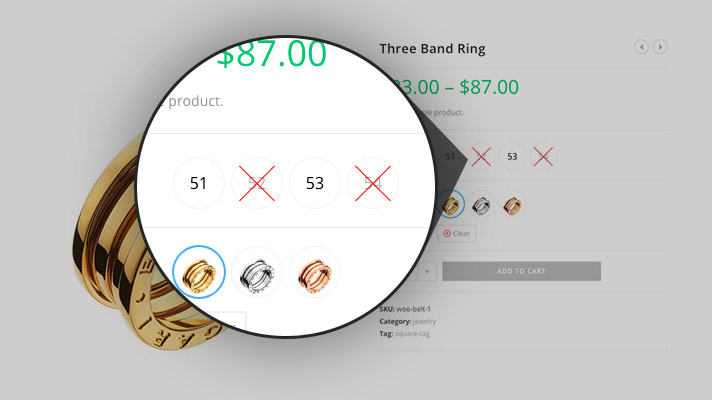
Cross Preview (Up To 30 Variations)

Cross Preview (More Than 30 Variations)

Blur Preview (Up To 30 Variations)

Blur Preview (More Than 30 Variations)
Hide Preview (Up To 30 Variations)
Hide Preview (More Than 30 Variations)
Video Tutorial
To hide / blur out of stock attribute variations with cross sign. Head to the Advanced tab from Swatches Settings and select your desired Blur or Hide Attribute behavior from Attribute Behavior Setting.
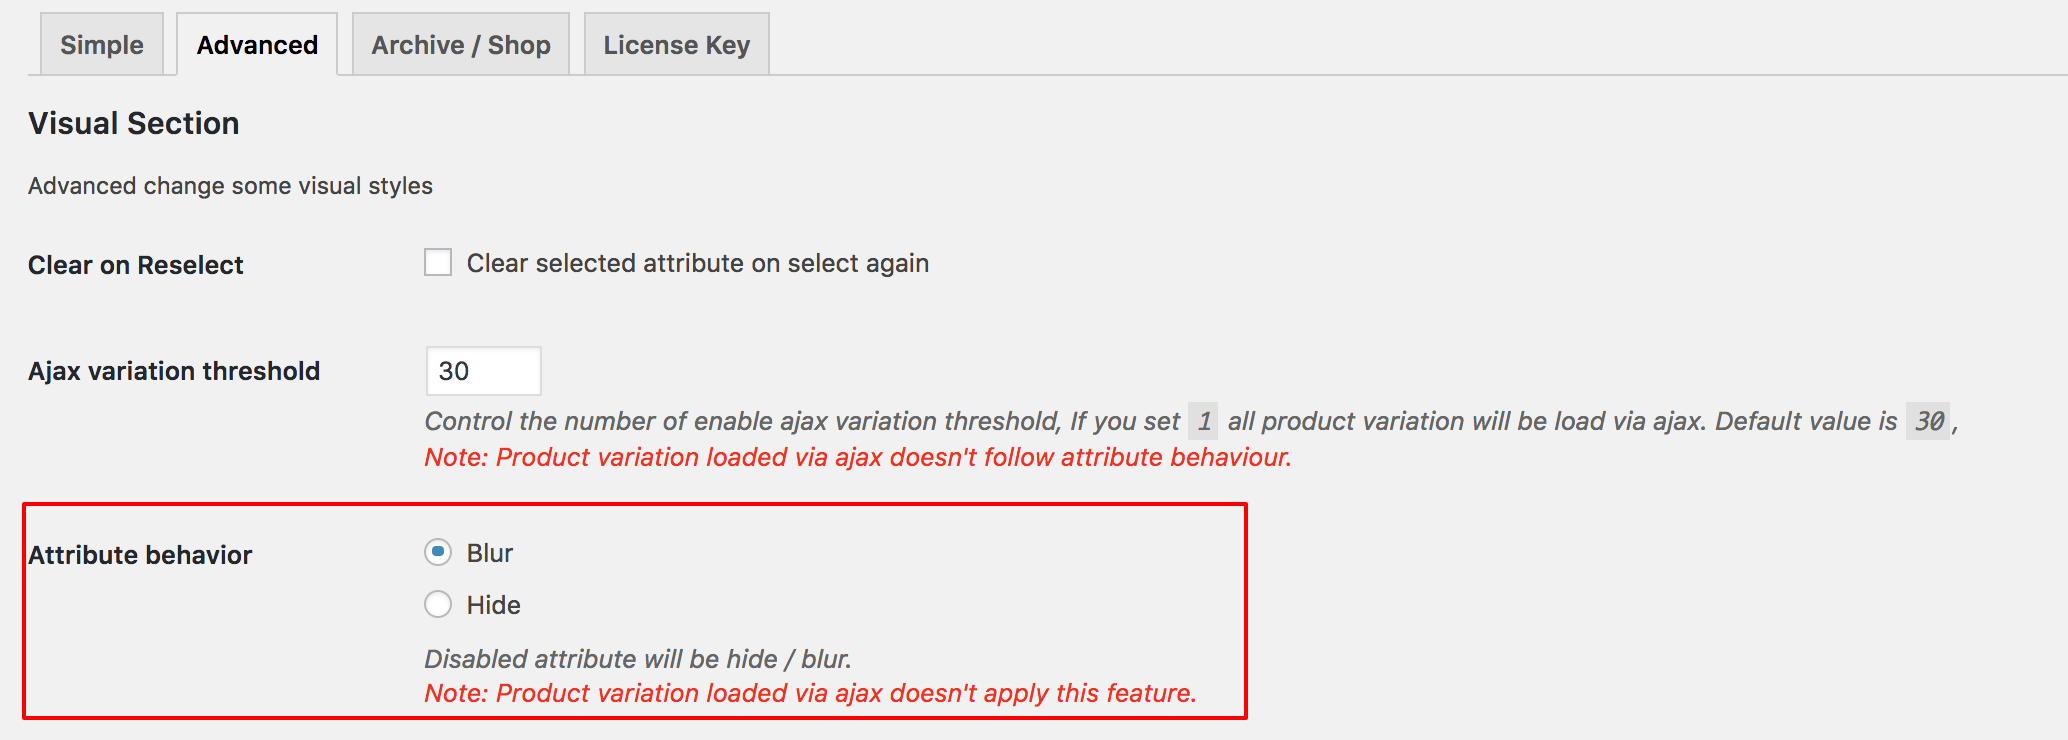
If you select the blur setting, the out of stock attribute variation would be blur with cross icon. Check the following screenshot from the frontend preview.
If the blur cross icon doesn't appear in the out of stock variation swatches. You have to hide out of stock swatches from Inventory Setting. So, make sure Hide out of stock items from the catalog from WooCommerce >> Settings >> Products >> Inventory.

Duplicate Variation Image With Its Image, Price, SKU and etc Back To Top
The feature allows duplicating product variation with its all properties include variation price, image, SKU, Stock and so on. To enable the feature, install and activate the Variation Duplicate For WooCommerce Plugin.
Copy Variation Image To Other Variations Back To Top
The plugin allow you to copy selected variation image to other variations. To enable the feature, install and activate the Variation Duplicate For WooCommerce Plugin.
WPML + Swatches Setup Back To Top
Besides the variation swatches plugin installed, make sure you have the following plugins WPML extensions activated:
> WPML Multilingual CMS
> WPML String Translation
> WooCommerce Multilingual & Multicurrency
If you need documentation to setup WPML perfect, follow this guideline: https://wpml.org/documentation/getting-started-guide/
Let's follow the steps given to set up WPML and Swatches perfectly.
Install the required WPML plugins
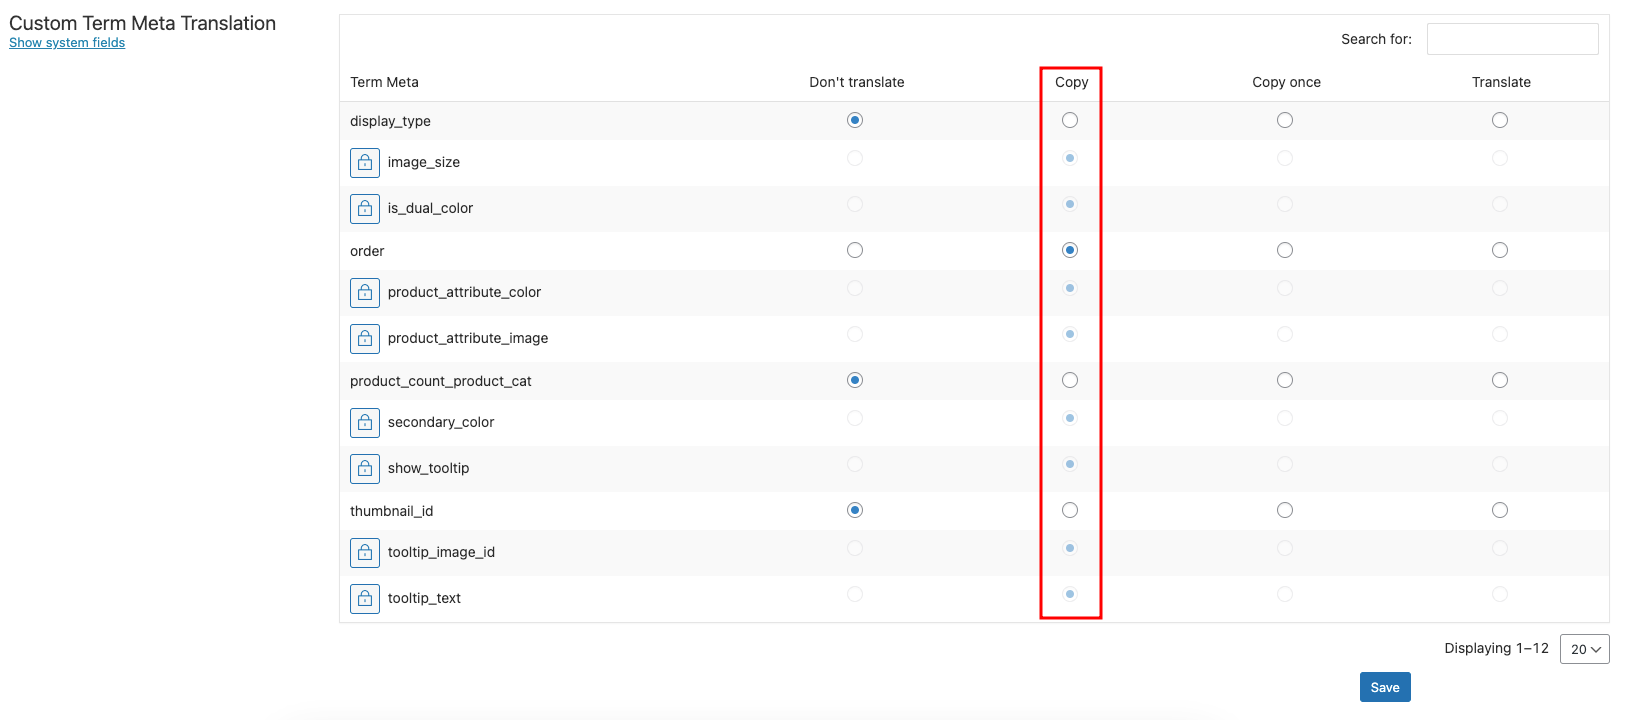
Now please go to WPML > Settings > Custom Term Meta Translation
If you use the prior version variation swatches for WooCommerce 2.1.0, ensure the following fields are checked in the copy checkbox.
- image_size
- is_dual_color
- product_attribute_color
- product_attribute_image
- secondary_color
- show_tooltip
- thumbnail_id
- tooltip_image_id
- tooltip_text
Once the given checkbox field is selected from the copy list, press the save button. I've added a custom Term Meta Translation table for your further guideline.
Note: If your store runs on the 2.1.0 or version after 2.1.0, you don't need to follow the previous steps. Our plugin will do the job automatically.
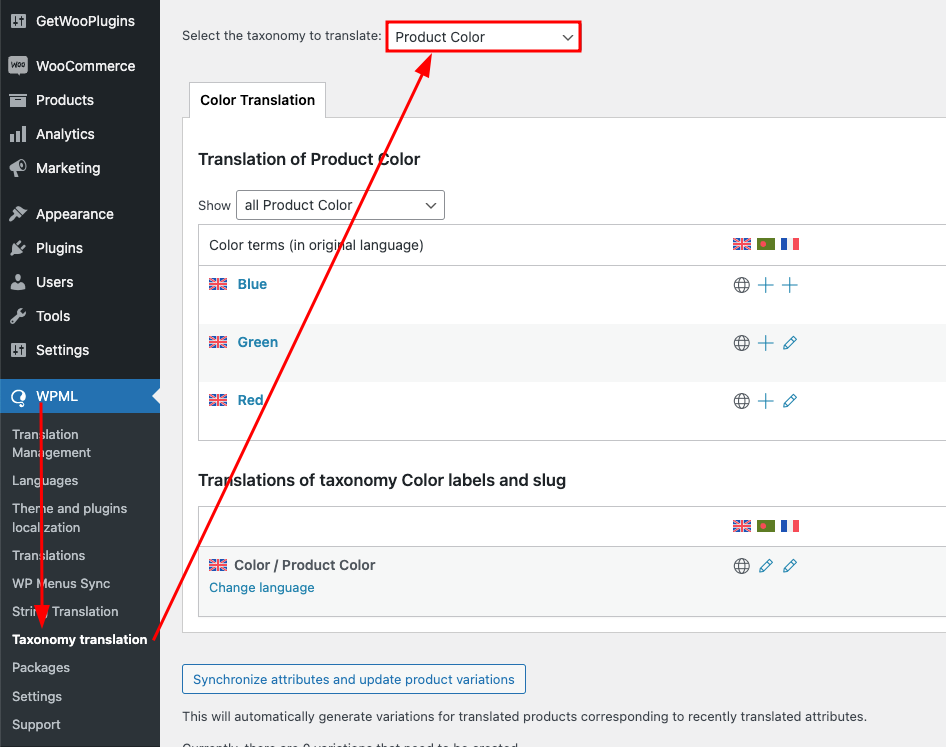
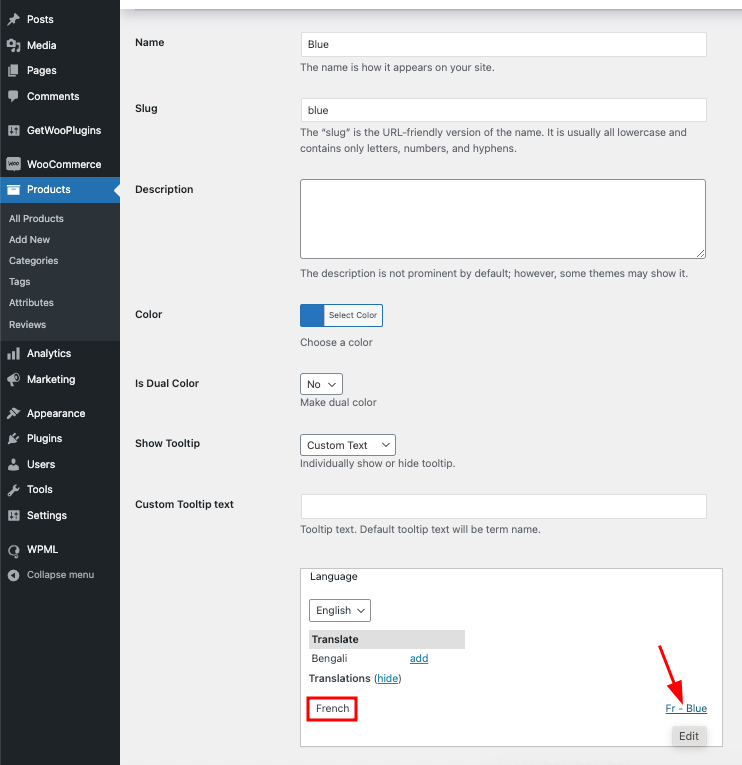
Translate Attribute from WPML Taxonomy Translation settings
You can translate all the meta from WPML > Taxonomy Translation > Select the taxonomy to translate. Please choose your desired taxonomy and translate it according to your requirements.
Manually Translate Attribute Meta
If the pointed setting in the screenshot is selected, the attribute meta should be translated automatically.

If you want to manually translate a specific attribute term, you can do that from Products > Attribute > Configure terms.
Troubleshooting Variation Translation (If needed)
If you have enabled Automatic translation and variations are not displaying the translated value, you can troubleshoot it from here-
WooCommerce > WooCommerce Multilingual & Multicurrency > Status > Troubleshooting (At the bottom of the page)
You will get an interface like this:
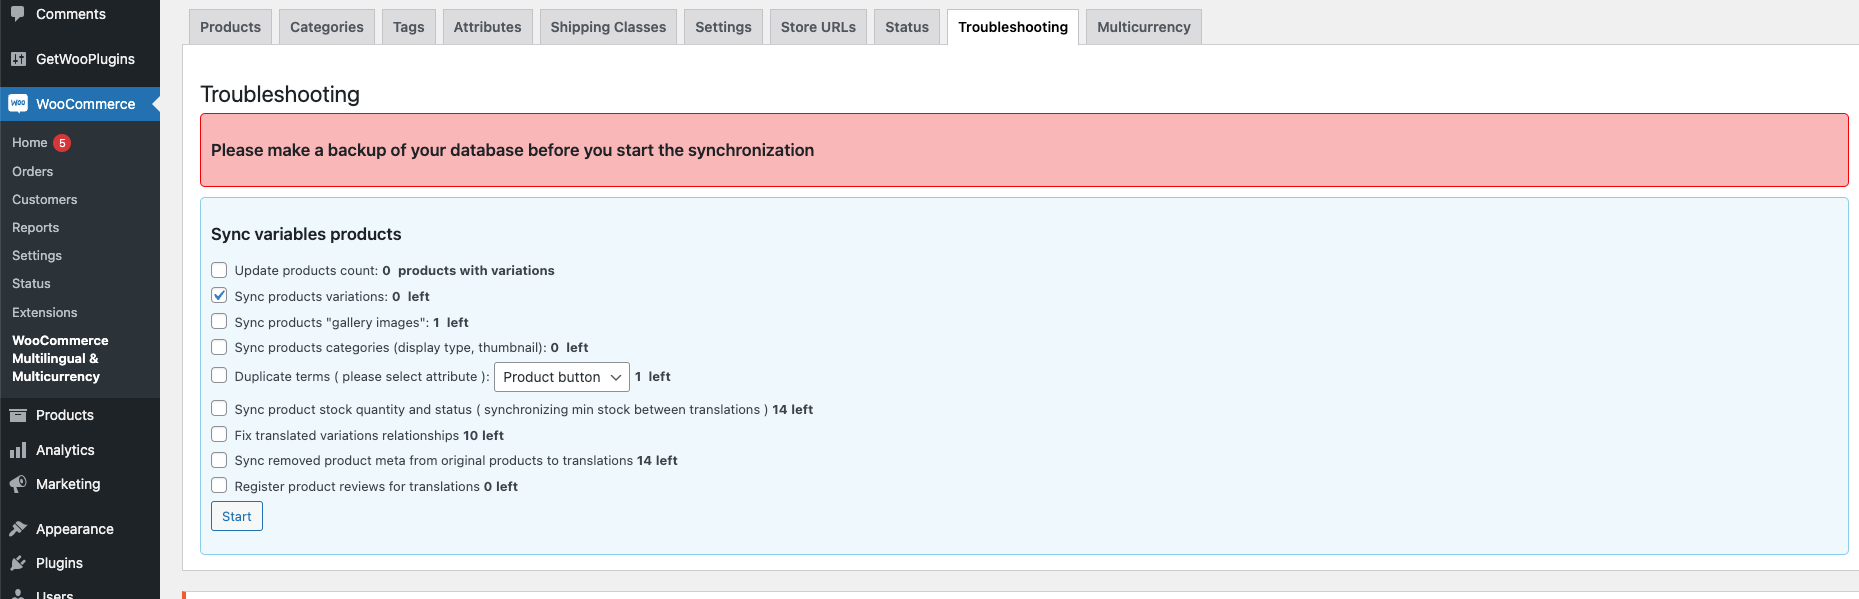
Now, from the mentioned screen, you can sync all the translation data from this interface.
Infinite Scroll or Ajax load more Back To Top
If you are using Jetpack Wordpress infinite-scroll you don't need to do anything. But if you using a custom or 3rd party plugin you have to trigger the following event after the "Ajax load more" completed
$(document).trigger('woo_variation_swatches_pro_init');
Uncode Theme Compatibility Back To Top
